

Building an online store has never been more important as the pandemic has diverted a growing number of sales from the traditional physical stores and shopping malls to the Internet. That's why we've decided to help people start their ecommerce journey by equipping them with all the necessary tools, information and support to establish a solid web presence.
We have recently added a brand new Website Builder tool to all of our shared hosting plans (Economy, Business, and Business Plus) at no extra cost for our customers and that's the instrument we will use to build our online store.
Designing a website can be quite intimidating if you don't know what you're doing and it could be quite costly if you decide to hire a company or even a freelancer to do it for you. And that's where the power of our Website Builder comes into play. It covers a wide range of use cases from building a simple portfolio website in under an hour, to creating a fully functional web store where you can sell your products. No coding skills are required, and the websites you build would be mobile friendly by default, and they will look great on all devices.

This blog post is also available in video format in the ICDSoft Youtube Channel:
- Getting Started
- Starting the Website Builder
- Wide range of templates
- Easy editing of just about everything
- Auto-save & publish
- Ready-to-use blocks and Apps
- Endless customization possibilities for each theme
- The Settings menu
- Menu templates
- Easily add a slider
- Pick from a huge selection of free stock photos
- Adding products to our home page
- Finishing up
Getting Started
So without further ado, let's get started and build our website. We will create a fully working online store with products and categories, a working shopping cart, and will even add a live chat, so potential customers can easily get in touch with us. In the process of building the website, you will learn the most important functionalities of the software and from that point on you should be able to create your own project.
You can use the methods described here to build all kinds of websites - portfolio sites for showing your work, photography websites, restaurant websites with menus, etc.
Of course, if you do encounter any problems while using the Website Builder that comes free with your hosting account, you can always contact our support team for help.
Starting the Website Builder
The Website Builder is available as a separate icon in the hosting Control Panel. You have to log into the ICDSoft Control Panel and navigate to the Website Builder section.

First, you'd have to accept the terms of use, and then you can go ahead and press the Create new site button.

Our next step is to select the Installation address - this is where our website would be accessible at. In our case, we've already created a new subdomain called "builder.icdsoft-store-demo.com", so that's the one we will use. If you want to have it available directly at "your-domain.com", you'd have to select the "www" subdomain, but we already have an existing website there - the online store based on WordPress & WooCommmerce from one of our previous blogpost/video, which we want to keep intact, and that's why we are using a new subdomain. Don't worry, you can easily move the website build with the Website Builder afterwards.
Wide range of templates
There is a wide range of themes to choose from, and the list is growing all the time. You can build a portfolio website, a restaurant website (there is even a menu application for it), gym/fitness website, cosmetics online store, tourist agency website, and many others . You can check out the available templates at Website Builder Demo, available at ICDSoft.com. Of course, you are not constrained to just these templates. You can use only certain sections from a given template or decide to completely delete everything and start from scratch using the existing Apps and modules, but we will get to that later. In our case, since we would be creating an online store, we will choose the template called "Bestseller". Press the Use template button, and now let's Install it.


We are OK with that since we've created a new subdomain specifically for that purpose. But if you already have an existing website in the target directory and you want to keep it, you should first move it to another location using the File Manager in the Control Panel or create an archive of it.
After confirming the terms, you will have to go through a quick 2-step wizard. You should enter your email and the name of your website. Let's say [email protected], and the name could be "ICDSoft Store Demo". If you click on the tooltip there, you will see that the website name would be used in your website title, and also in the header although you can change it at any time. Continue to step 2:
"Company location and contact details, the data you enter on this form will be used to generate your "Contact" section." So you should enter your valid physical address / company location.


And just like that, we have a website live and ready, and it should even be accessible online. It has four pages by default - Home, About, Shop, and Contact.
Quick Tour Of The Interface
Let's do a quick tour of the Website Builder interface, so you can get more familiar with its features. All the available functions are accessible from the sidebar on the left. It should load up by default and contains the following items - Minimize/Maximize (sidebar), Add Content, Design, Settings, Apps, Files, Help, Status.
Easy editing of just about everything
Editing your pages is easy with the Website Builder. Simply move your mouse over to the area you wish to modify and click to start editing. To change a given text, just click on it and start typing.
The website builder uses the modern block editor concept and each element on the website is contained inside a block which can be edited individually. You can easily move these blocks around and change their order with drag-and-drop. In addition to that, you can go to the Block Settings menu (the Gear icon in the top left corner of every block) and set a custom background (image or colour), adjust the sizing and positioning of the block, and set up some nice looking decoration dividers on the header and footer parts.


Auto-save & publish
The Website Builder automatically saves and publishes each change that you make. There is a Status Toolbar at the bottom, which you can pull up by clicking on the ellipsis menu (...) at the lower left corner. It contains three items - Live, Preview and Undo. If you hover over the Live status label, you'd see a notice "Your website is live and all changes you make are published immediately." And if you are not happy with something, you can just Undo the change. The Preview button allows you to check out how the website would look on different devices (smartphone, tablet, and desktop). As mentioned, all websites you build would be mobile friendly by default.

Ready-to-use blocks and Apps
The Add Content menu item on the sidebar (designated by the Plus button) allows you add various ready-to-use content blocks, such as Banners, Headers, Videos, Features, Social Media widgets (Follow Us, Share), Testimonials, Pricing Tables, Footers, etc.


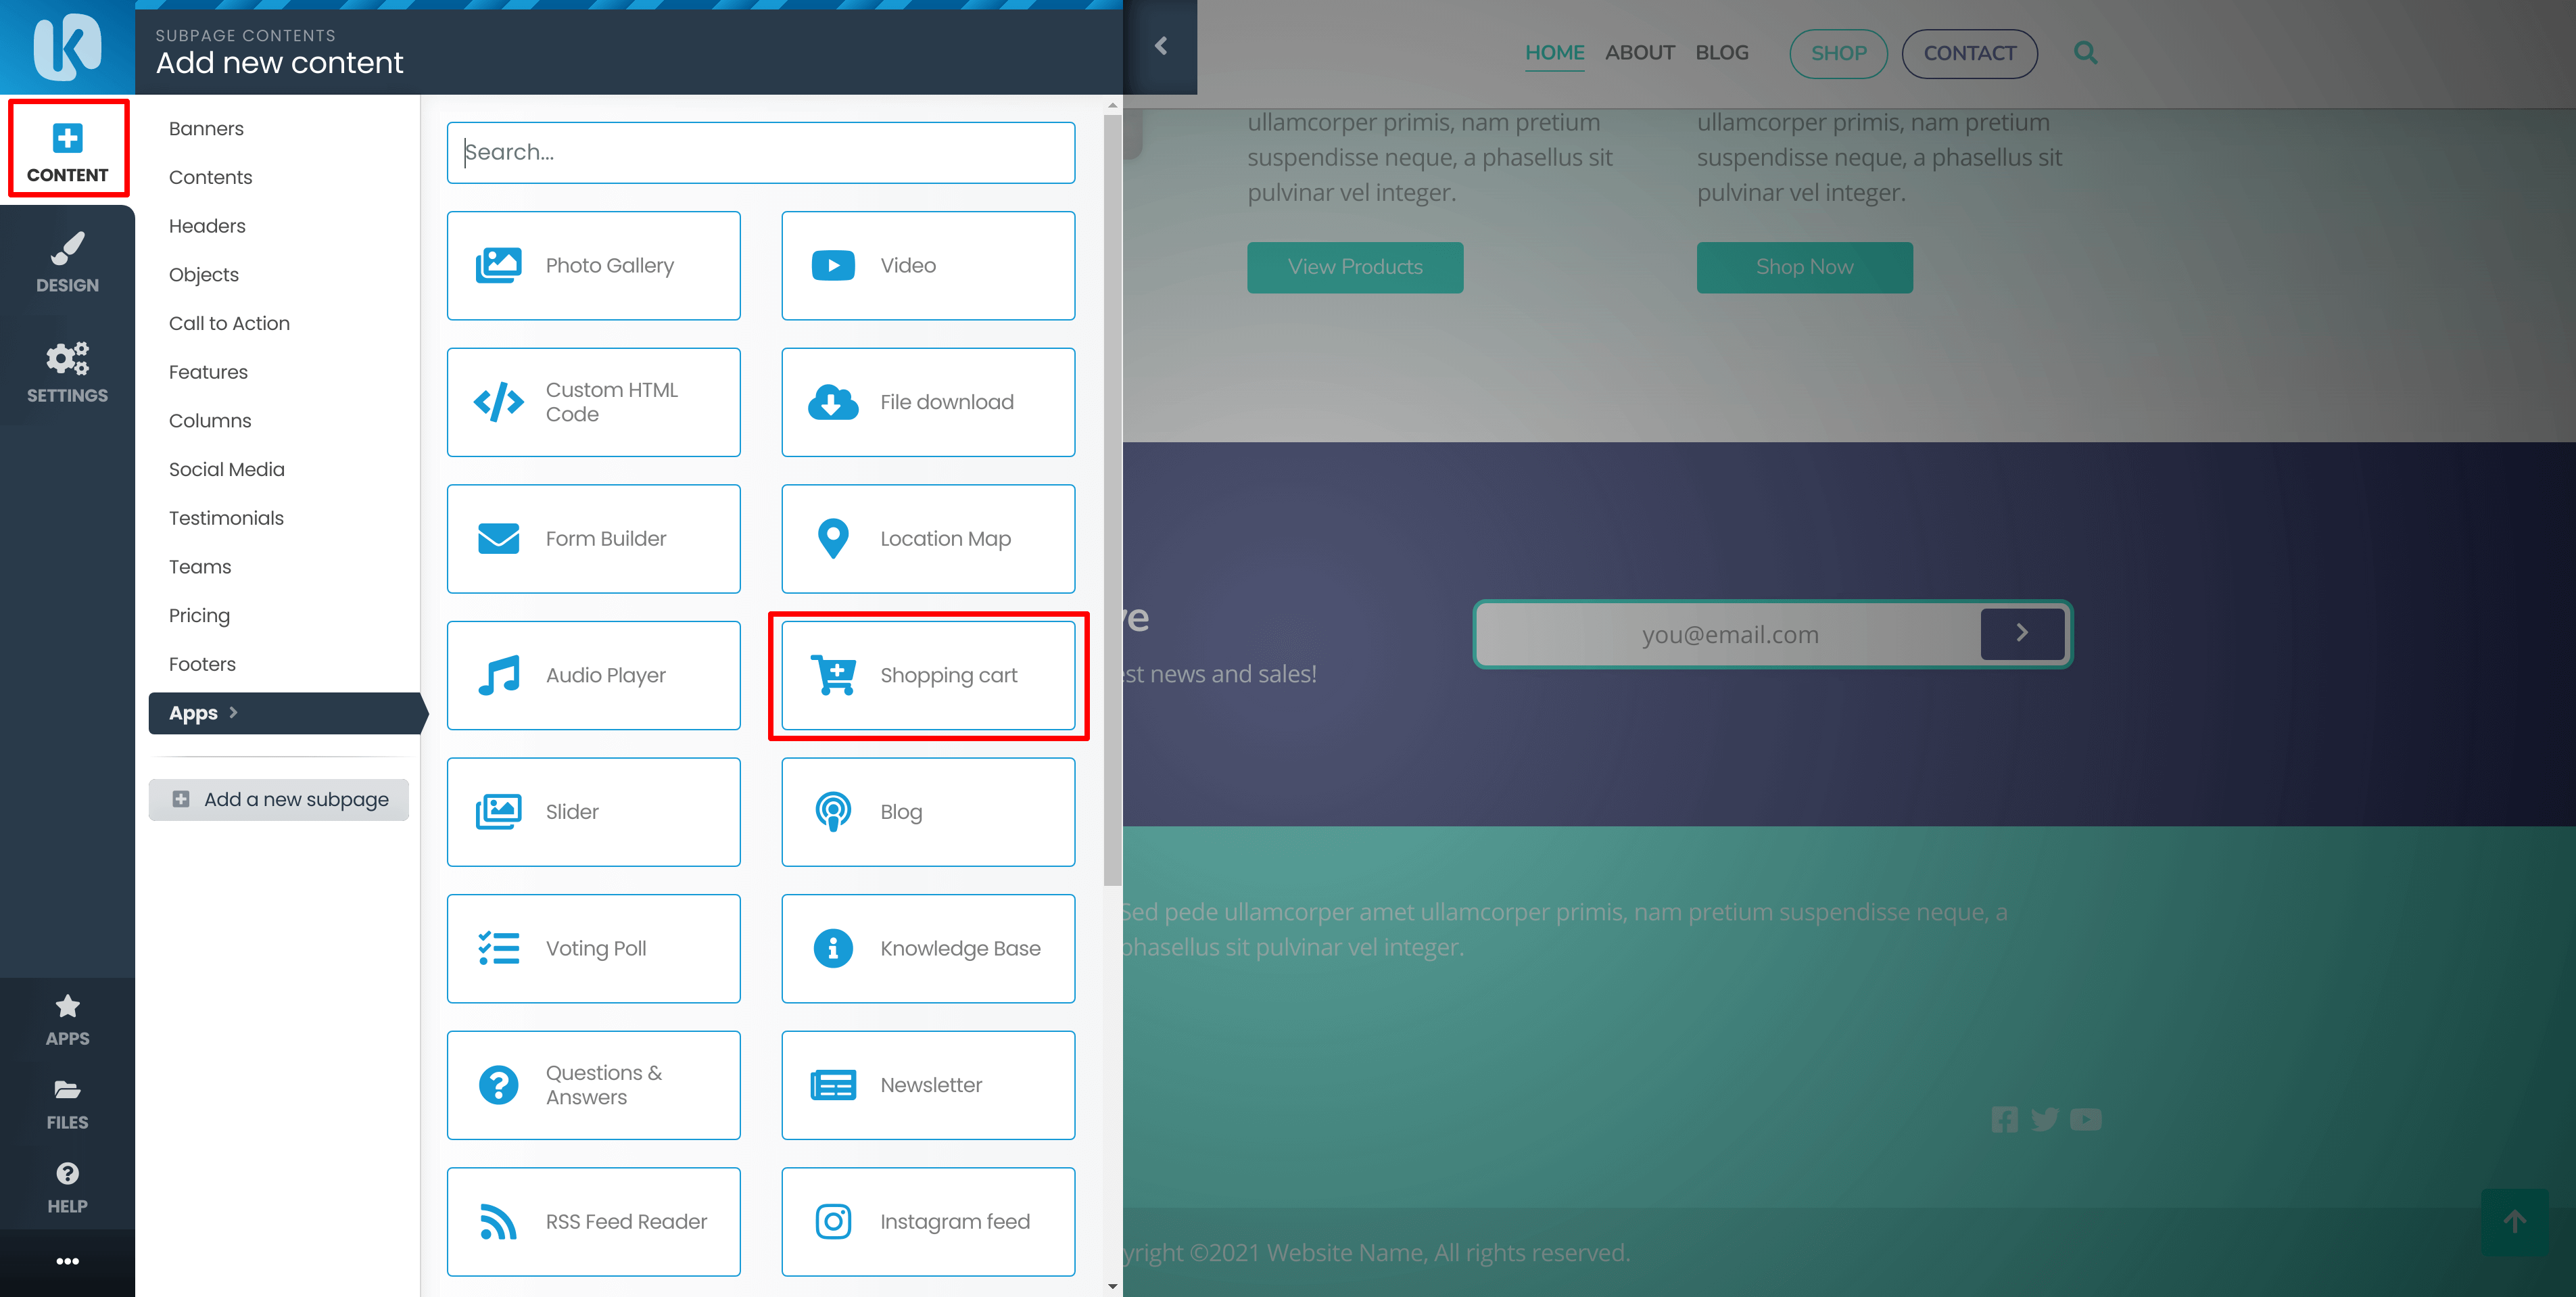
The Apps menu is very interesting as it allows you to add different fully working functionalities to your website, such as Photo Gallery, Form Builder, Location Map (based on Google maps), Audio Player, Shop module (which we will add and configure later), Image Slider, Newsletter, Restaurant menu, Live Chat, and much more.
Endless customization possibilities for each theme
The Design menu is where you can apply hundreds of customization possibilities to your theme. You can change the color scheme by choosing from some well matched default combinations or assign a specific color to each content element. In our case, we will select the second color combination. You can change the fonts used on your website by selecting from the available font pairs or you can create your own font settings. This is also where you can change the styling of your menu (> Menu Designer) by picking from one of the 19 available designs or apply more control by modifying the menu items and even adding custom CSS. And lastly, you can switch to a different theme (> Website Designs) with the available option of importing only the design settings, so you'd not lose any of your existing content.

The Settings menu
Let's check out the Settings menu - Subpages List is where you can see the structure of your Main Menu and add new subpages to your website, and they would appear directly at the menu. You do have the option to hide a given subpage from the menu. Logo and Website Title is where you can change the text of your website title or replace it with an image.

This Subpage Settings refers to the settings of the particular page that we have currently opened for editing - in our case that's the Home page. If you go to the Subpage Settings, this is where you can hide the page from the navigation menu, obviously we wouldn't want to do that with our index page. You can see the other options - you can password-protect that page, redirect it to another URL or set it up as a Landing page, which would basically hide the header and footer.
We will go one step back, again under This Subpage Settings > SEO & Meta Tags. You can see how the page would appear in Google's Search Results. Obviously we can work a little bit here, and set our meta title, description and keywords, which would be great for the Search Engine Optimization of our website.
- The Settings > General Settings menu
This menu allows you to configure your administrator email where the system emails would come. You can also select the page which would be used as a Home page; change the Language - this refers to the language of the Website Builder interface, and the Date and Time Format.
This is also the place to add a Favicon for your website, and it's strongly recommended that you do that as it makes your website look much more professional.
Show search in header adds a search button at our header, and that's really useful for an online store, so we will enable that option.
The Always use SSL/HTTPS for this website option is very important, so we will cover it in more detail later on in this tutorial.


Exit the General Settings menu by going one step back, and let's review the rest of the options under the Website Configuration section.
- The Manage Access menu
This is where you can add a pair of login credentials as an alternative way to log in to that administrative part of the Website Builder interface. Instead of going through the hosting account Control Panel, you can go directly to your website URL and add "/admin" (e.g. https://builder.icdsoft-store-demo.com/admin) and log in. You can also provide these credentials to your developer or someone who is working on your site, so they would only have access to the Website Builder and not your Control Panel.
- The Contact Information menu
is where we can enter the physical address of our store or our company address.
is where you can link up all your social media accounts.
- The SEO & Analytics section
allows you to add the Meta tags for your website (title, description and keywords). This is also where you can add custom code that would be added to the header tag of your website. Usually that's used for tracking purposes by various analytics tools.
And at the bottom, you can see the Add a new subpage button and that's how you can add a new page to your website.
allows you to add files to your project - you can add free stock images directly through the interface, provided by Pixabay. You can also add free illustrations, or you can upload your own files, like images or even downloadable products (e.g. if you are selling digital books).
- The Help section
is where you can find entire video guides on how to use the Website Builder and you can also find the answers to some of the most common questions. And if you don't find the answer to your particular question, you can quickly get in touch with our Support team via the Personal Assistance menu.
Menu templates
Let's select the styling of our menu. Go to the Design menu from the sidebar > Menu Designer. Again, there are menu templates you can choose from. Let's go with Menu Design #10 and save the changes.

Now let's see how we can modify the website header. Go to the Menu Designer > Menu Title/Logo. It's highly recommended that you upload an image file of your company logo in order to get that professional look. Since we are just building a demo website, and we don't have a logo, we will just change the default color of the text. So click on Text Color > Custom color and paste #01C8B4.
Easily add a slider
You can easily add a slider from the Apps section, but since we already have one as part of our theme, let's see how it can be modified. Hover over it, click on the Slider menu > Edit. There are two slides that have been imported as part of our theme. You can edit the existing slides, change their Header and Subtitle text, color, and alignment. Of course you can also change the image shown on the slide, and you can easily add new slides by pressing the Plus button at the bottom left corner.


Pick from a huge selection of free stock photos
Since the online store we are building would actually sell electronics, the existing sliders are not really suitable. We will have to change their images and text, and of course we will also add some new slides. A great feature of the Website Builder is that it comes with a huge library of Free Stock Photos provided by Pixabay, and you also have the option to purchase Professional Stock Photos.
Go to the Files menu from the sidebar on the left, and select > Free Stock Photos. There make a search for "smartwatch" and pick one. This places the image in your "My Files" category, so you can now use it in your Website Builder project. Now let's use it in place of the existing one, so go to Edit Slider > Edit > edit the first one, change the Background Image to the newly added smartwatch photo, and change the Title to "Smartchwatch Deals". The Subtitle could be "Best Smartwatch deals, sales and prices in 2021!". Text color will be black to make it more visible, and we will align it to the left.

For the second slide, we will use a image of a smartphone, so again, go to the Files menu > Free Stock Photos > search for "smartphone"; we will have "All the new smartphones" for the Title, and "The future of smartphones" as our Subtitle. Black for the Text Color and left Alignment again.
You can add a new slide by pressing the Plus sign at the bottom of the Edit Slider menu.
Configuring the Shopping Cart
The Website Builder comes with a fully functional shopping cart app that allows you to easily sell both physical and digital/downloadable products online. It supports a wide range of payment and delivery methods. There is also a complete email notification system and statistics section. To add the shopping cart module to our website, click on the Apps icon from the sidebar on the left and search for the Shop module.


Now click on the Configuration menu on the left side, and we will start by entering our Shop Name, Default Country, and Default Currency. Go to the Payment Methods - and you can see all the supported payment methods - some of the more popular ones are PayPal, Stripe, Square, 2Checkout, Authorize.Net. You can also accept bank wire payments, and cash on delivery. PayPal is super easy to set up and it's one of the most widely known payment processors out there, so that's the one we will configure. All you need to do is enter your PayPal email where payments from your store would be sent.
Don't forget to set up your Delivery Methods via the menu. You have the option to set a fixed delivery fee or enter a weight cost (delivery fee per weight unit).
The default E-mail messages sent out from the store are OK, so we are not going to modify them, but you do have the ability to customize them. There are four existing email message templates - New Order (to customer), New Order (to store admin), Order Status Changed, Order Processed. You do have the option of changing who the message would be sent to - customer, admin or any email address.
The last step here is to add our products in different categories. Go to the Categories menu to set up the categories of your store. Once you've done that, you can start adding products into your categories.
Adding products to our home page
We will delete this entire "Today's specials" block and replace it with products from our actual store. Move your mouse over it, click on the Trash can.
Now, let's insert the new block so press the Plus Content button at the top of the sidebar. Under Apps search for Shopping Cart. If the block was not added in the correct place, you can easily move it around.
If you go to Shopping Cart > Edit, you can see the different layouts that are available - the default one we currently have shows Random Products, with a Categories Sidebar on the right side, and Categories Thumbnails at the bottom. So if you want to remove the Categories Sidebar, select the second layout type, Save the changes and refresh the block. Or we can just show the products without any categories or sidebars for a cleaner look. You can play around with the appearance of the entire block that contains the shopping card app. Click on the Gear Icon that says block settings, now check out the Block Decoration Dividers - enable that, set our custom color, and select Rounded #6 for the Footer divider.

Adding Live Chat
Our next step is to set up a live chat, which is a really nice feature to have for online stores as potential customers often have various questions about the products and shipping. Go to the Apps menu, scroll down to the bottom and you'll see two different live chat systems - Tawk.to and Smartsupp. Both are really simple to use and configure. In this case, we'll go with Smartsupp. Its free package should be fine for most use cases. It provides 14-day conversation history, up to 3 chat bots and Facebook Messenger integration.
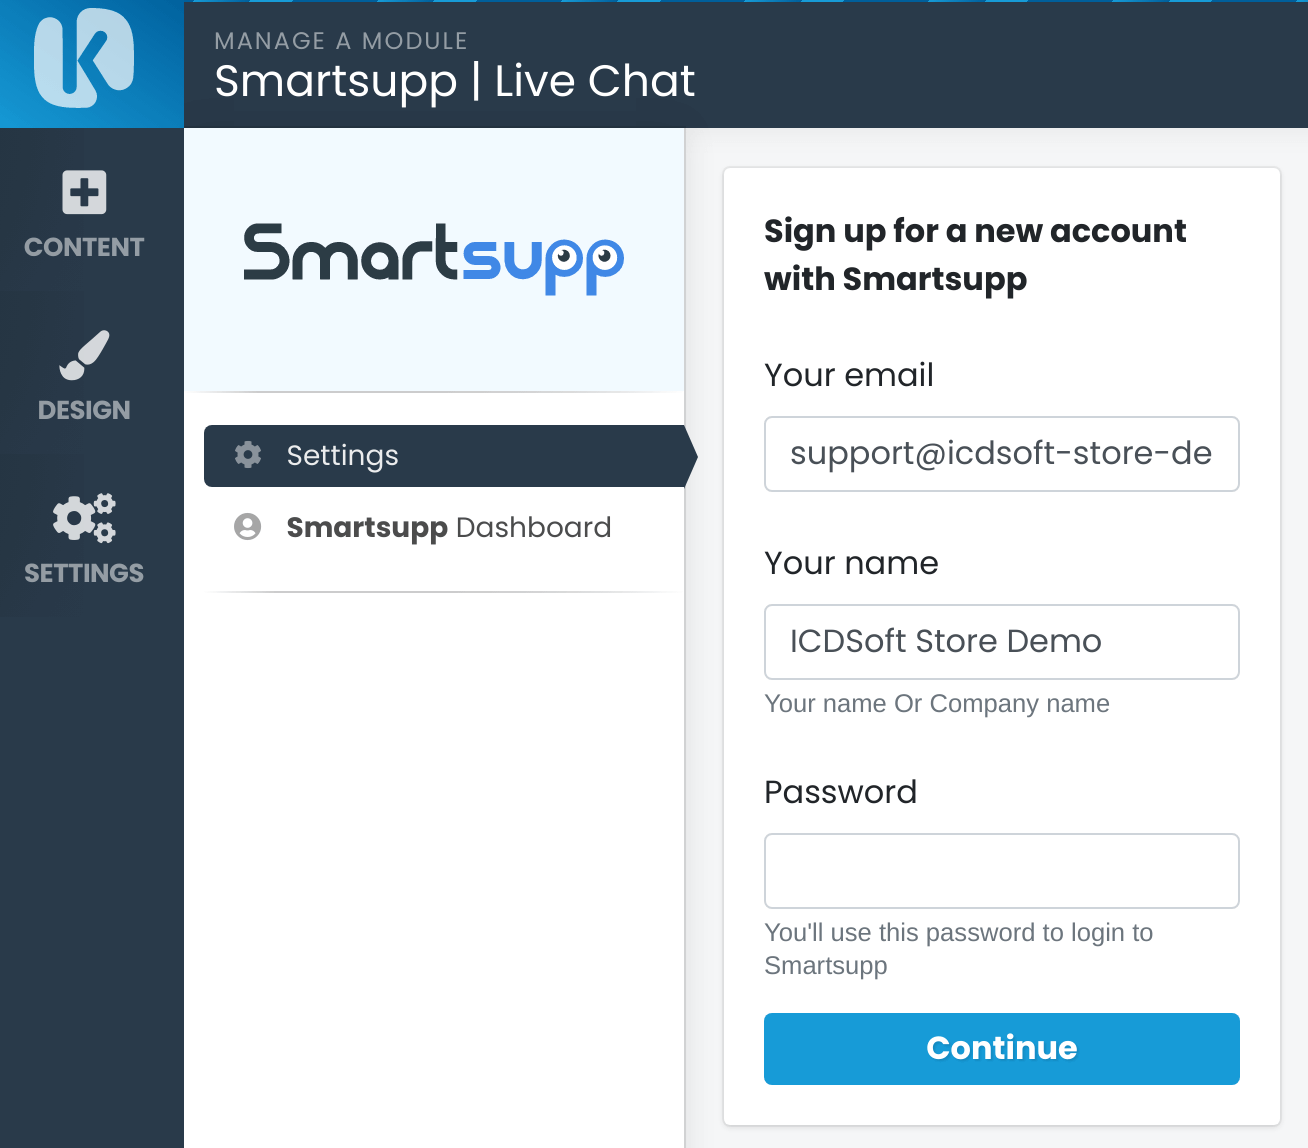
Since we don't have an account, click on the New Account/Key link and this takes us to the sign-up form. The system automatically pre-fills the administrative email entered in the configuration of your side builder project, so that should be OK. We will just have to enter a password.
And just like that, you can see that the Live Chat box is already available at the lower right corner of our website. It will show on all pages. If you click, you'd see how it appears for visitors of your site. Currently, it says it's offline, because we have not logged in at the admin dashboard of the live chat system - that's where you should go as the owner/administrator in order to answer your visitors' questions.
To log in, go to Smartsupp.com, click log in, and enter the email and password you set during the registration. You can go through a quick configuration wizard.
Now, if you go back to your website, you should be able to see that the status of the chat has turned "Online". You can give it a try to make sure it's working correctly. There is an App that you can install on your phone (both Android and iOS are supported), so you can answer questions right from your mobile device wherever you are. You can switch to the Free version from the Account Settings menu > Packages > Activate Free.

Securing Our Online Store With Free SSL
We've come to the final step of building and configuring our online store, and it's really important. What we want to do is to have our website working over an encrypted connection, so that visitors will see the reassuring padlock at the address bar of their browsers.
First we have to install an SSL certificate covering the address where our store is working at - in our case that's builder.icdsoft-store-demo.com. As you are probably aware of, all ICDSoft hosting accounts come with free SSL certificates from Let's Encrypt and you can quickly add one from your Control Panel > SSL/HTTPS section > Let's Encrypt certificates > Enable.


Now, we need to configure the Website Builder to work over an encrypted connection. To do that, go back to the Website Builder > Settings menu from the left sidebar > General Settings > scroll down to the bottom, and activate the option Always use SSL/HTTPS for this website. Save the changes.
Now you can see the padlock in the address bar of the browser indicating that the connection has been secured with an SSL certificate.
Finishing up
That's it. Our website is ready now, and we are ready to sell our products.
In this tutorial we've shown you how to quickly built a fully working e-commerce website. The website is mobile friendly, and looks good on all devices by default. The shopping cart module comes with a wide range of easy-to-configure payment methods. There is also a live chat which is known to increase the conversion rates for online store.
If you wish, you can also add a blog section, or any other of the modules, available in the free Website Builder.
In conclusion, the Website Builder software provides just about all the features you can ask for in an online shop in 2021. If you have any questions, feel free to contact our support team. Thank you!


 – Improved Email Forwarding")