
 + Video")
This blog post will show you to how to make an online store from the ground up with zero investments. Thanks to the latest advancements in CMS applications, nowadays you don't necessarily need a web developer to build a professional online store. We will use only free tools to build our online store, so all you would need is a hosting account with a domain name registration and basic computer skills. The store would be based on WordPress and WooCommerce.
YouTube Video - How to Make an Online Store

There are a lot of e-commerce solutions out there. Some are web-based, and there are also various applications you can use, so let's go through some of the advantages of WordPress and WooCommerce and why we believe this combination is a great choice for setting up an online store.
1. Advantages of WooCommerce
It's Free
Yes, there are paid extensions, but the base version of WooCommerce, which should be good for just about any e-commerce project, is absolutely free and there are hundreds of free templates that you can choose from.
It's the Industry Leader

The stats from the chart are provided by Datanyze. According to the latest estimates, WooCommerce is the industry leader among e-commerce platforms powering 30% of all online stores on the Internet. That's a huge market share and what this means for you is that there are tons of themes and extensions for just about anything you can think of. This popularity also means that the product will continue to be under active development, so you can expect constant improvements and new features. Also, whenever you stumble upon a certain difficulty, there are tons of information online so you can find answers and solutions more easily.
You Have Full Control Over Your Data
With some of the popular web-based solutions, you cannot export your own customer and product data should you decide to move elsewhere at some point. With WooCommerce, the data is on our servers, but you have full control over it and you can export it and move it elsewhere or download it to your computer with just a single click.
Endless Flexibility
WooCommerce allows you to easily customize every aspect of your store. With the popular web-based solutions, you can't modify the underlying CSS files or the actual look of your store. You are getting a template as-is and you are stuck with it. WooCommerce, on the other hand, is open-source and you can modify absolutely every aspect of your store, every file, and every script.
No Hidden Limits or Extra Charges
There are no limits or extra charges based on the number of products your store has. Some web-based ecommerce providers place ads on their lower-entry plans, and there is no such thing with WooCommerce.
Mobile-Friendly by Default
WordPress and WooCommerce are mobile-friendly by default, so your online store will look great on every device. There would be no need for you to make any adjustments in that regard.
Great Performance
WooCommerce is fast, and there is a wide range of caching options available to you. It's built on PHP 7, making it faster and future-proof.
Complete Multilingual Support
With WooCommerce, it's easy to set up a multilingual online store. Many eCommerce systems out there may offer multilingual functionality, but WooCommerce is a robust platform with built-in advantages for anyone wishing to build a smooth multilingual experience for their customers.
Easy to Use
WooCommerce and WordPress in general have intuitive interfaces and are really easy to use. All you need are basic computer skills.
Better SEO
WooCommerce is very SEO-friendly right out of the box. It runs on top of WordPress, which is standards-compliant itself and good for SEO. However, you can easily add plugins and implement techniques to further improve the SEO of your store.
So now that you know just how great WooCommerce is, let's go ahead and create our online store.
Not sure where to start?
ICDSoft.com could be the perfect home for your online store. We offer a wide range of hosting plans suitable for just about any type of eCommerce venture. You can start with our Economy or Business plan and upgrade at any time if you need to. We also offer domain name registrations at cost price, so you can have everything at one place. There is an automated WordPress installer available in the Control Panel, and we also offer free SSL certificates so that visitors can enter their payment details securely over an encrypted connection.
2. Install an SSL Certificate

Having an SSL certificate is an absolute must for online stores. Without it, browsers will show a "Not Secure" sign next to your domain in their address bars. That would certainly put off buyers, especially considering the fact that this is an online store where they are expected to enter their personal details.
In short, an SSL certificate encrypts all the data (including contact and payment information) transmitted between your website visitors and the hosting server. If you want a more detailed explanation on this topic, you can check our blog post "What is an SSL Certificate, and Do You Need It?".
Installing an SSL certificate is our first step towards building our online store. This will allow us to install WordPress using the SSL certificate, so we won't have to make any additional adjustments later on. Otherwise, if you skip that part, you will later have to re-configure WordPress to use the SSL certificate.
That's why the easiest approach is to start with the SSL certificate, and then install WordPress. This way connections to your website would be fully secure right from the start.
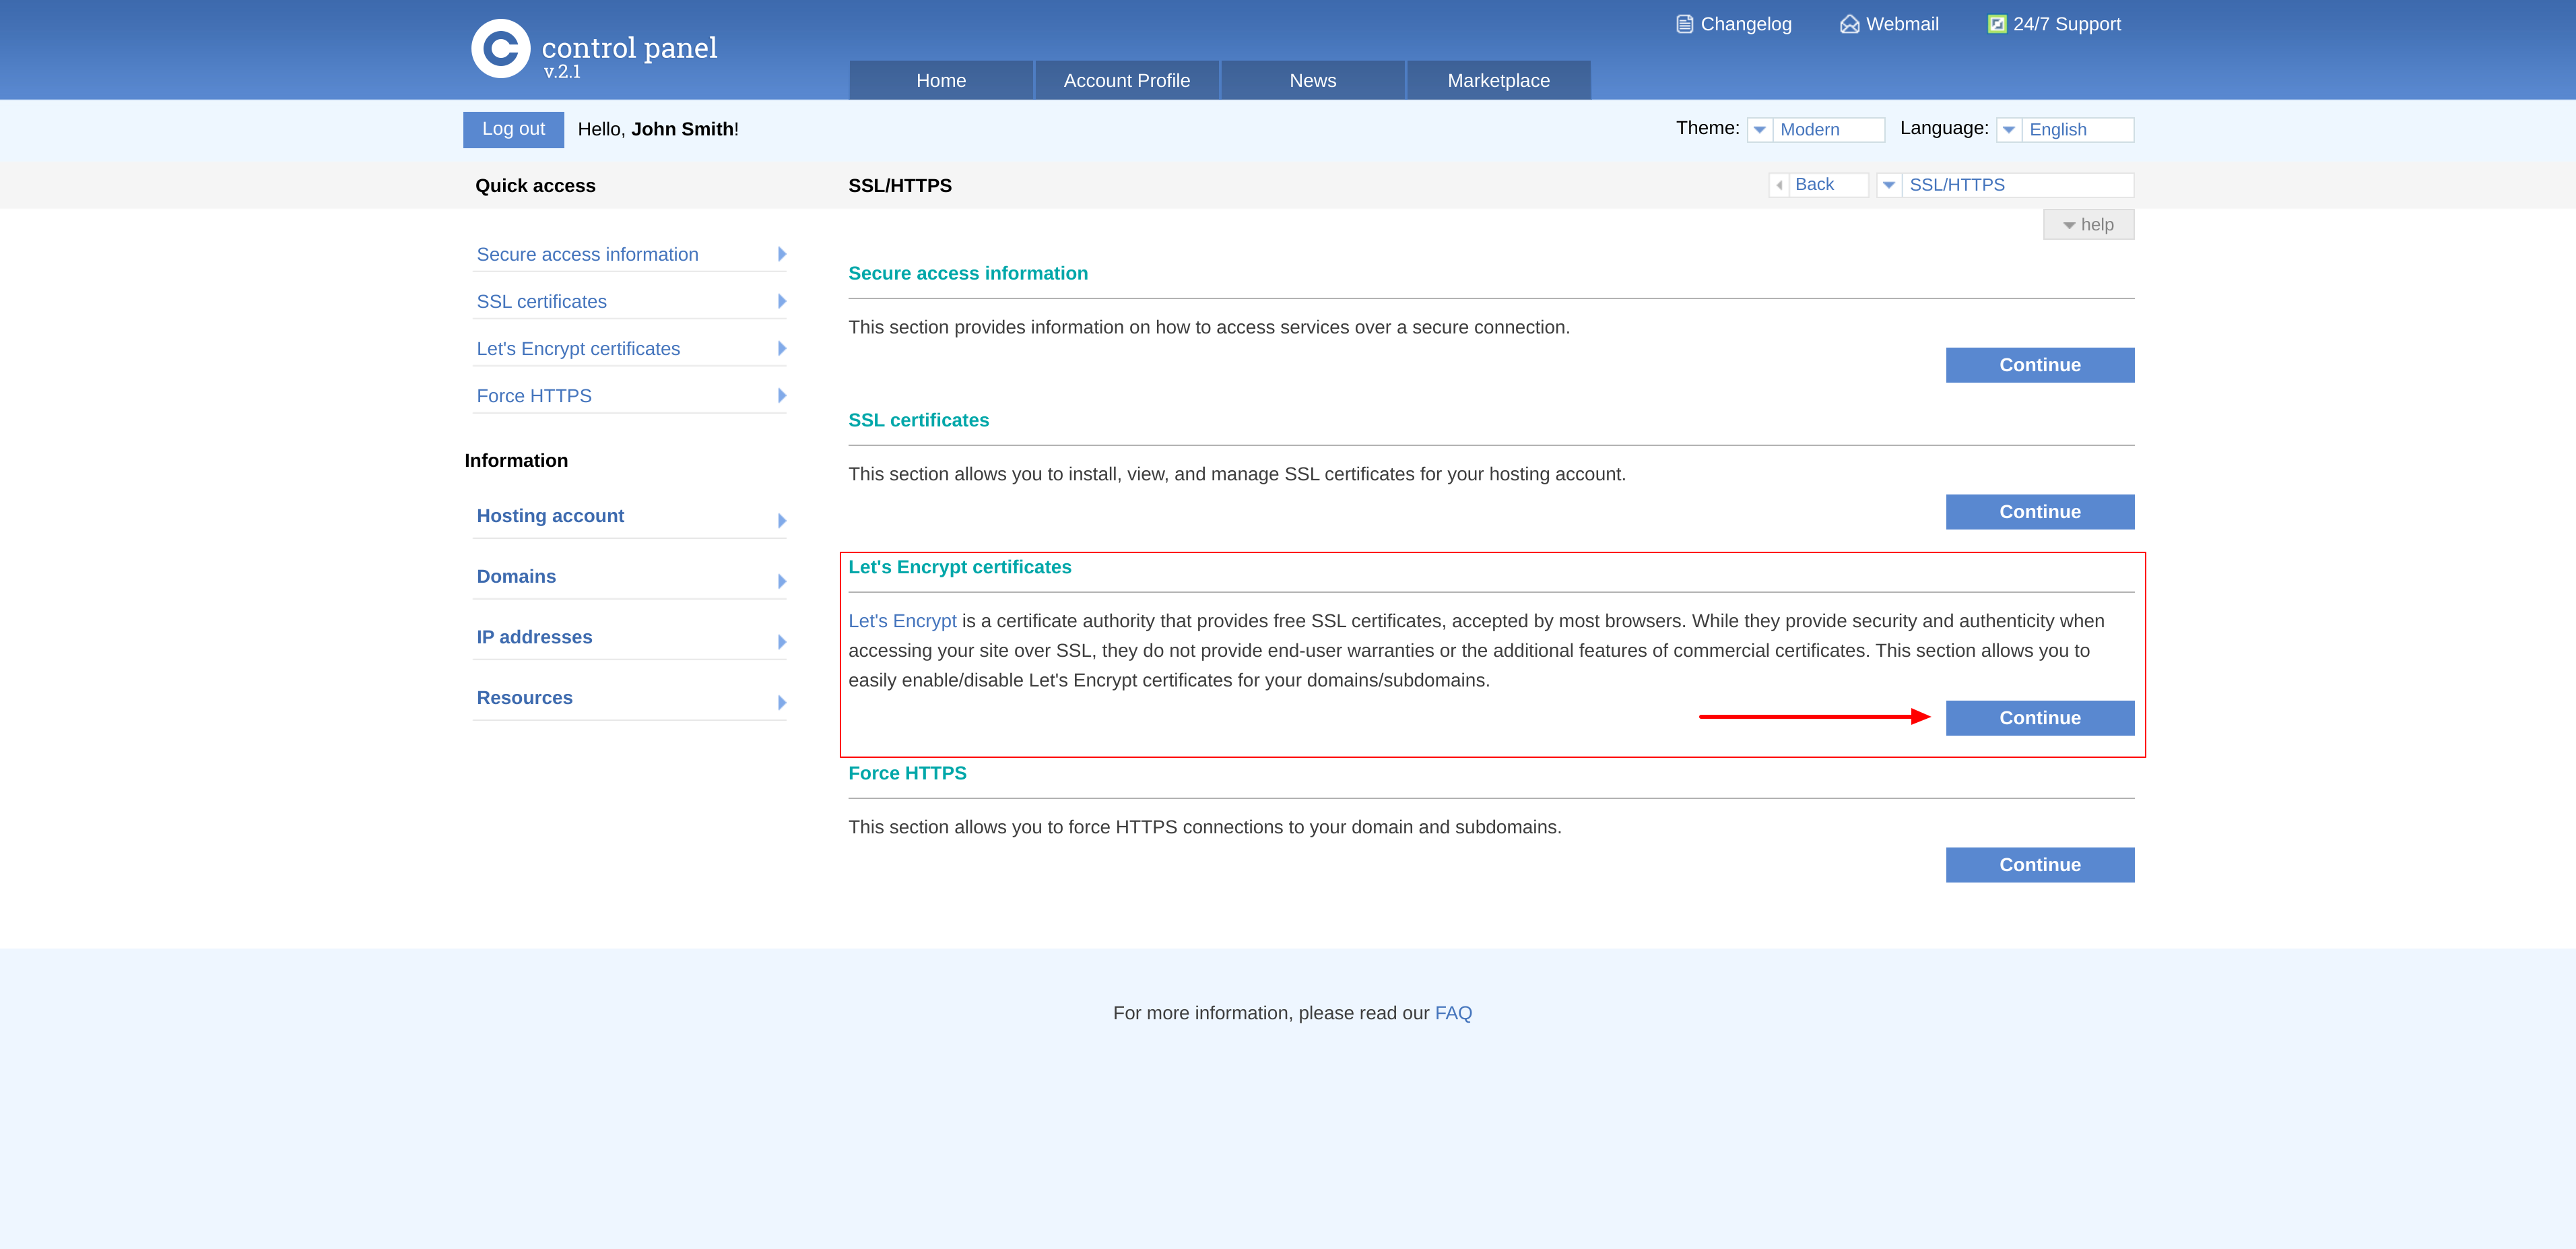
Free Let's Encrypt SSL Certificates
We (ICDSoft) offer free SSL certificates provided by Let’s Encrypt with all our hosting plans. These certificates are issued and activated with a single click in the Control Panel of your account. Let’s Encrypt’s free SSL certificates use the same encryption methods and strength as commercial certificates. The renewal process for Let’s Encrypt certificates is fully automated on our servers, so once you activate a certificate, your website will stay secured until you deactivate it. The certificate will be automatically renewed when needed.
Let's go ahead and install one. Go to the Control Panel > SSL/HTTPS > Let's Encrypt certificates > and enable a Let's encrypt certificate for your domain.

3. Install WordPress
So now that we have an SSL certificate installed on the server for our domain, the next thing we need to do is install WordPress. We will use the automatic installer available in the WordPress Manager in the Control Panel. There, click "Continue" under "Install WordPress". At that point, you would be presented with the WordPress installer wizard, where you can configure your WordPress installation. Here is a screenshot of the values we used for our store:

Site Title - Our fictional store would be about organic health products, like foods and juices, so we enter "Organic Foods and Products".
Domain - click on the drop-down and check the options - we have our domain and also the server-based address of your hosting account (e.g. icdsoft-store-demo.com.user.s484.sureserver.com). You can use the server-based address if you don't have a domain or it's not pointed to the server yet. This will give you the option to install WordPress on this system address, so you can still work on your website and later you can change it to your actual domain.
Subdomain - We will install it under the "www" subdomain, so that the WordPress installation would be accessible at https://icdsoft-store-demo.com.
Path - Leave empty to install in the root directory of the subdomain.
Use WWW - Google started a campaign of erasing the WWW subdomain in an attempt to simplify website URLs. With the release of version 76 of the Chrome browser, Google decided to no longer show the WWW "trivial subdomain" in the address bar when visiting a website. That's why we will directly skip that part.
Use HTTPS - since we already have an SSL certificate installed on the server for our domain, we can activate that option.
Username - In our case, we will set the username to "organic".
Password - You can generate a strong password using the automated password generator.
Email - You should enter your actual email, and it will be associated with this administrative WordPress dashboard user. By default, the installer uses the contact email for the hosting account.
Accept the license agreement and click Install.

4. Install the Astra Theme and Starter Templates
The next task on our list is to install a new theme. To do that, log in to your WordPress dashboard. The WordPress installer will show you the actual URL. If you installed under the WWW subdomain, the URL should be https://your-domain-name.com/wp-admin. In our case, that's https://icdsoft-store-demo.com/wp-admin.
Once you have logged in, go to the Appearance menu > Themes, press the Add New button, and make a search for Astra. Install the Astra theme and Activate it.
The great thing about this Astra theme is that it comes with a lot of different templates for just about any type of eCommerce website you can think of. You can sell physical items like shoes, t-shirts, services like DJ bookings, or downloadable products. Every template comes with demo products that you can just replace with yours. Of course, you can also add an unlimited number of new products.
I love the fact that the Astra Starter Sites plugin comes with dozens of pre-built sites that were built using Elementor and that can be used to create a full website with one click.
– Ben Pines, CMO at Elementor
Astra Sites allows anyone to have a beautiful website in under 5 minutes while using all open source software. The theme is free, the plugin is free, it’s almost unbelievable. You have to see it with your own eyes.
– Adam Preiser, WPCrafter
Our next step is to import one of these ready-to-use websites and this is done by installing a new plugin called Starter Templates. Go to the Plugins menu -> Add New, and type in Starter Templates. Press Install Now, and then Activate it.

Then, under the Installed Plugins menu, click on the See Library link under Starter Templates.


The interface will prompt you to go through a quick Getting Started wizard. First, we need to select the page builder we will use. We like Elementor, so let's select it. For more details on how to work with Elementor, you can refer to our blog post "How to Build a WordPress Website in 10 Steps".
And now you can see this huge list of templates that you can choose from. We will use the Organic Store template, because it's a more traditional type of store with physical products, so it's more suitable for our example here. You could be making bracelets at home, jewellery, or something else, and you can just follow these steps and replace the images and the actual products with yours and you will have a fully working online store.

Use the Import Complete Site option, and you would be given the choice to select what you'd like to import. We will use all the pre-selected options - Import Customizer Settings, Import Widgets, Import Content. You may notice that the Install Required Plugins option has been selected by default for us. If you click the "info" icon, you will see it will install all the required plugins that are needed for our online store. So it will directly add WooCommerce and Elementor which we will later use to edit our website pages.

Typically, the import process completes in under a minute. Before viewing the imported site, make sure to clear the cache of your web browser. To do that, press Command + R on a Mac or Ctr + F5 on a PC. At this point, you should have the default Organic Store site with all the demo content imported.

5. Configure WooCommerce
Our next step is to configure WooCommerce, so go to the WooCommerce > Settings menu. We start at the General tab. At the Store Address section, you should enter the physical address of your store - "This is where your business is located. Tax rates and shipping rates will use this address."
5.1 General Options
Under the General options section, you should specify whether you'd be selling to all countries or if you want to limit your sales to specific countries. In our case, we will leave the Selling location(s) set to Sell to all countries. For the Shipping location(s), again we will use the default value Ship to all countries you sell to. For the Default customer location, you can set No location by default.
At the Currency options, you can select the currency for your online store. We will use United States (US) dollar ($).
5.2 Products
Let's go to the next tab - Products. The important thing to note here is the actual Shop page - this is the WordPress page that would serve as your actual storefront. In this case, we have this page called "Shop". It was created as part of the content import that came with the Organic Theme, so that's OK, but this is where you can change it. We don't have to make any adjustments here, we are outlining it for your reference only.
5.3 Shipping
The Shipping tab is where we have to add a shipping zone - "A shipping zone is a geographic region where a certain set of shipping methods and rates apply. WooCommerce will match a customer to a single zone using their shipping address and present the shipping methods within that zone to them."
Press the Add shipping zone button. The name Zone name is just for your personal reference and in our case it would be "United States". We will set the Zone regions to United States US.
Press the Add shipping method button. We will use "Flat rate". The other default options are "Free shipping" and "Local pickup". Note that there are various shipping modules for WooCommerce that would allow you to offer more shipping methods to your customers. Now, click on the Edit link under it in order to enter the Method title, Tax status, and Cost.

5.4 Payments
Let's proceed to the Payments tab and set up a payment method for our store. The easiest one to set up is PayPal - "PayPal Standard redirects customers to PayPal to enter their payment information". Toggle the switch in order to enable it and press the Set up button. All we need to do here is enter our PayPal email in the fields PayPal email and Receiver email. We will use [email protected].
You can add more payment gateways by installing WordPress plugins, such as the one for Stripe - WooCommerce Stripe Payment Gateway. The great thing about Stripe is that it allows customers to complete the payment at your own website without being redirected elsewhere. That makes for a smoother and more professional experience, which in turn should result in higher conversion rates. Stripe requires that you have an SSL certificate, but we already installed it, so this would not be an issue if you've been following this tutorial from the start.
5.5 Emails
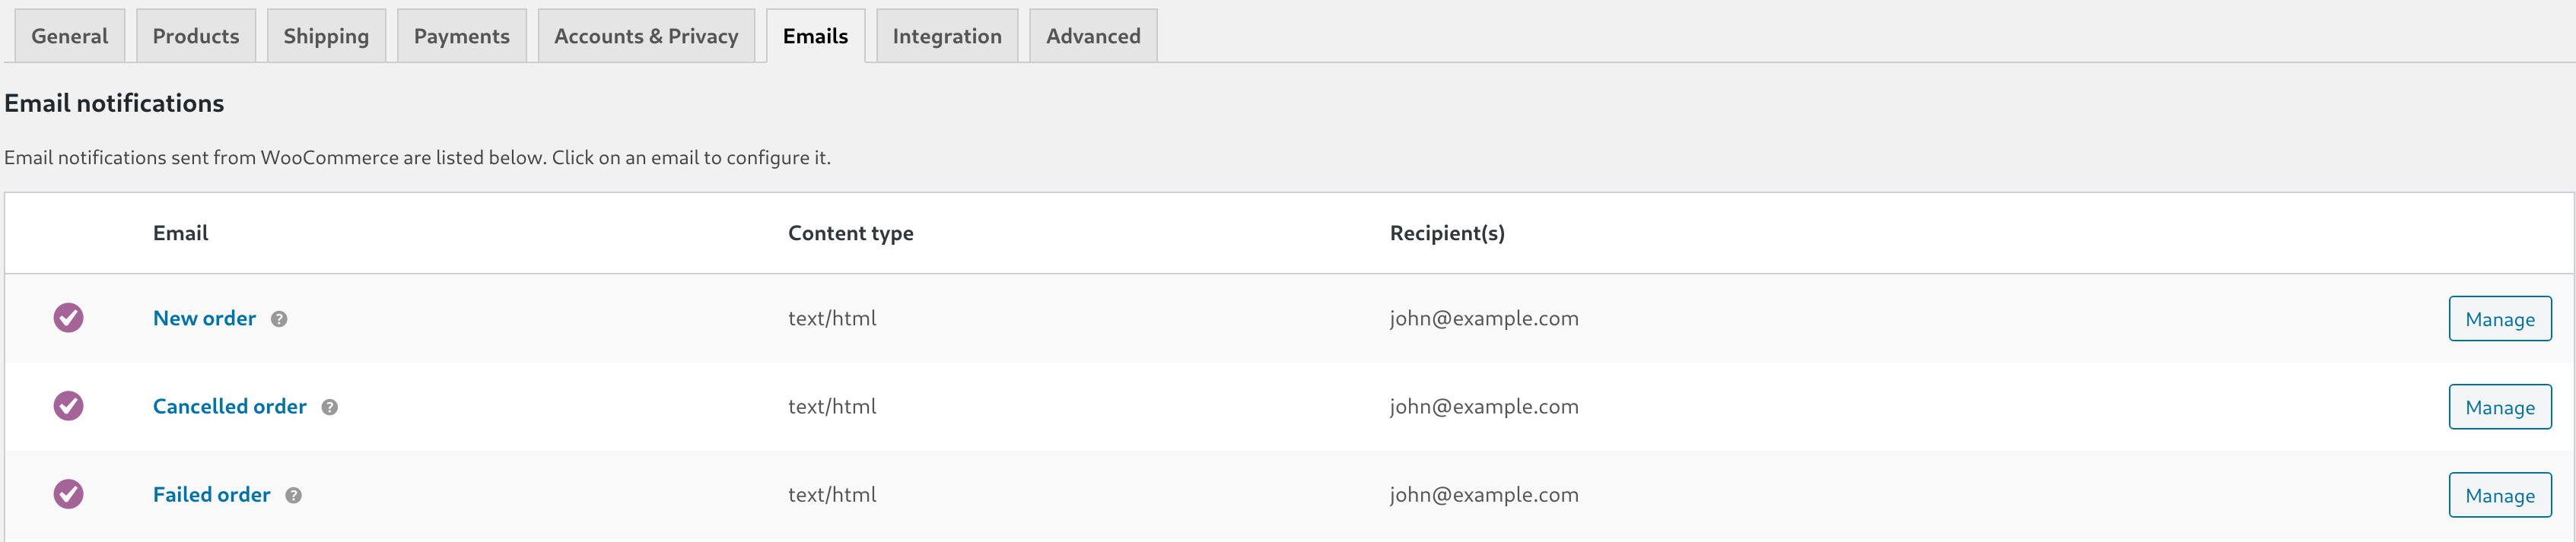
The final step is to configure the Email notifications sent from WooCommerce at the Emails tab. There, make sure to enter your email for the following notification types - New order, Cancelled order, Failed order. Also, under the Email sender options, enter your store email (in our case [email protected]) in the "From" address field.
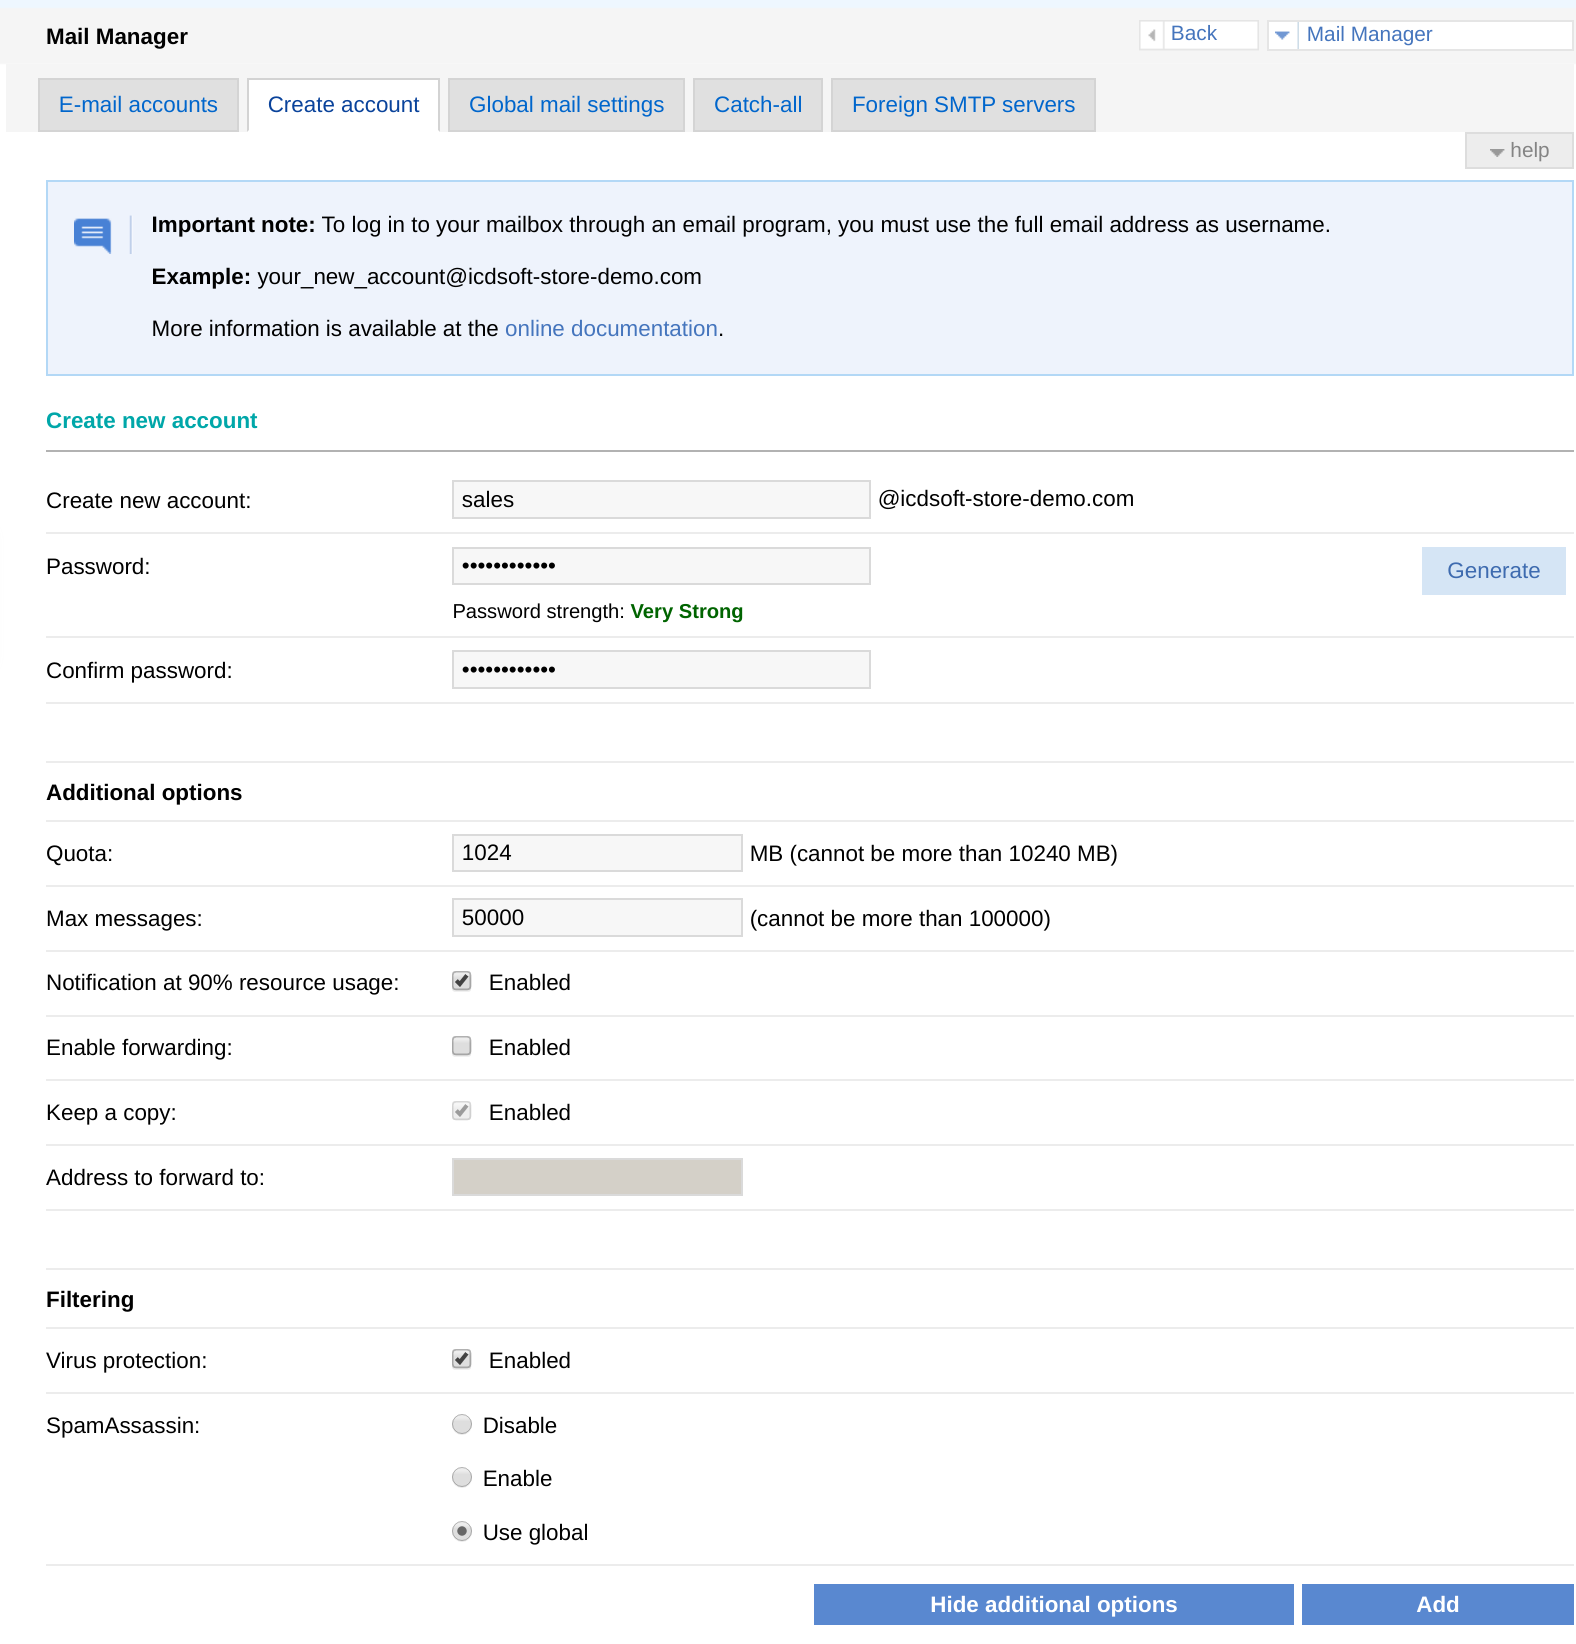
Let's actually go ahead and create that mailbox under our domain. For this purpose, we will go to the hosting account Control Panel > Mail Manager. There, we will create the "sales" account. With our email service, you can have an unlimited number of mailboxes under your domains. So go to the Create account tab, enter sales, generate a strong password for it, and press Add.
Another important thing as far as the email notifications are concerned is to set up an SPF record for our domain, which designates the permitted senders, and we want to make sure that our email server is listed there. This way, the messages sent from your store won't get flagged as spam by the receiving email servers.
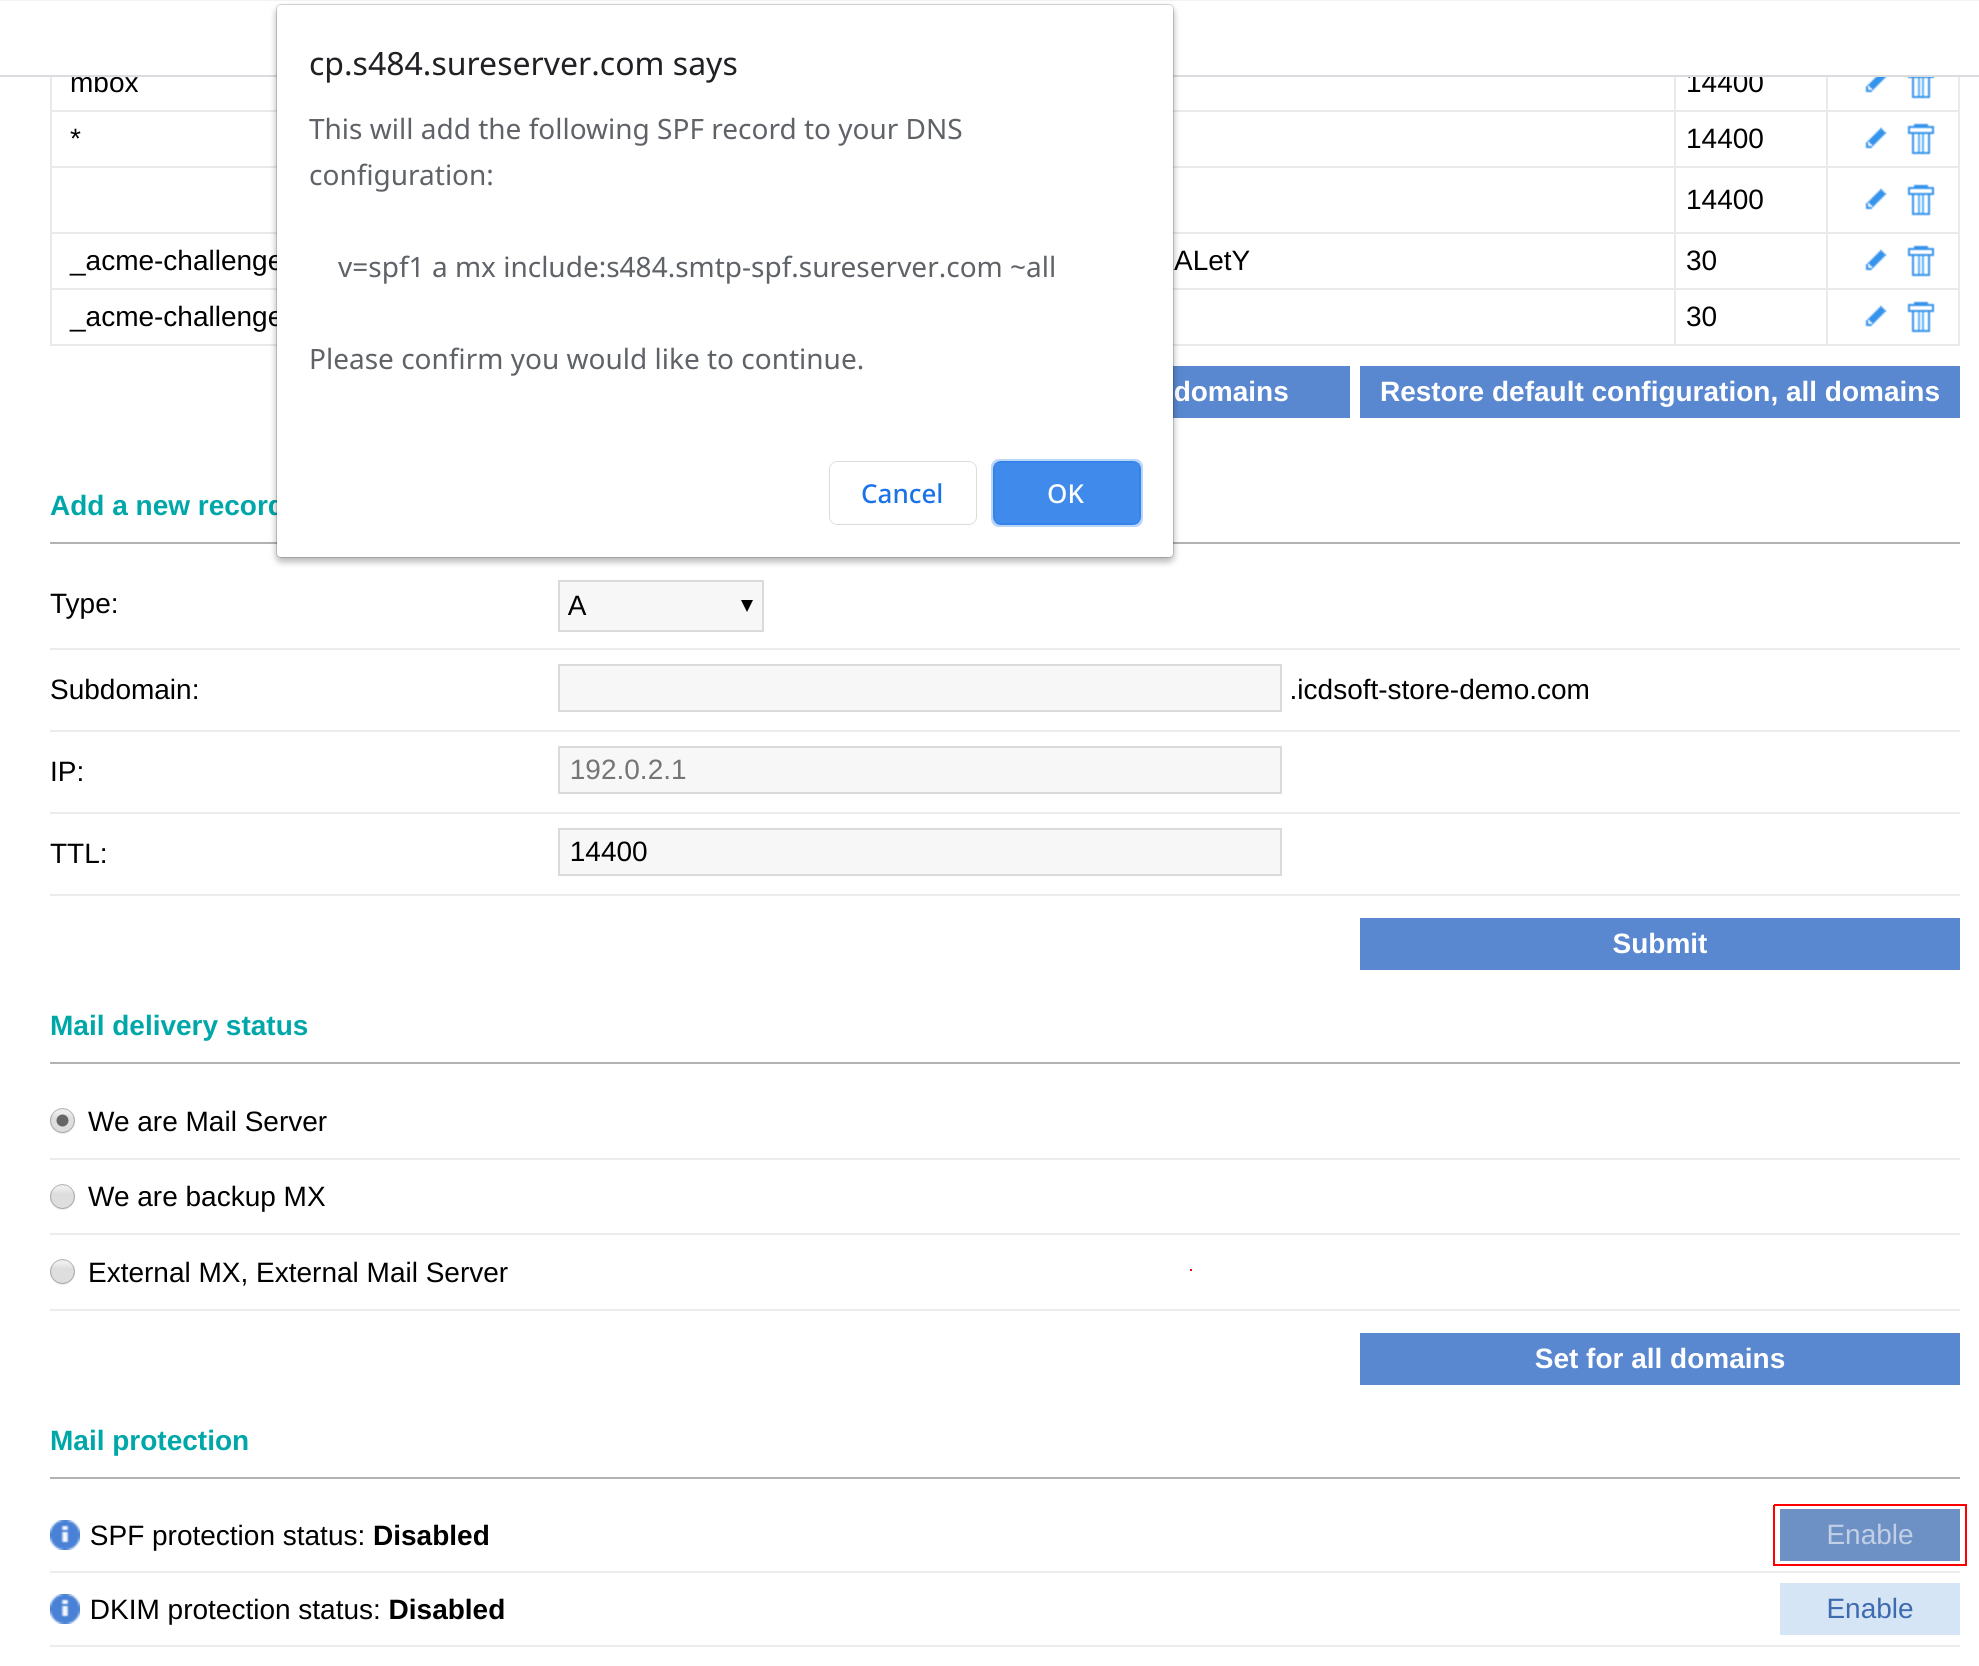
This is done under the Mail protection section at the DNS Manager, where you just need to press the Enable button next to SPF protection status. Note that this requires that your domain be configured to use our name servers.
6. Set Up Products and Categories
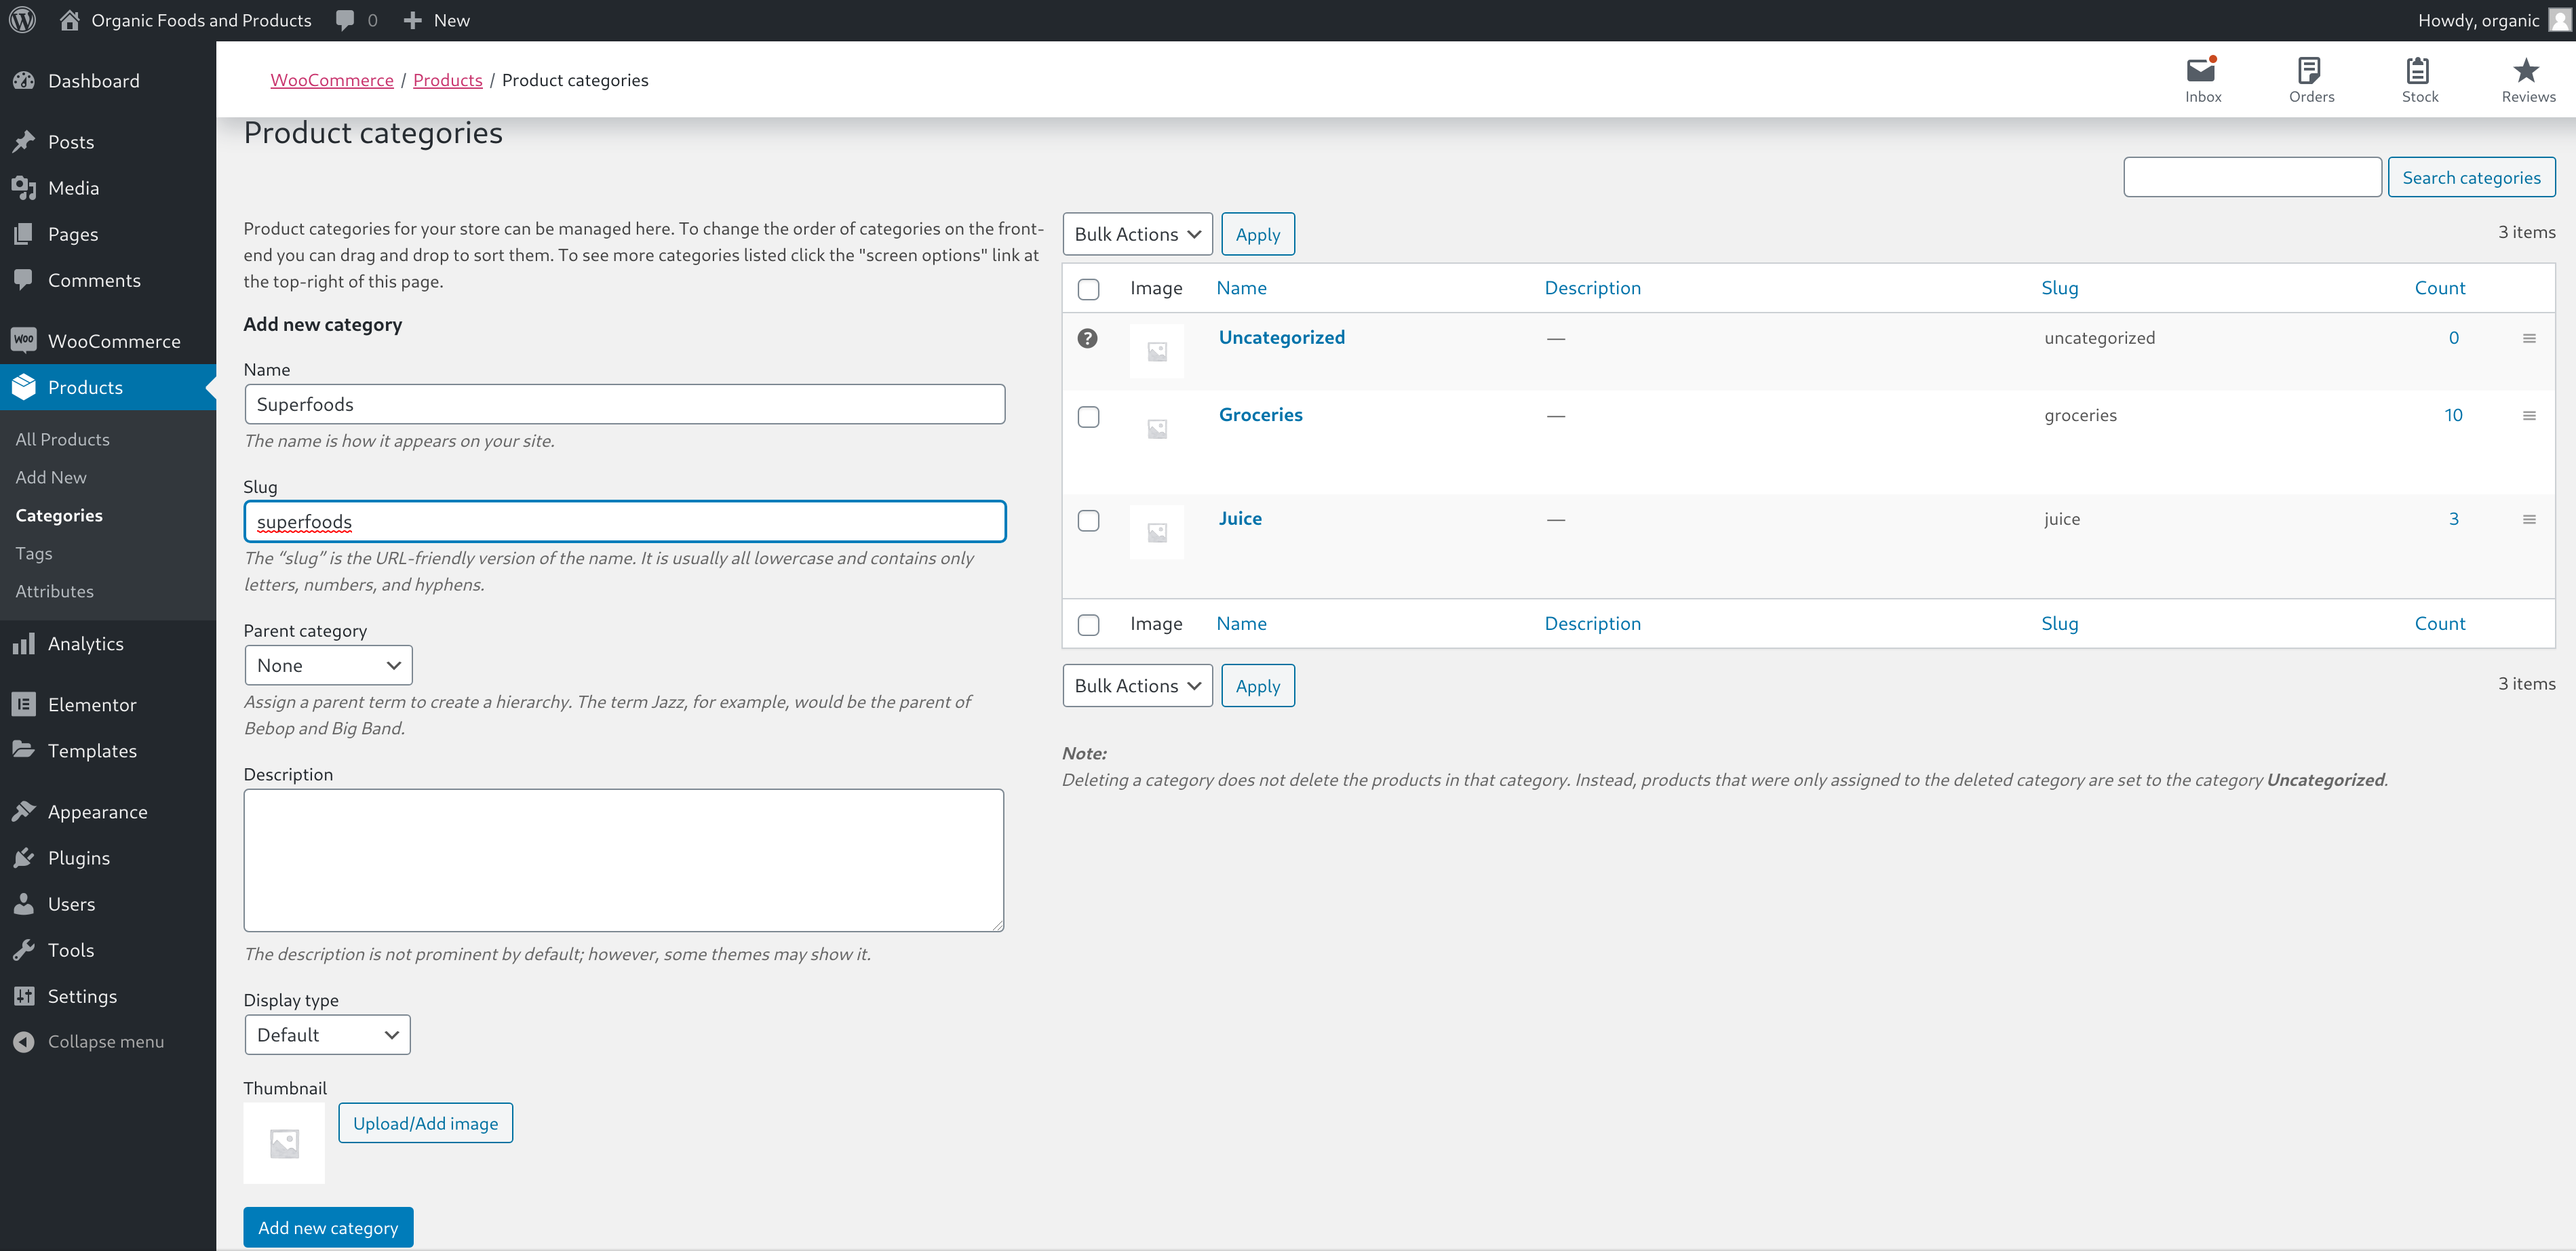
With the Astra Starter Templates plugin, we installed WooCommerce and imported the demo content including a number of products. You can manage them from the newly created Products menu under your WordPress dashboard. So let's head to Products > All Products. You can see all these products there, and you can see they are grouped in these categories - Groceries, Juice.
We will create a new category called "Superfoods". To do that, click on the Categories menu and fill in the details under the "Add new category" section. Namely, we will enter the name (Superfoods) and slug for our category. Slug is the "URL-friendly version of the name", so it will appear in the address bar of the browser. In our case, we will have "superfoods" for the slug (all lower case). Finally, press the Add new category button at the bottom. We will also create another category called "Coffee", and one called "Fruits".
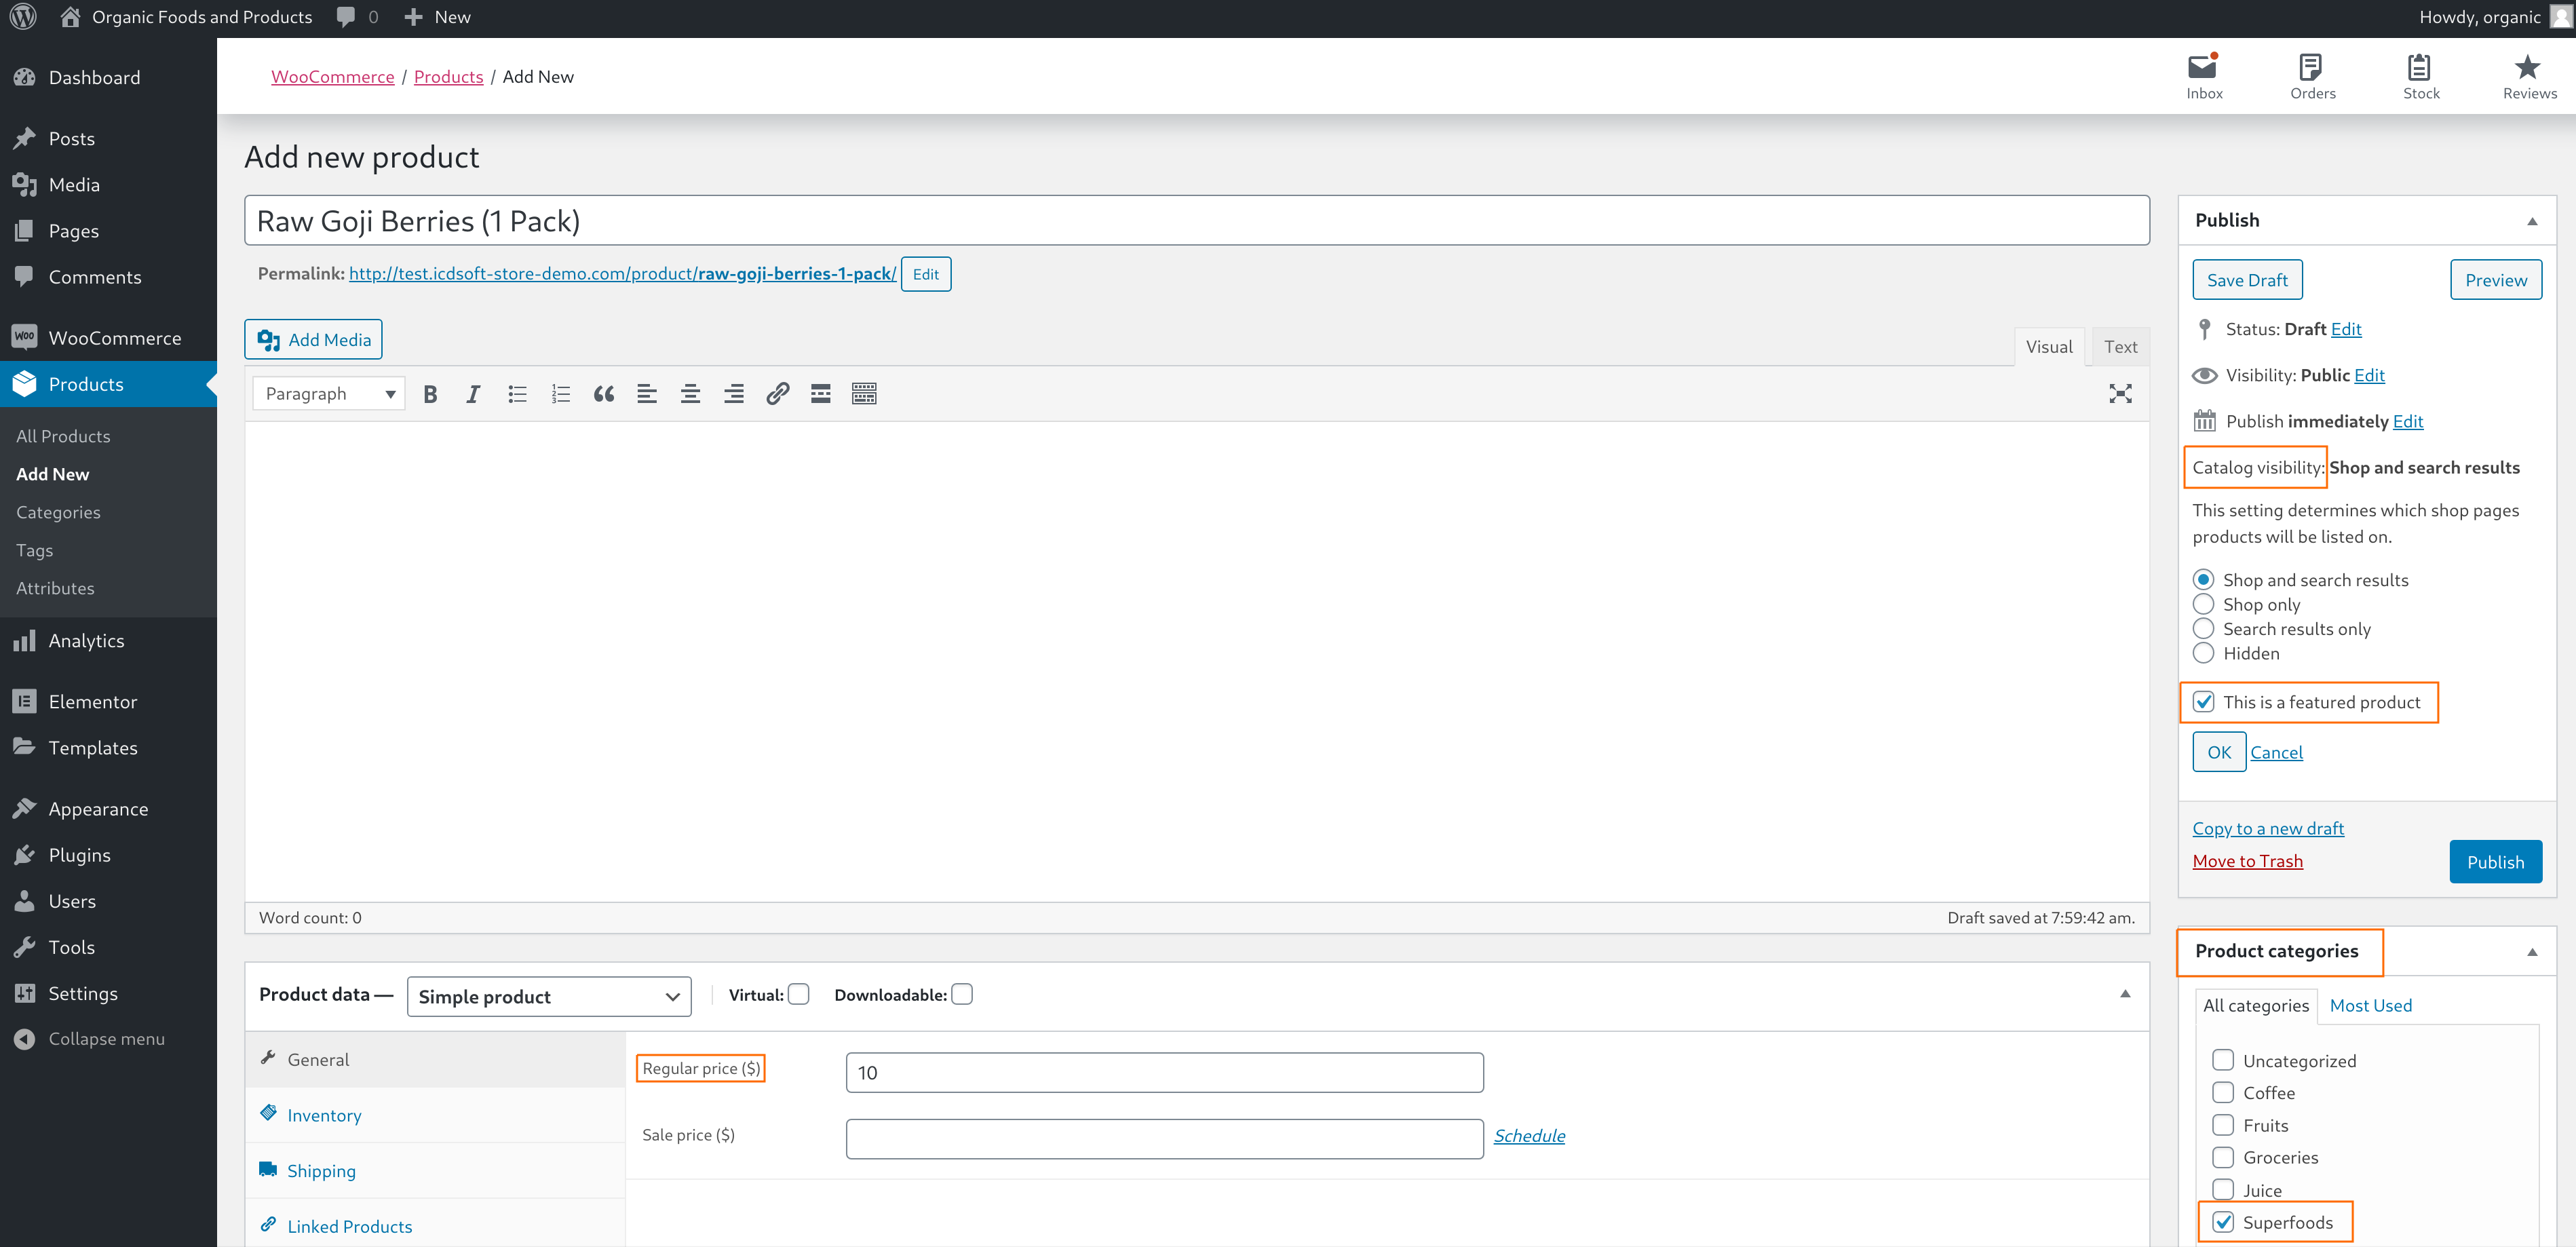
Our next step is to add a couple of products to our newly created "Superfoods" category. Under the Products menu > select Add new. We will enter "Raw Goji Berries (1 Pack)" for the product name. Set a Regular price of let's say $10 USD, and a sale price of $5.00 USD. Navigate to the Product categories section on the right side and add it to the "Superfoods" category by selecting it. Let's also make it a featured product, so click the Edit link under Catalog visibility and place a check on "This is a featured product". The idea behind the featured product option is that WooCommerce allows you display them at areas of your choice by using a special shortcode, and we will get to that later. Go to the Product image section at the bottom right corner and use the Set product image link to upload an image for this particular product.
We will add another product to our "Superfoods" category, lets say tomatoes - $5.00 USD Regular price, upload a Product image for it and press Publish.
Now, we will organize all the products we currently have in the corresponding categories. Navigate to Products > All products. Click on the Quick Edit link under "Organic Handpicked Coffee", remove it from the "Groceries" category, and add it to our newly created "Coffee" category. Move "Assorted Coffee" to the "Coffee" category in the exact same way. We will also move the "Assorted Dry Fruits" product to our "Fruits" category.

7. Set Up the Website Menu
If you take a look at the website now, you would notice that the second menu item is labelled "All Products" and it links to our Shop page. Let's rename it to "Shop" and add the different categories as its submenus.

To do that, go to the WordPress dashboard > Appearance > Menus. Expand the "All Products" menu item and change its label to "Shop".

Our next step is to create the submenus. Under the Add menu items section, click on the Custom Links type. Enter "Superfoods" for the Link Text. To get the actual URL, open your Products > Categories menu (in a new browser tab), click View under a given category to see it in your browser and just copy its address (URL).
Now, just paste it as the URL for our Custom Link. Press Add to Menu. And you can see that the menu item will appear at the bottom of the menu list. So to make it a submenu of our Shop, we just need to drag it and drop it under it.
We will create submenu items for the rest of our product categories - Fruits, Coffee, Juice, and Groceries. For example, the URL for our Coffee category would be "/product-category/coffee/", and the URL for our Fruits category would be "/product-category/fruits/".
Once you are ready, make sure to press the Save Menu button.
And now, let's check out the website and see the difference. Make sure to refresh the page. You can see that the Shop menu now has a separate submenu for each category. If you click on the Superfoods submenu, it would take you to the "Superfoods" product category where you would see the Goji berries and tomatoes we added there. You would see that the goji berries are on "Sale".

8. Update The Index Page With Elementor
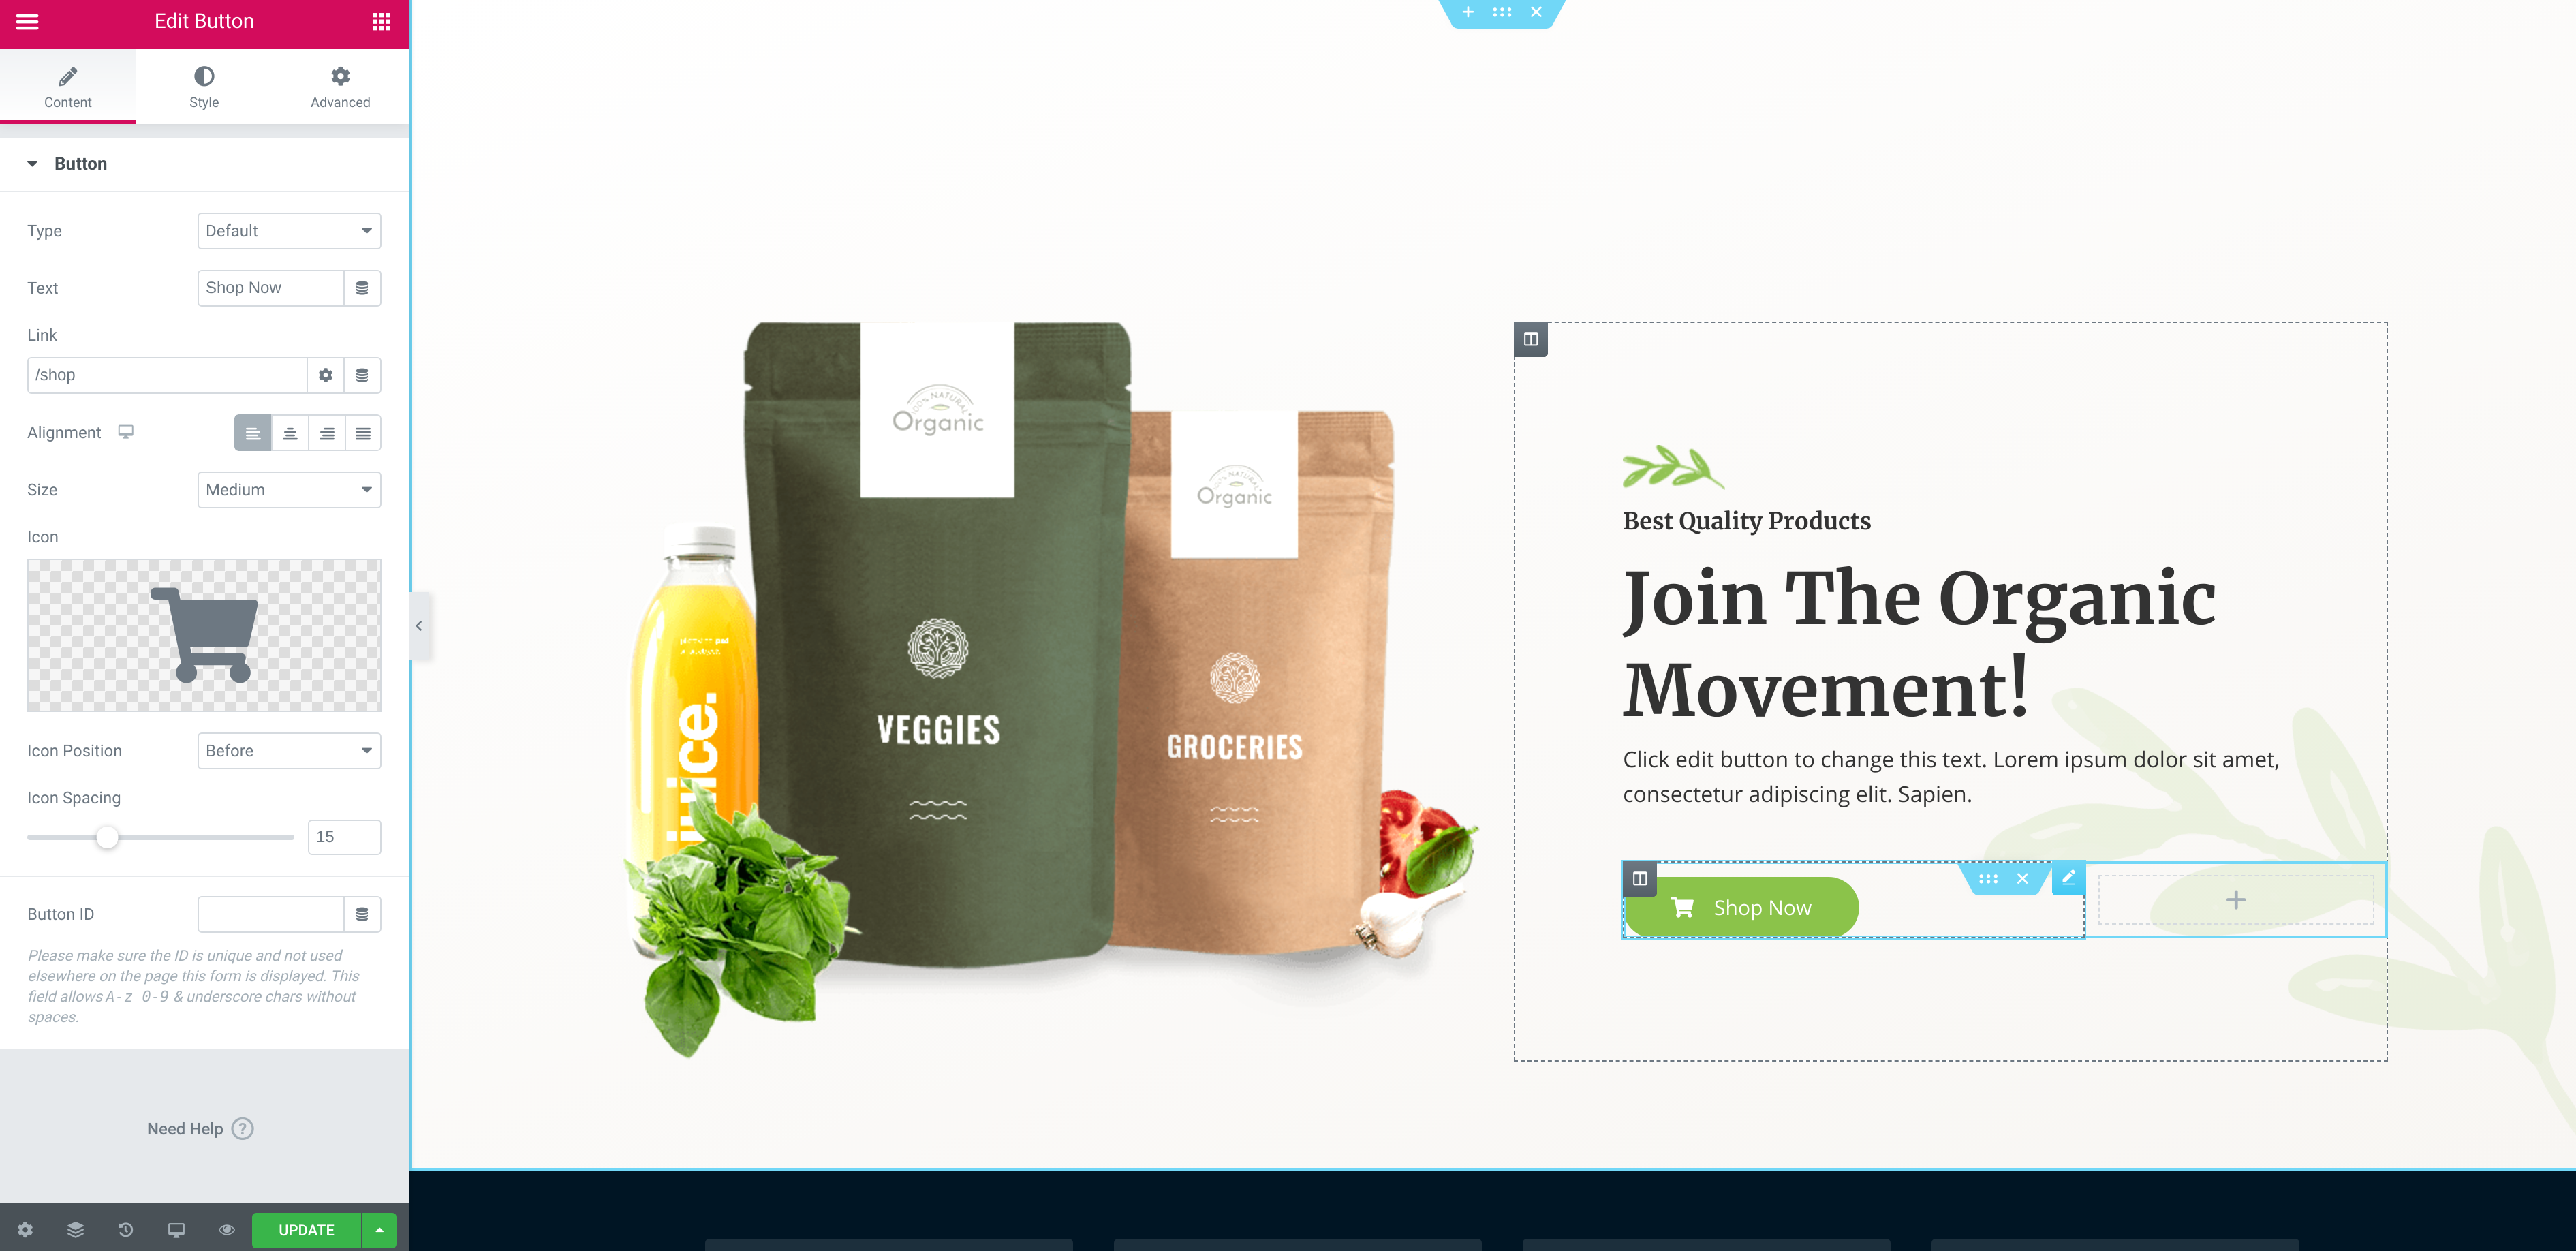
If you look at our index page, you'd notice that all these "Shop Now" buttons are not actually working, so let's fix that. Go to Page > All Pages, and press the Edit with Elementor link under the "Home" page.
Once the Elementor interface loads up, click on a given "Shop Now" button in order to select it, and set its Link to "/shop", which is our Shop page. We will apply this change to all the "Shop Now" buttons on the Home page.
Scroll down a bit and take a look at the "Best Selling Products" section. You can see on the left side that there is a Shortcode:
[products limit="4" columns="4" visibility="featured" category="groceries"] This shortcode dynamically loads up to four products (in four columns) from the "groceries" category that are set as "featured".
Scroll further down, and you would see these three sections that can actually serve as links to our different categories. For example, "Farm Fresh Fruits" can link to our Fruits category, so let's set the Link to "/product-category/fruits".
This third item here could be called "Superfoods" and we will link it to the "Superfoods" category - /product-category/superfoods. To change the label, just click on it and update the text.
Don't forget to click Update at the end. You can go ahead and check out your changes. Again, don't forget to clear the cache of your browser. These "Shop Now" buttons should be working.
9. Create a Coupon
We'll set up a coupon for first-time shoppers. To do that, go to the WooCommerce > Coupons menu. Press the Create your first coupon button. Enter "FirstTime" for the Coupon code, change Discount type to Percentage discount, set the coupon amount to 25. Go to the Usage Limits menu and for the Usage limit per user, enter 1. If you click on the "info" icon, you can see that it uses billing email for guests and the user ID for registered users. Press publish at the end.
Let's add this coupon information to our Home page. Navigate to Pages > All Pages > Edit with Elementor (for the "Home" page). Scroll down to the section with title "Get 25% Off On Your First Purchase!" and add "Use Promo Code "FirstTime"!".

10. Place a Test Order
Our last task is to test our online store. We will log out of the WordPress dashboard to make sure we are seeing the website exactly as a regular visitor would.
Let's add a product to our cart. Press View cart. Apply our "FirstTime" coupon, and you should be able to see the 25% discount applied right away. Proceed to checkout and enter the billing details. Upon pressing the Proceed to PayPal button, you would be redirected to PayPal where a payment can be submitted.
Of course, we are not actually going to submit a payment, but this order should now be available under the WooCommerce > Orders menu, so let's take a look. That's where you'd be able to see all the orders from your store. You can see that this one is "Pending Payment".


 – Improved Email Forwarding")