Uploading with Macromedia Dreamweaver
To upload your site with Macromedia Dreamweaver, you need to follow these steps:
1. Start Dreamweaver.
2. Choose Site -> New site.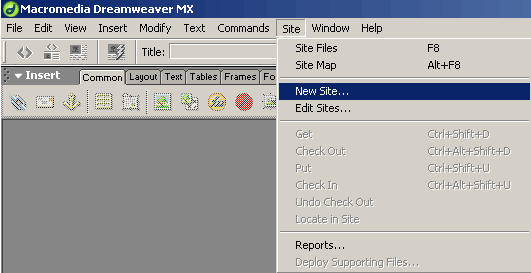
A Site definition screen will open up.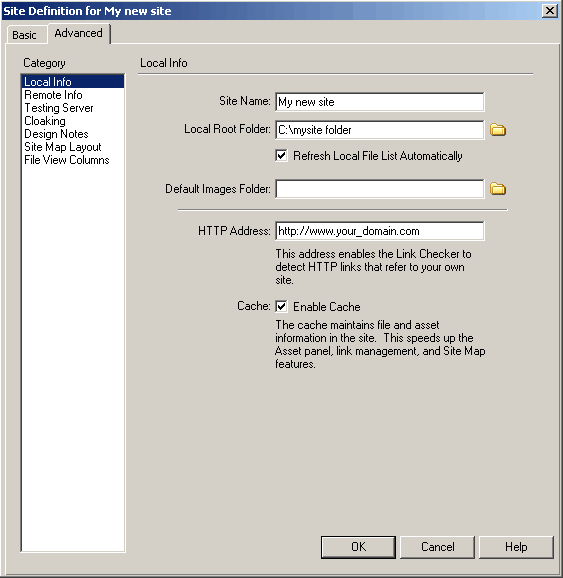
The first set of options is under Local info. You need to enter the following information:
Site name: Here you can type a name of your choice; it will be used as a title reference in the sites list in Dreamweaver.
Local root folder: Click on the folder icon button and navigate to the folder on your local computer where your site files are located. if you have not created yet a folder where your local site files will be stored, please create one and then define it as local root folder.
Default Images folder: Leave this field empty.
HTTP address: Enter http://www.your_domain.com, replacing your_domain.com with your own domain name.
3. When you are ready with the local site setup, choose the Remote Info set of options from the left pane.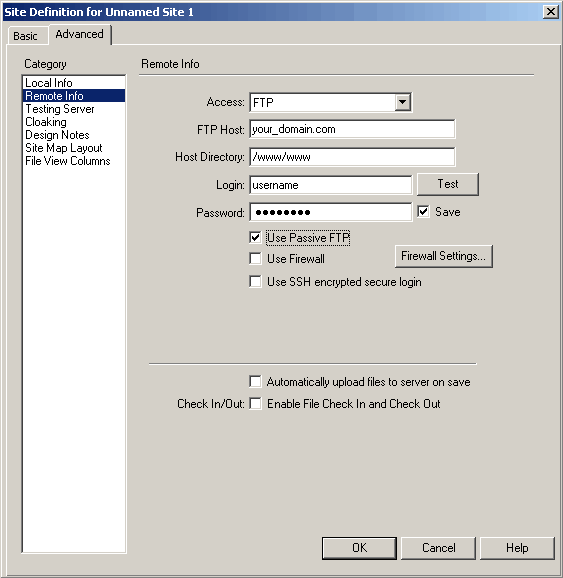
You will need to enter information for the following fields:
Access: FTP
FTP Host: This is your_domain.com, where your_domain.com is your actual domain name. You can also use the hostname of the server on which your account is hosted. This information can be found in the Welcome e-mail message of your hosting account.
As a Host Directory you need to use "/www/www".
If you need to publish to a subdomain on your site, please use "/www/subdomain_name", where subdomain_name must be replaced with the name of your subdomain. For example, if you have sub.your_domain.com in the Host Directory you should type in /www/sub.
In the "Login" and "Password" fields you need to specify the FTP login details you want to connect with. Normally, you would want to connect with your main Control Panel username/password pair. In case you want to connect with an FTP subuser you previously created at your FTP Manager Control Panel section, you need to specify the login details for that particular user.
Use Passive FTP: Make sure this option is checked.
Once you have filed out all the needed fields, you can test the connection by pressing the Test button.
4. You can now set up the Testing server if needed. The testing server is useful when you have PHP scripts running on your site.
When you have a testing server setup, DreamWeaver executes almost all PHP statements and has options for showing live data under design view.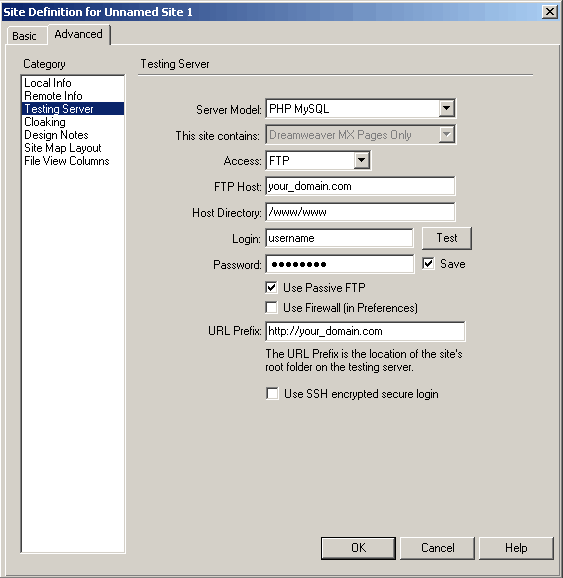
You will need to enter information for the following fields:
Server Model: PHP/MySQL
Access: FTP
FTP Host: This is your_domain.com, where your_domain.com is your actual domain name. You can also use the hostname of the server on which your account is hosted. This information can be found in the Welcome e-mail message of your hosting account.
As a Host Directory you need to use "/www/www".
If you need to publish to a subdomain on your site, please use "/www/subdomain_name", where subdomain_name must be replaced with the name of your subdomain. For example if you have sub.your_domain.com in the Host Directory you should type in /www/sub
In the "Login" and "Password" fields you need to specify the FTP login details you want to connect with. Normally, you would want to connect with your main Control Panel username/password pair. In case you want to connect with an FTP subuser you previously created at your FTP Manager Control Panel section, you need to specify the login details for that particular user.
Use Passive FTP: Make sure this option is checked.
URL Prefix: http://your_domain.com here your_domain.com is your actual domain name.
Once you have filed out all the needed fields, you can test the connection by pressing the Test button.
5. You can also set up some other options for your site using the other sections in the Site definition screen left pane. They are not related to the way you publish your site to the hosting server.
Once you are ready, please click the OK button and your new site will be saved in Dreamweaver.
6. To view your new site files, connect to the server, upload files, etc, you need to open the Site Panel.
By default this panel should be opened. If it is not, you can open it by choosing Window -> Site from the main menu.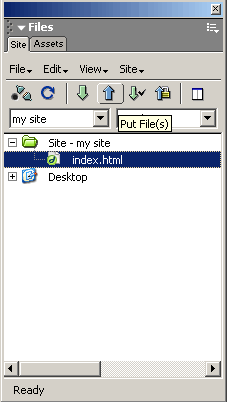
To upload a single file to the server, select the file and click on the Put Files button.
This will upload the selected files to the server.
Another option is to use the Synchronize command available under the Site menu in the Site Panel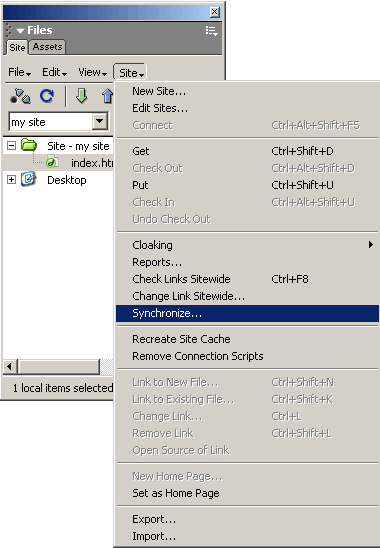
The command will compare the files on the server to the files on your computer and will upload only the changed and updated files.
7. To manage files directly on the server or download them on your computer, you need to switch to Remote View in your Dreamweaver Site panel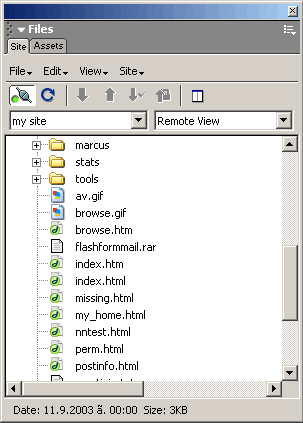
With Dreamweaver you can rename/delete or open for editing files directly on the server. To edit a file, double-click the file name, and the program will download it from the server and will open it for editing. Saving the filewill upload the changed version to the server.