Installing OpenCart [version 3.0.2.0]
![]() OpenCart is a free, PHP-based shopping cart software.
OpenCart is a free, PHP-based shopping cart software.
NOTE: You can install OpenCart on your account with a few clicks via the App Installer section of the Control Panel.
If you prefer to install OpenCart manually, you can follow the instructions listed in this article.
To install OpenCart, please follow these steps:
1. Download the installation from the site of the vendor:
2. Once you've downloaded the archive that contains the installation, you need to upload it to your disk space.
You can either extract all the files from the downloaded archive and upload them, or you can upload the archive and use the web hosting Control Panel's File Manager to extract the package. Please note that the installation files are usually placed in a subdirectory, so after extraction you may need to move them to the directory you've designated for the OpenCart application. The File Manager lets you select multiple files and folders to move to any location on your account.
The best way to upload big files or multiple files is via FTP. If you are not sure how to upload the files, please check the Uploading files section from our online documentation.
If you are installing the application directly in your main domain or in a subdomain, you may need to delete the default index.php file first. You can do this either via FTP or through your web hosting Control Panel's File Manager.
3. Create a new MySQL database and user for the OpenCart application. For security reasons, MySQL databases and users can be created only through the hosting Control Panel. Detailed instructions on the process are available in our Creating a MySQL database/user article.
Once you have the database and MySQL user created, you should associate the MySQL user with the database by following the instructions from our Associating a MySQL user with a database article. Unless you have a reason to do otherwise, you can select all available privileges for the new MySQL user.
4. Using the File Manager section in the hosting Control Panel, locate the directory where you extracted the OpenCart archive. Change the permissions (recurse into directories) of the upload directory to 775. Then you will need to move the contents (all files and directories) of the upload directory to the directory where you wish to install OpenCart. Rename the config-dist.php files in the main installation and admin folders to config.php. Access the URL of the main installation folder.
5. On the first step of the installation, you have to agree to the OpenCart license terms. Click "Continue".
6. On the next page, OpenCart will check whether the hosting server meets the installation requirements. Click "Continue".
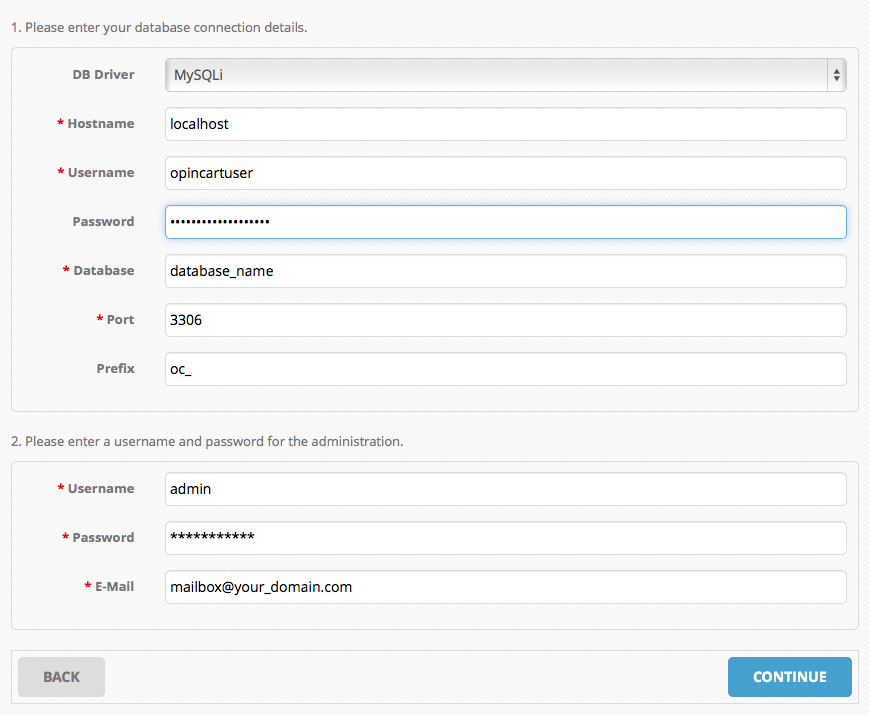
7. You will need to enter your database information. Please specify the following settings:
Hostname: You need to enter localhost for MySQL 5 or 127.0.0.1 for MySQL 8.
Username: You need to enter the MySQL username you created at your web hosting Control Panel's MySQL Databases section for your OpenCart application.
Password: You need to enter the password you assigned to your MySQL user.
Database: You need to specify the MySQL database you created for your OpenCart application.
Port: You need to enter 3306 for MySQL 5 or 3308 for MySQL 8.
Prefix: You do not need to modify this setting, unless you are installing more than one copy of OpenCart using the same database.
This step also includes creating an administrative account for OpenCart. You have to fill out the following fields:
Username: Choose a username for the administrative account of OpenCart.
Password: Enter a password for the administrative account.
E-Mail: Enter an email address for the administrative account.

Click "Continue".
8. The "Go to your Online Shop" link will take you to the main page of your OpenCart installation. The "Login to your Administration" link will take you to the administrative panel of OpenCart. Before using these links, go to the File Manager section in the hosting Control Panel and delete the install directory of OpenCart.
IMPORTANT: You should monitor the site of the software vendor for any security updates of your installed application.