Integrated Calendar
Each mailbox you create from the Mail Manager in the Control Panel has an integrated calendar functionality. Calendars can be shared and managed across multiple devices, making them very convenient to keep track of your appointments and tasks.
Managing calendars
You can access your calendars via the Roundcube Webmail interface > Calendars. A calendar is set up automatically for the specific mailbox as soon as you access this section.
Note: Each newly-created mailbox comes with a calendar set up by default. If an existing mailbox does not have a calendar, you can set up one for it by accessing its Calendars section in Roundcube. When you open this section, the system will automatically set up a calendar for the specific mailbox.
From this section, you can also link your calendar with your favorite email program, so that you have access to your calendar in it as well.
Note: Webmail Classic does not support the calendar feature, and you won't be able to access your calendar there.
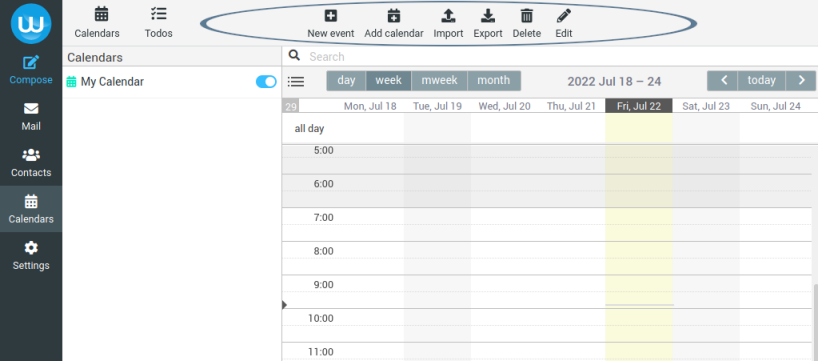
The controls for managing calendars are available at the top of the page in Roundcube:

Creating a new calendar
A calendar is defined by its ID. The ID can contain lowercase latin letters, hyphens, and numbers. This ID must be unique because it is used for internal reference to the calendar. However, you will only see the calendar listed under its name.
To create a calendar, you should click on the "Add Calendar" button and specify an ID and a display name. The new calendar will appear on the list on the left.
Note: By default, there is always one default calendar (its ID is "default"). You can change its display name, but the ID of that calendar remains the same.
Modifying a calendar
You can modify the display name of a calendar by editing it from Roundcube (the ID cannot be changed). Changing the calendar name is a matter of clicking on the "Edit" button and choosing the calendar you want to modify.
Deleting calendars
If you have only one calendar, you won't be able to delete it, as there will be no Delete option for it. If you have two or more calendars, you can choose which one to delete.
Importing data into the calendar
It is possible to import data into the calendar from a file on your computer. The calendar server supports the popular iCalendar format (.ics).
Sharing calendars
There are several ways to share a calendar. They are all available from the "Export" button on the Calendars page in Roundcube.
Sharing with another mailbox on your account
The easiest way to share a calendar is to allow another mailbox on your hosting account to access your calendar. This can be easily done by clicking on the "Export" button and choosing the calendar you want to share.
Note: You cannot share a third-party calendar that has been shared with you. You can only share your own calendars, and only with mailboxes under the current hosting account.
The option to share with another mailbox is at the bottom of the form; you just have to enter the email address of the mailbox in the "Share with" field. After that, you can choose the level of access you want to give that other mailbox.
You can also use this form to revoke access to your calendar by choosing the "Revoke access" option in the "Share Access" dropdown menu.
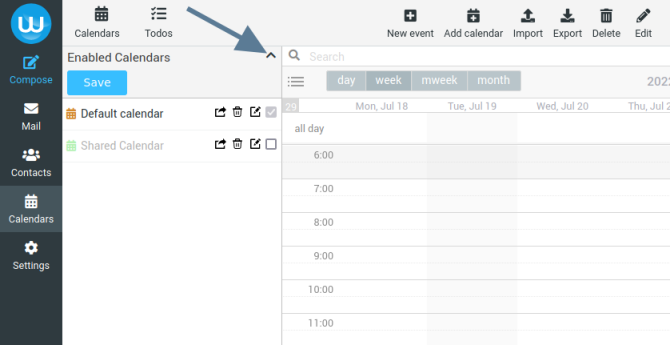
The calendar will become available in the other mailbox on your hosting account as soon as it is shared; it can be shown in the calendars list of the second mailbox by clicking on the button next to the "Calendars" caption. There, you can manage the list of visible calendars:

Synchronizing a calendar over the network
The calendars you create in Roundcube can also be used in your favorite email program if it supports the CalDav calendar functionality. You can synchronize your calendar over the network with some of the most popular email programs, for example Mozilla Thunderbird. Microsoft Outlook does not support CalDav out of the box, but you should be able to add this functionality with the Outlook CalDav Synchronizer plugin. There are also applications for iOS and Android that support calendars. This way, you can synchronize your calendar and manage your appointments easily from all devices you use.
In order to synchronize a calendar, you need the URL of the calendar and its login details.
When you click on the "Export" button, you can see the URL of the calendar in the "Calendar URI" field, and the username for it in the "Username" field. The password is the mailbox password.
After you save these details in your email program, you will be able to use your calendar in it, and any changes you make will be automatically synchronized across your devices.
Exporting calendar events
It is also possible to export event and tasks data from the calendar on our server and import it on another service that supports the iCalendar format (.ics). This functionality is also available using the "Export" button. There is an option to export the data. After that, you can import the downloaded file into any service that supports the format.
Managing events
You can add and edit events on the "Calendars" page, as well as tasks on the "Todos" page.
If the calendar you use is shared over the network with another mailbox or email program, you will see the changes you make to your calendar across all devices that synchronize calendar data from the server.
Note: If you are logged into the Roundcube webmail program using a mailbox with a parked domain and send a calendar invite, the invite will be sent using the main or addon domain associated with the parked domain.