Creating and using WordPress staging sites
You can use the WordPress Manager in the hosting Control Panel to create staging sites of your WordPress installations, make and preview your changes on them, and finally, publish those changes to the main site.
Creating a staging site
- Navigate to the hosting Control Panel's WordPress Manager.
- Find the WordPress site in the list, and click on the Manage button for it. This will take you to the management page for the WordPress installation.
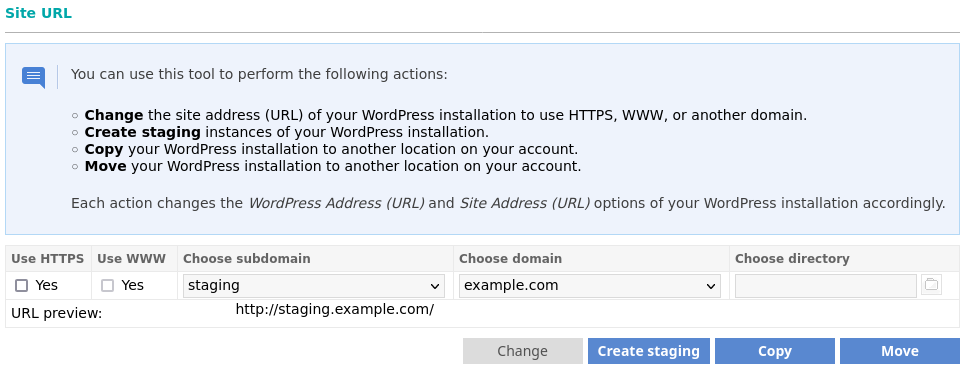
- Select the Site URL of the staging site using the controls under the Site URL section. A preview of the URL is shown below the controls. The controls are as follows:
• Use HTTPS: Choose whether to set the site to use HTTPS instead of HTTP. This is only possible if there is a valid SSL certificate installed for the host.
• Use WWW: Choose whether to add the www. prefix to the address.
• Choose subdomain: Choose the subdomain from the list of the subdomains created on the account.
• Choose domain: Choose the domain from the list of domains available on the account.
• Choose directory: Choose a directory in the selected subdomain. Leave empty for the root of the domain/subdomain.
Please note that you need to choose a location that is different from the current one. Nested WordPress installations are not supported, so you cannot have a WordPress installation in a subdirectory of another WordPress installation. Thus, you will not be able to create a staging instance in a subdirectory of the current WordPress installation. Our recommendation is to use a different subdomain. Here, we are using a subdomain named "staging" as an example.
- Click on the Create staging button.
This will create a separate staging site at the chosen location by copying the files and folders there. It will also use a separate MySQL database and user, so you can edit the new installation without affecting the original site. The staging site will be automatically added to WordPress Manager.
Publishing the staging site to the live one
- Open the WordPress Manager section in the hosting Control Panel.
- Find either the live WordPress site or the staging one and click on the corresponding Manage button. This will take you to the management page for the WordPress installation in question.
- Find and click on the Set as live button. If you are on the management page for the live site, you will find the button in the Staging section of the page. If you are on the management page for the staging site, you will find the button in the Staging site info section.
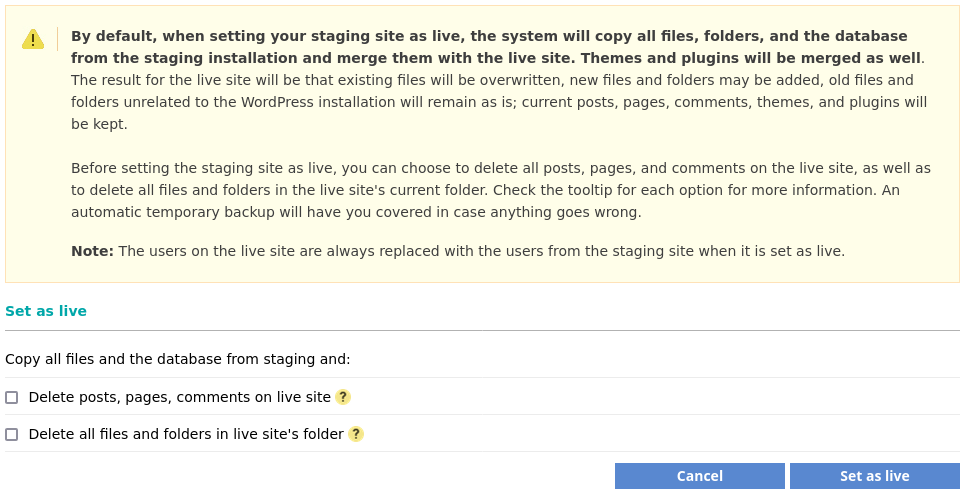
- On the next step you will be asked to choose what to do with the posts, pages, and comments on the live site, as well as the files and folders there. By default, the system will merge the staging site with the live one.

You have four possible ways for setting the staging site as live depending on the options on this page:
- If you don't select any of the two checkboxes for deleting content from the live site.
All current posts, pages, and comments on the live site will remain. All files attached to posts on the live site will remain on the file system and will be available in the WordPress Media Library. Files uploaded via the WordPress Media Library that are not attached to posts will not be available in the WordPress Media Library, but will remain on the file system. - If you select only the option to Delete posts, pages, comments on live site.
All current posts, pages, and comments on the live site will be deleted. All files on the live site, no matter whether they are attached to posts or not, will remain on the file system, but will not be available in the WordPress Media Library. - If you select only the option to Delete all files and folders in live site's folder.
All current posts, pages, and comments on the live site will remain. All files attached to posts will remain as well, but all other files will be deleted from the WordPress Media Library and from the file system. - If you select both options - Delete posts, pages, comments on live site and Delete all files and folders in live site's folder.
All current posts, pages, and comments on the live site will be deleted. All files will be deleted from your WordPress Media Library and from the file system.