Enabling server-side caching for WordPress
Server-side caching may help reduce page load times by a significant margin if configured properly. You can learn more about the server-side caching service in the General information about server-side caching article.
Automatic server-side caching configuration for WordPress
You can configure server-side caching for a WordPress website with just a few clicks using the hosting Control Panel:
- Open the WordPress Manager section of the hosting Control Panel.
- Navigate to the management screen of your WordPress installation by clicking on the Manage button next to the WordPress installation.
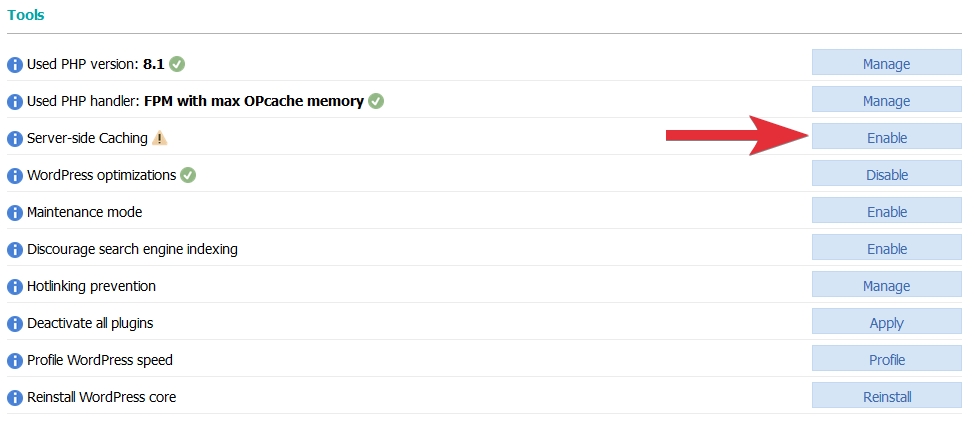
- Click on the Enable button next to Server-side Caching under the Tools subsection.
- A pop-up message will appear with information about the changes that will be made to the account and the WordPress installation to enable server-side caching - WordPress optimizations must be enabled for the WordPress installation, server-side caching must be enabled for the domain/subdomain, and the Server-Side Cache Autopurge plugin must be installed and activated for the WordPress installation.
Click on the OK button to proceed.

Manual server-side caching configuration for WordPress
To manually configure server-side caching on a WordPress website, you need to:
1. Configure WordPress to cache content
You should configure your WordPress installation to send the correct caching headers.
If you have installed your WordPress instance using the WordPress Manager section of the hosting Control Panel, content caching should be already enabled for your WordPress installation. Otherwise, you can enable it by following the instructions from our Optimizing WordPress article.
By optimizing your WordPress installation through the hosting Control Panel, the following line of code will be added to your .htaccess file, which will guarantee that a separate cache entry gets created for every different User Agent (browser):
Header append Vary User-Agent env=!dont-vary
If you don't want to have a separate cache entry for every User Agent, you should comment or remove that line from the main .htaccess file of your WordPress installation.
Alternatively, you can install a plugin that allows you to set caching headers. The Cache-Control plugin has proven to work correctly on our servers.
Note: We advise that you do not combine multiple tools/methods that set HTTP Cache-Control headers as this may lead to unexpected results.
2. Choose how to clear the cache
You can configure WordPress to clear the server-side cache automatically whenever content is changed. All you need to do is download and activate the Server-Side Cache Autopurge plugin for your WordPress installation. The plugin works correctly out of the box, so no additional configuration is required. This plugin also allows you to purge the cache on demand via the "Purge Server-Side Cache" button at the top left side of the WordPress Dashboard, as well as via WP-CLI with the following command:
wp surecache purge
If you do not wish to install or use the Server-Side Cache Autopurge plugin, or you do not update content regularly, you can purge the server-side cache manually by using any of the methods listed in our Purging the server-side cache article.
3. Enable server-side caching
Once you have prepared WordPress for server-side caching, you can enable the server-side caching service by navigating to the hosting Control Panel's Server-side Caching section and clicking on the Enable button next to the domain/subdomain where your WordPress is installed.