Deploying any application as a WebApps project
The WebApps platform is a versatile backend process management system that allows you to start and use applications that run their own network-facing servers in the background of your hosting account. Such applications expect to handle requests directly.
There are many applications that may require to be run like this; for example, Node.js applications usually use their own web server to handle incoming requests, as well as most web-based applications written in Python.
However, the WebApps platform is not limited to only running Node.js or Python applications. It allows any application that handles network requests to be run. For example, the following code shows an extremely simple web server that is implemented in just two lines of shell code:
#!/bin/sh
response="${2:-"OK"}"
while { echo -ne "HTTP/1.1 200 OK\r\nContent-Length: ${#response}\r\n\r\n$response"; } | nc -l -p "$1"; do printf "\n"; done
In this article, we will create a WebApps project to run this simple web server.
Warning: Note that this web server is not meant for production use and we would not recommend using it. This is a proof-of-concept for demonstration purposes only.
If you do not see a WebApps section in the Control Panel of your hosting account, this tutorial may not be suitable for your particular hosting environment. Please contact our support team for more information.
You need SSH access to the server in order to make the changes described in this tutorial. If you haven't set up SSH for your account yet, you should do this now.
Note that you should also enable both "Network tools" and "Compiling tools" on the SSH Access page of the Control Panel of your hosting account.
Creating the web server
The following commands, when run over SSH, will create and configure the application.
First, we create a directory to hold all files for this project:
webapps_project="shell_web_server_demo"
webapps_project_dir="/home/$USER/private/$webapps_project"
mkdir -pv "$webapps_project_dir/sureapp"
After that, we create the webserver.sh file that contains our web server code:
cat <<WEBSERVER_SH > "$webapps_project_dir/webserver.sh"
#!/bin/sh
response="\${2:-"OK"}"
while { echo -ne "HTTP/1.1 200 OK\r\nContent-Length: \${#response}\r\n\r\n\$response"; } | nc -l -p "\$1"; do printf "\n"; done
WEBSERVER_SH
chmod 0700 "$webapps_project_dir/webserver.sh"
Creating the WebApps project
There are two ways to create a WebApps project. One is from the WebApps page of the Control Panel of your hosting account. The other is using the command line interface over SSH.
Using the WebApps page of the Control Panel
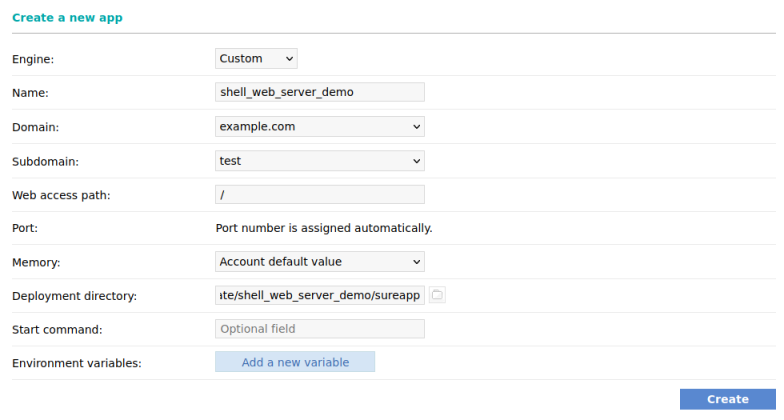
In the "Engine" field, choose "Custom".
The name of this project is "shell_web_server_demo".
For "Domain" and "Subdomain", you can choose anything you like; we would recommend that you set up a new subdomain dedicated to your application.
The last setting we need to add is "Deployment directory". In this case, it is /private/shell_web_server_demo/sureapp.
For now, you should not enter anything in the "Start command" field:

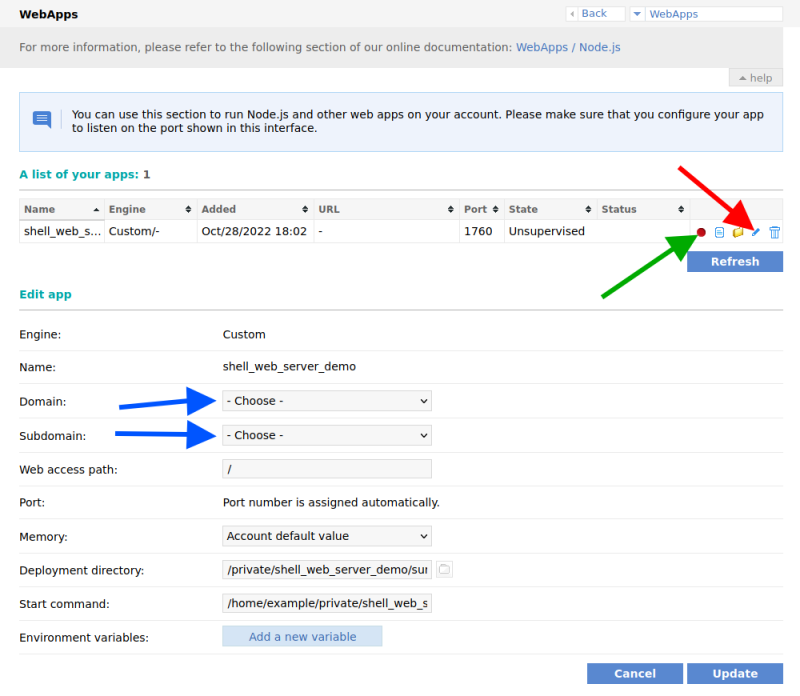
After you create the project, a port will be assigned to it automatically. You can use this port (red arrow) to edit the project and set up its "Start command":

The "Start command" should be something like this:
/home/example/private/shell_web_server_demo/webserver.sh 6086 'Hello World'
Note that you have to update the username ("example" here) and the port number ("6086") in the command to match the username of your hosting account and the port assigned to the project.
Using the command line interface over SSH
If you prefer to use the command line to manage the project, you can use the command line WebApps management tool. It is called sureapp.
Creating the WebApps project is a matter of running the following command:
sureapp project create \
    --engine "custom" \
    --engine-version "-" \
    --release-dir "$webapps_project_dir/sureapp" \
    "$webapps_project"
sleep 10  # Some time is needed for the project to be saved
At this point, we configure the WebApps project to use the TCP port that is automatically assigned to the project:
webapps_project_port="$(sureapp project list | grep "$webapps_project" | awk '{print $5}')"

sureapp project modify \
    --start-cmd "$webapps_project_dir/webserver.sh '$webapps_project_port' 'Hello World'" \
    "$webapps_project"
The final step you have to make is decide where on your website to deploy the project. You can create a new subdomain for it, or use an existing one. You can also make the application available in a subdirectory:

The first step is to click on the "Edit" button (red arrow). This will load the settings of the project in the form under "Edit app".
There, you should choose the domain and subdomain (blue arrows) at which to deploy the project. You can choose the "Web access path" as well; this is optional.
Finally, after you click on the "Update" button and the settings are saved, you can start the project (green arrow). Your new web server will be automatically started and managed by the WebApps platform.
HTTPS encryption
It is important to note that the WebApps platform takes care of encryption automatically. This means that your WebApps project will be served over HTTPS even if your application does not support HTTPS explicitly (like this simple web server). This happens automatically for every project.
In fact, you should not enable HTTPS connections for your application even if it does support them; the connection between WebApps and your project is done locally and is secure, and connections between visitors and the WebApps platform in front of your application is encrypted by our servers.