WebGuard
WebGuard is a traffic analysis and protection system that helps you understand how visitors interact with your websites and highlights which traffic sources use the most server resources. It provides detailed visibility into user agents, networks (ASN), countries, hit counts, traffic volume, and PHP CPU usage.
Please note that the resource usage shown in WebGuard is PHP CPU usage: the CPU time (in seconds) that the PHP scripts of your websites use on the server. Charts and tables are sorted by PHP CPU usage, so the sources at the top are the ones that load your account the most. Hits and traffic (data volume) are shown next to it for reference.
Using this information, you can identify abusive patterns and apply targeted challenge and whitelist rules to control how specific traffic is handled. Traffic that matches a challenge rule receives a CAPTCHA challenge (see What visitors see), while whitelisted traffic bypasses it.
WebGuard is organized into five main sections:
Statistics
At the top of the Statistics and Explorer sections, a banner reminds you what WebGuard does: review your traffic by user agent, network (ASN), and country, then challenge abusive sources with a CAPTCHA to reduce CPU usage.
The Statistics section gives you an overview of traffic patterns for the selected time range. By default, it shows statistics for the last 24 hours.
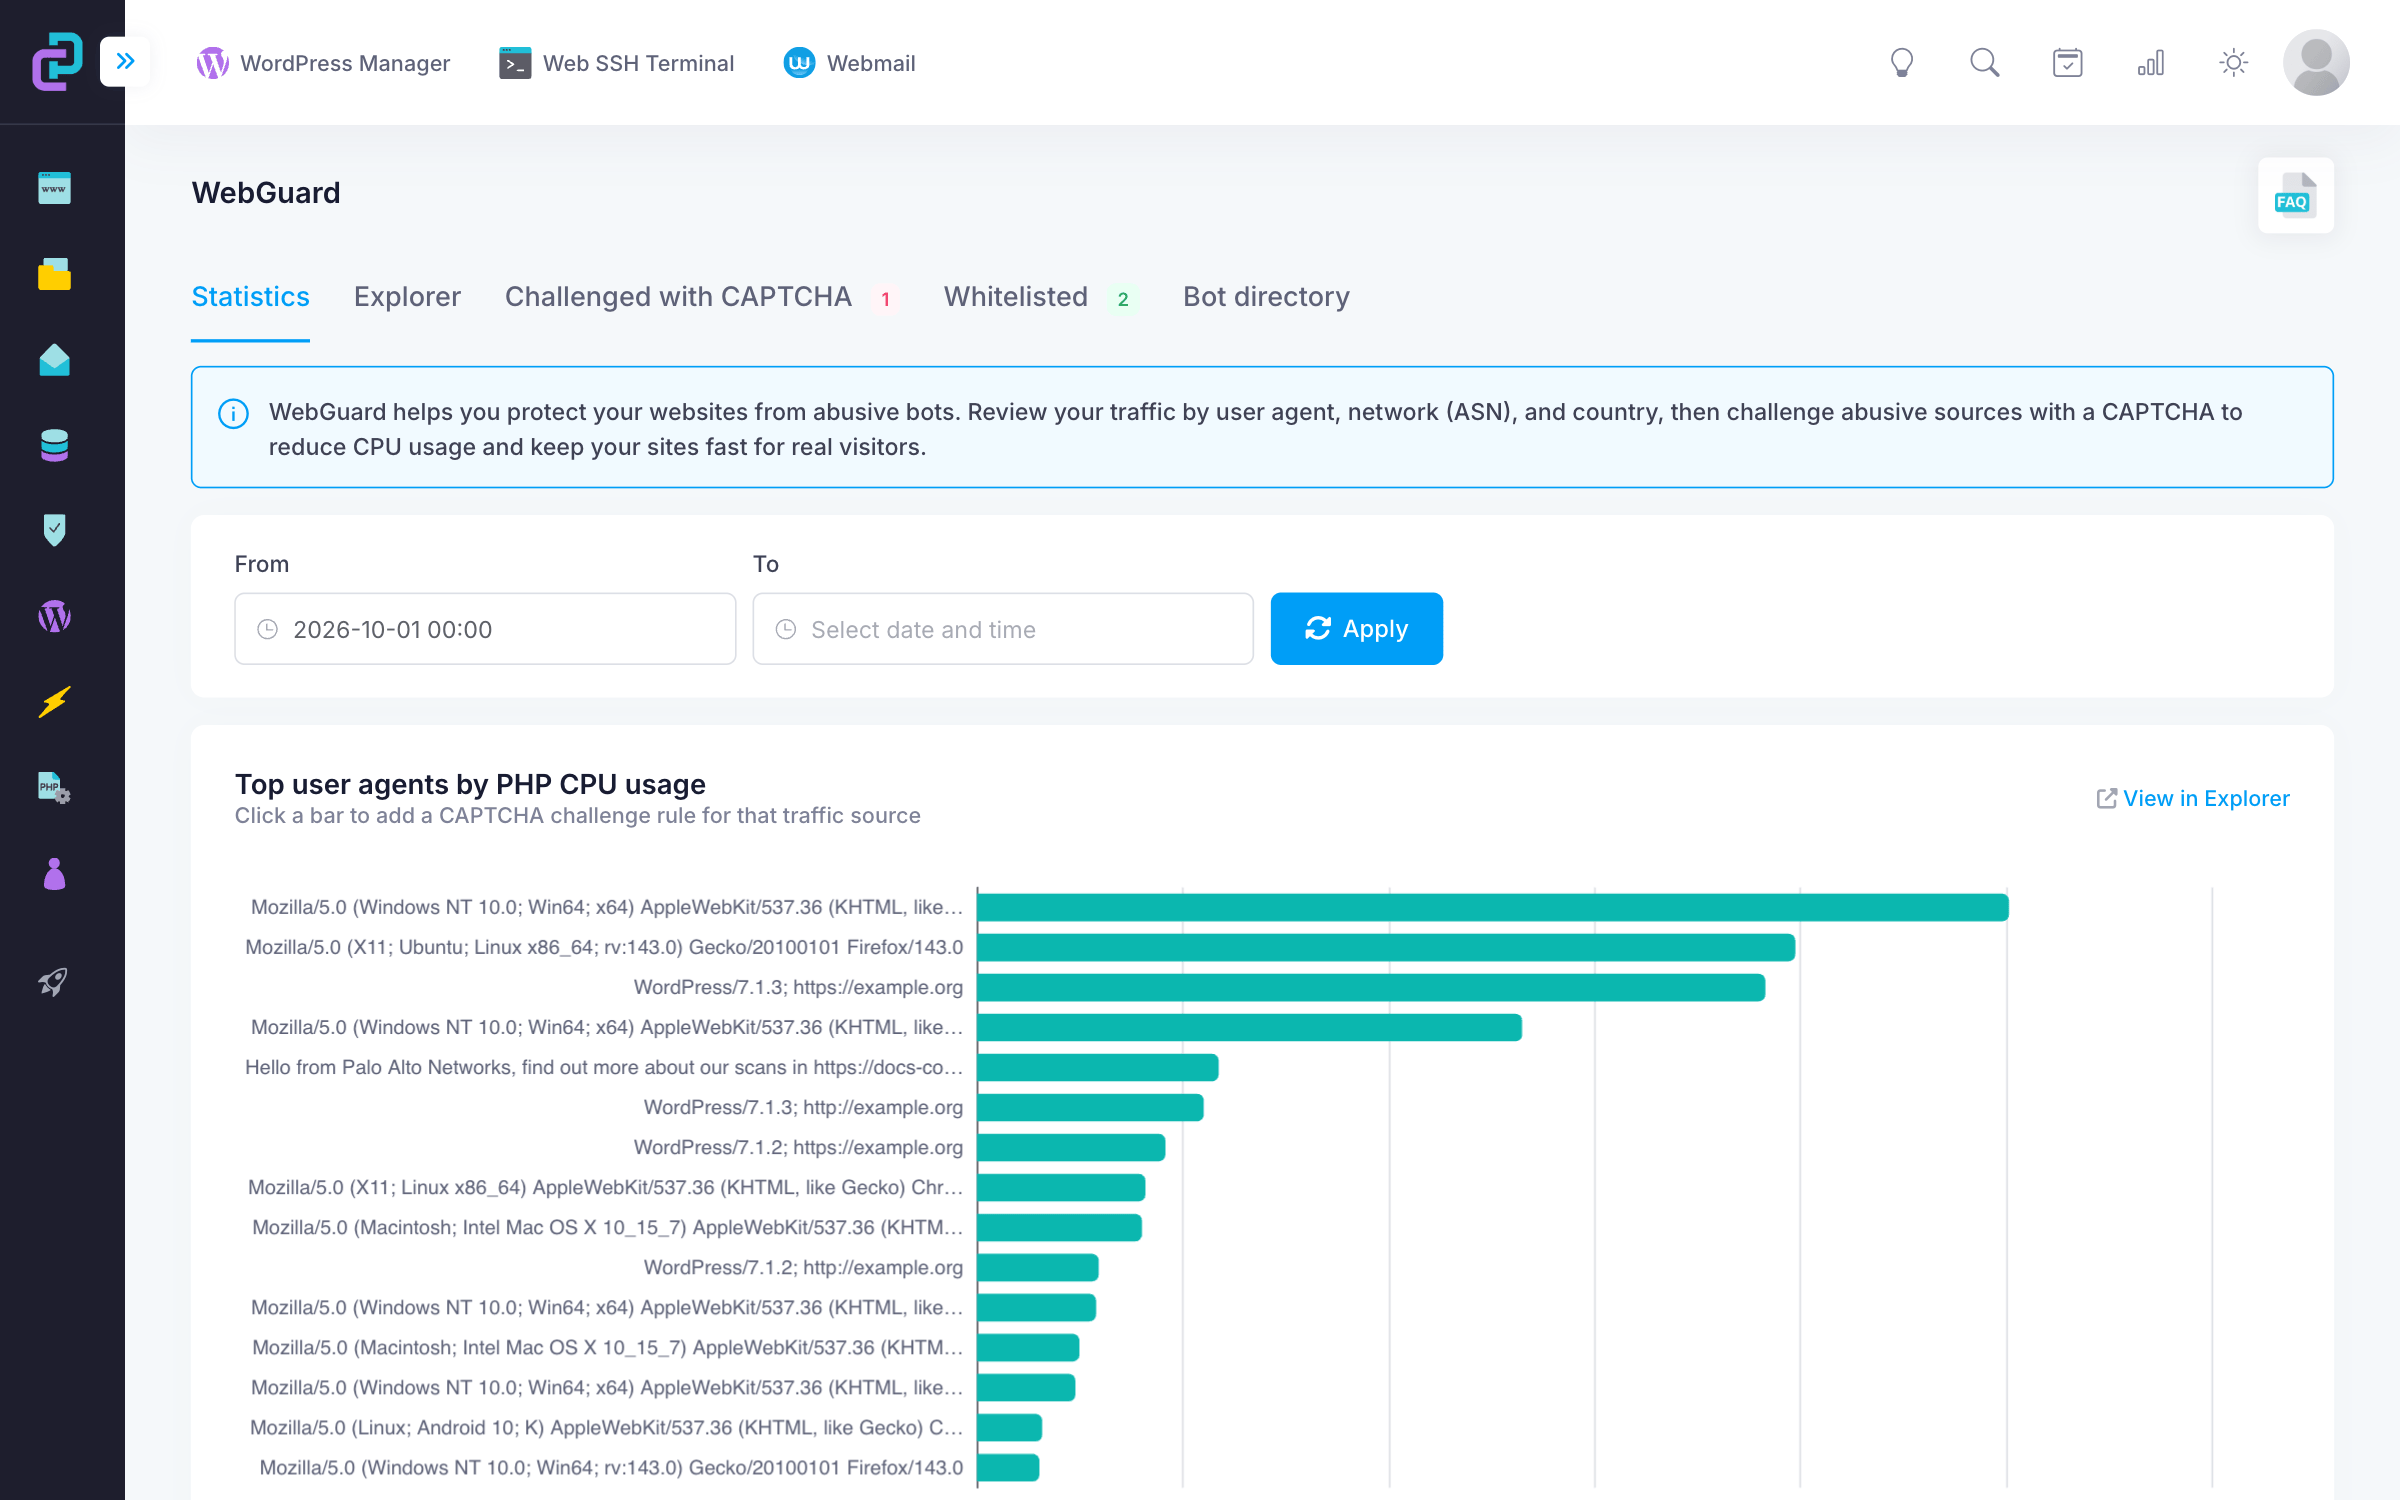
Clicking the From field opens a date picker where you can choose a custom date and time or select a predefined period: Last hour, Today, Last 24 hours, Last 7 days, Last 30 days, or This month. After selecting a period, please click the Apply button to update the results.
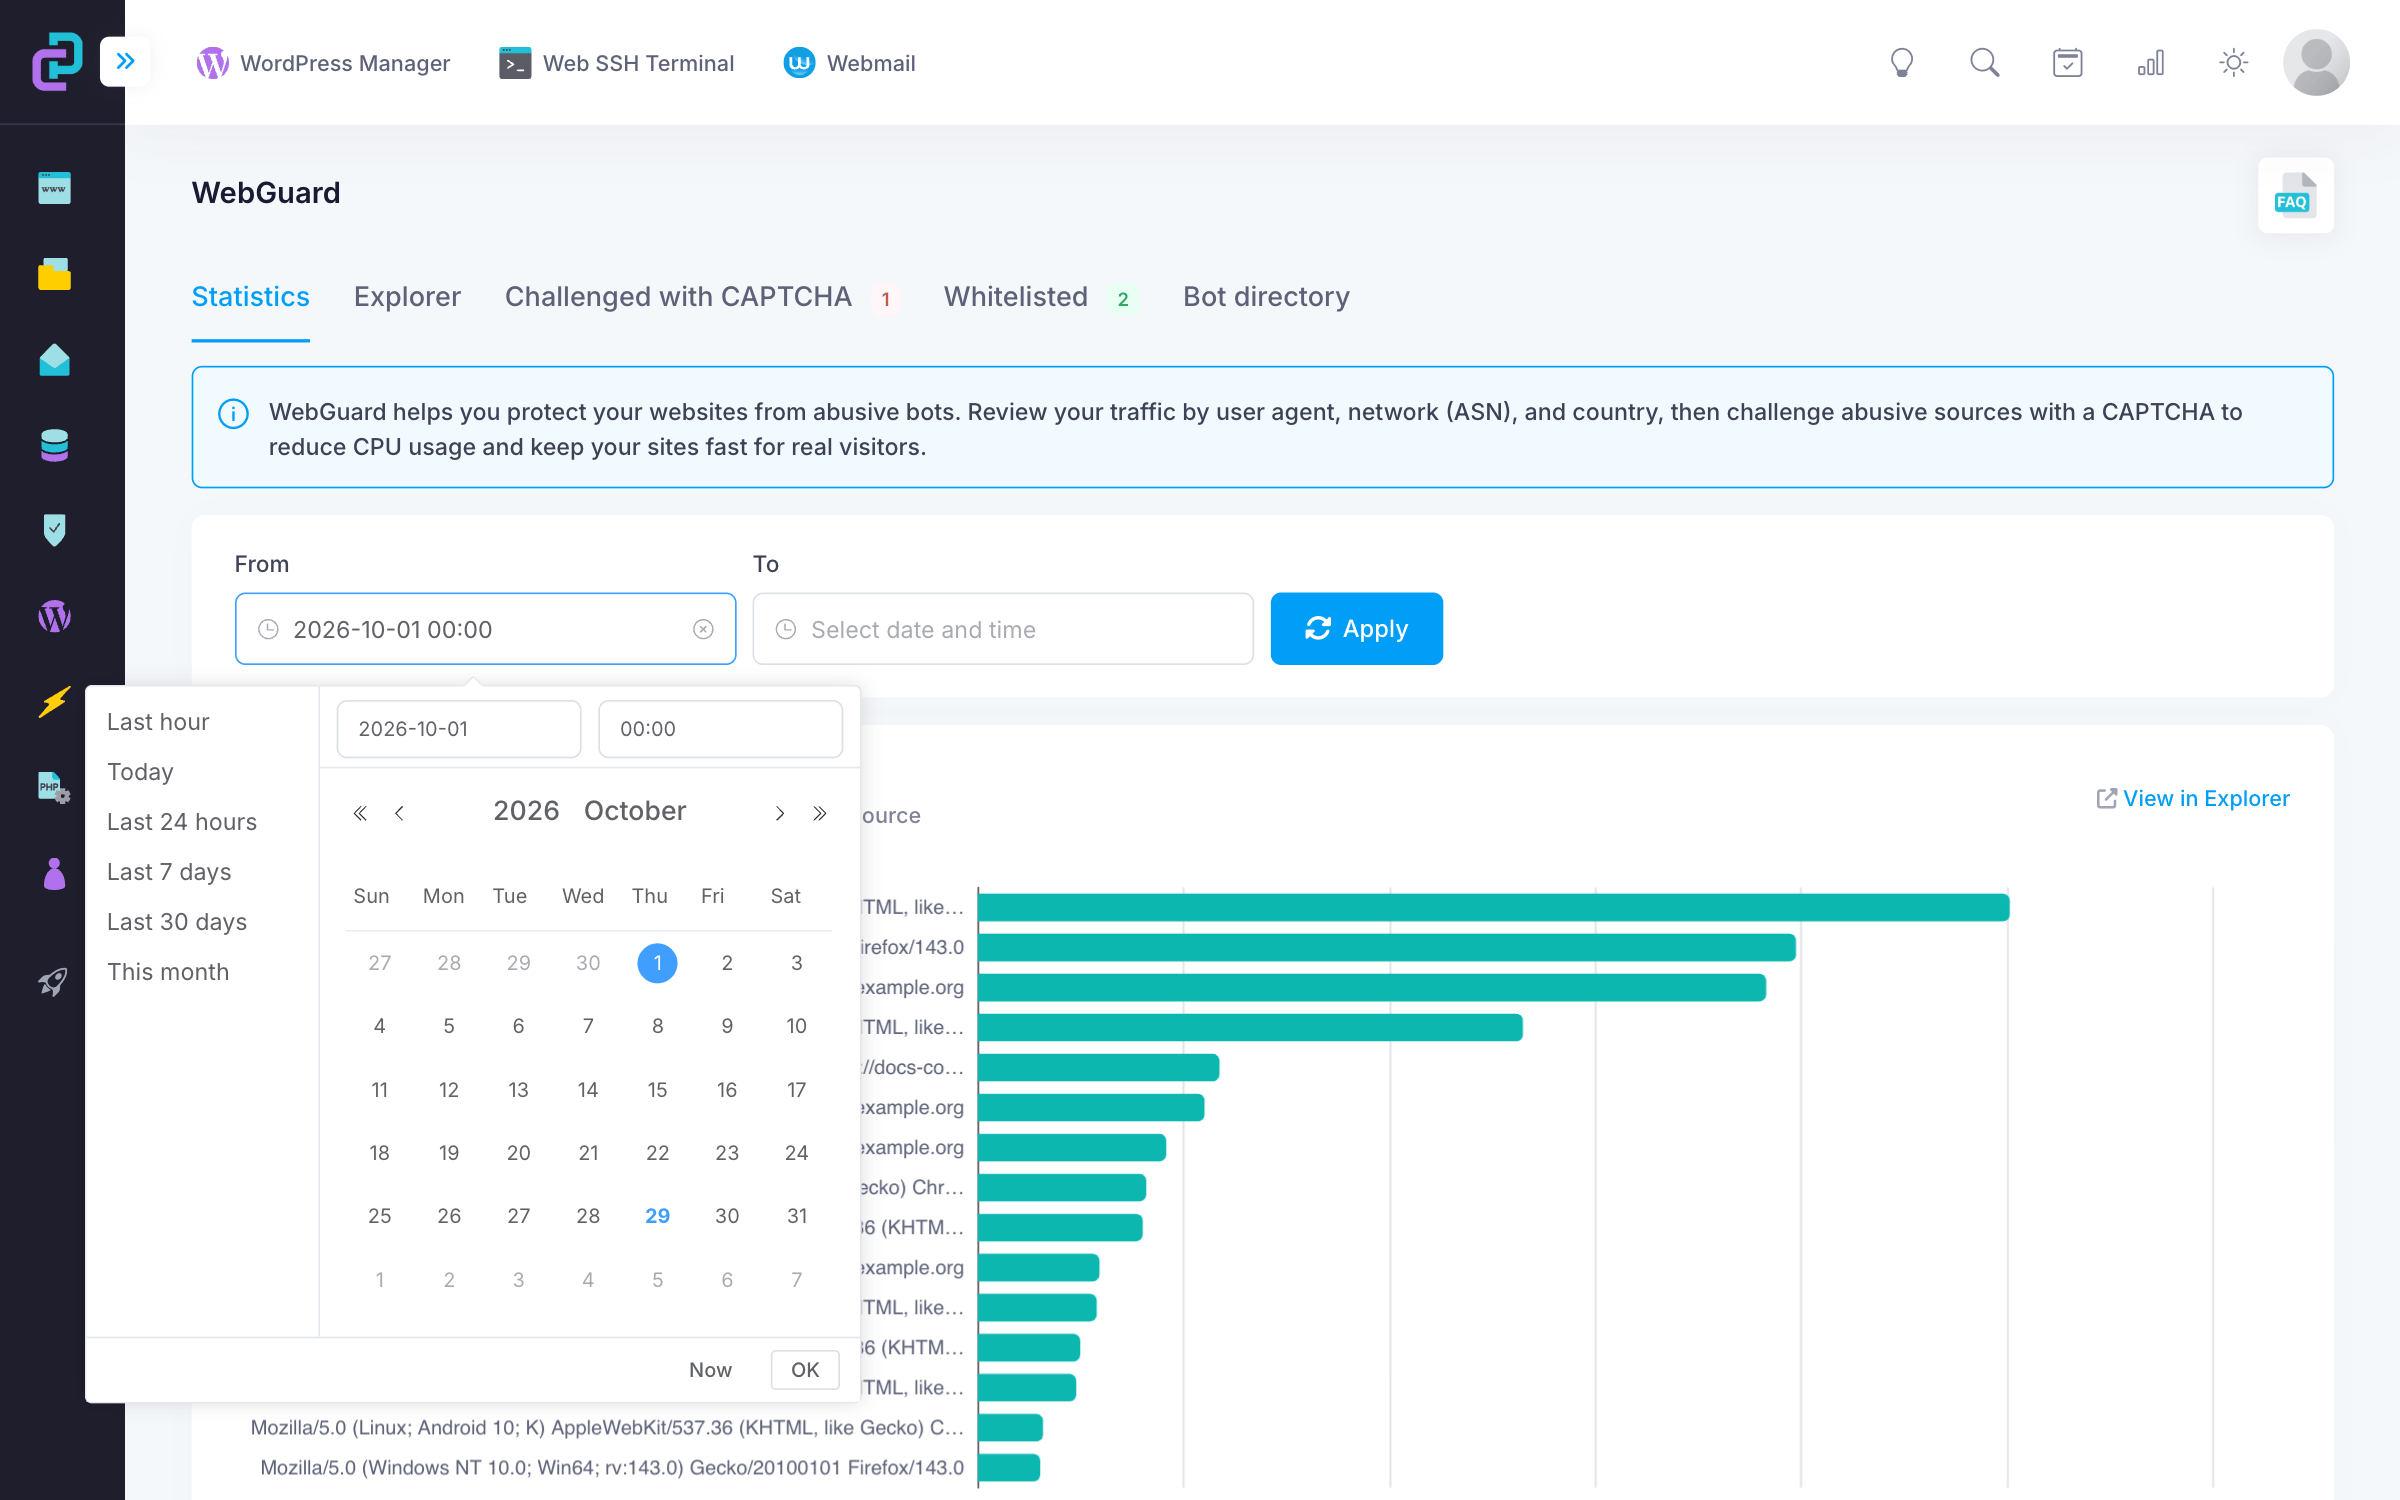
Clicking the To field opens a custom date and time picker, without the predefined periods. Use it to set the end of the period, so you can look at a specific range in the past instead of one that always ends now, for instance two days ago or last Wednesday.
Each chart says "Click a bar to add a CAPTCHA challenge rule for that traffic source". When you click a bar, such as a user agent, country, or network, WebGuard opens the Add challenge (CAPTCHA) rule dialog with the selected value already filled in, so you can quickly create a challenge rule for that specific traffic source.
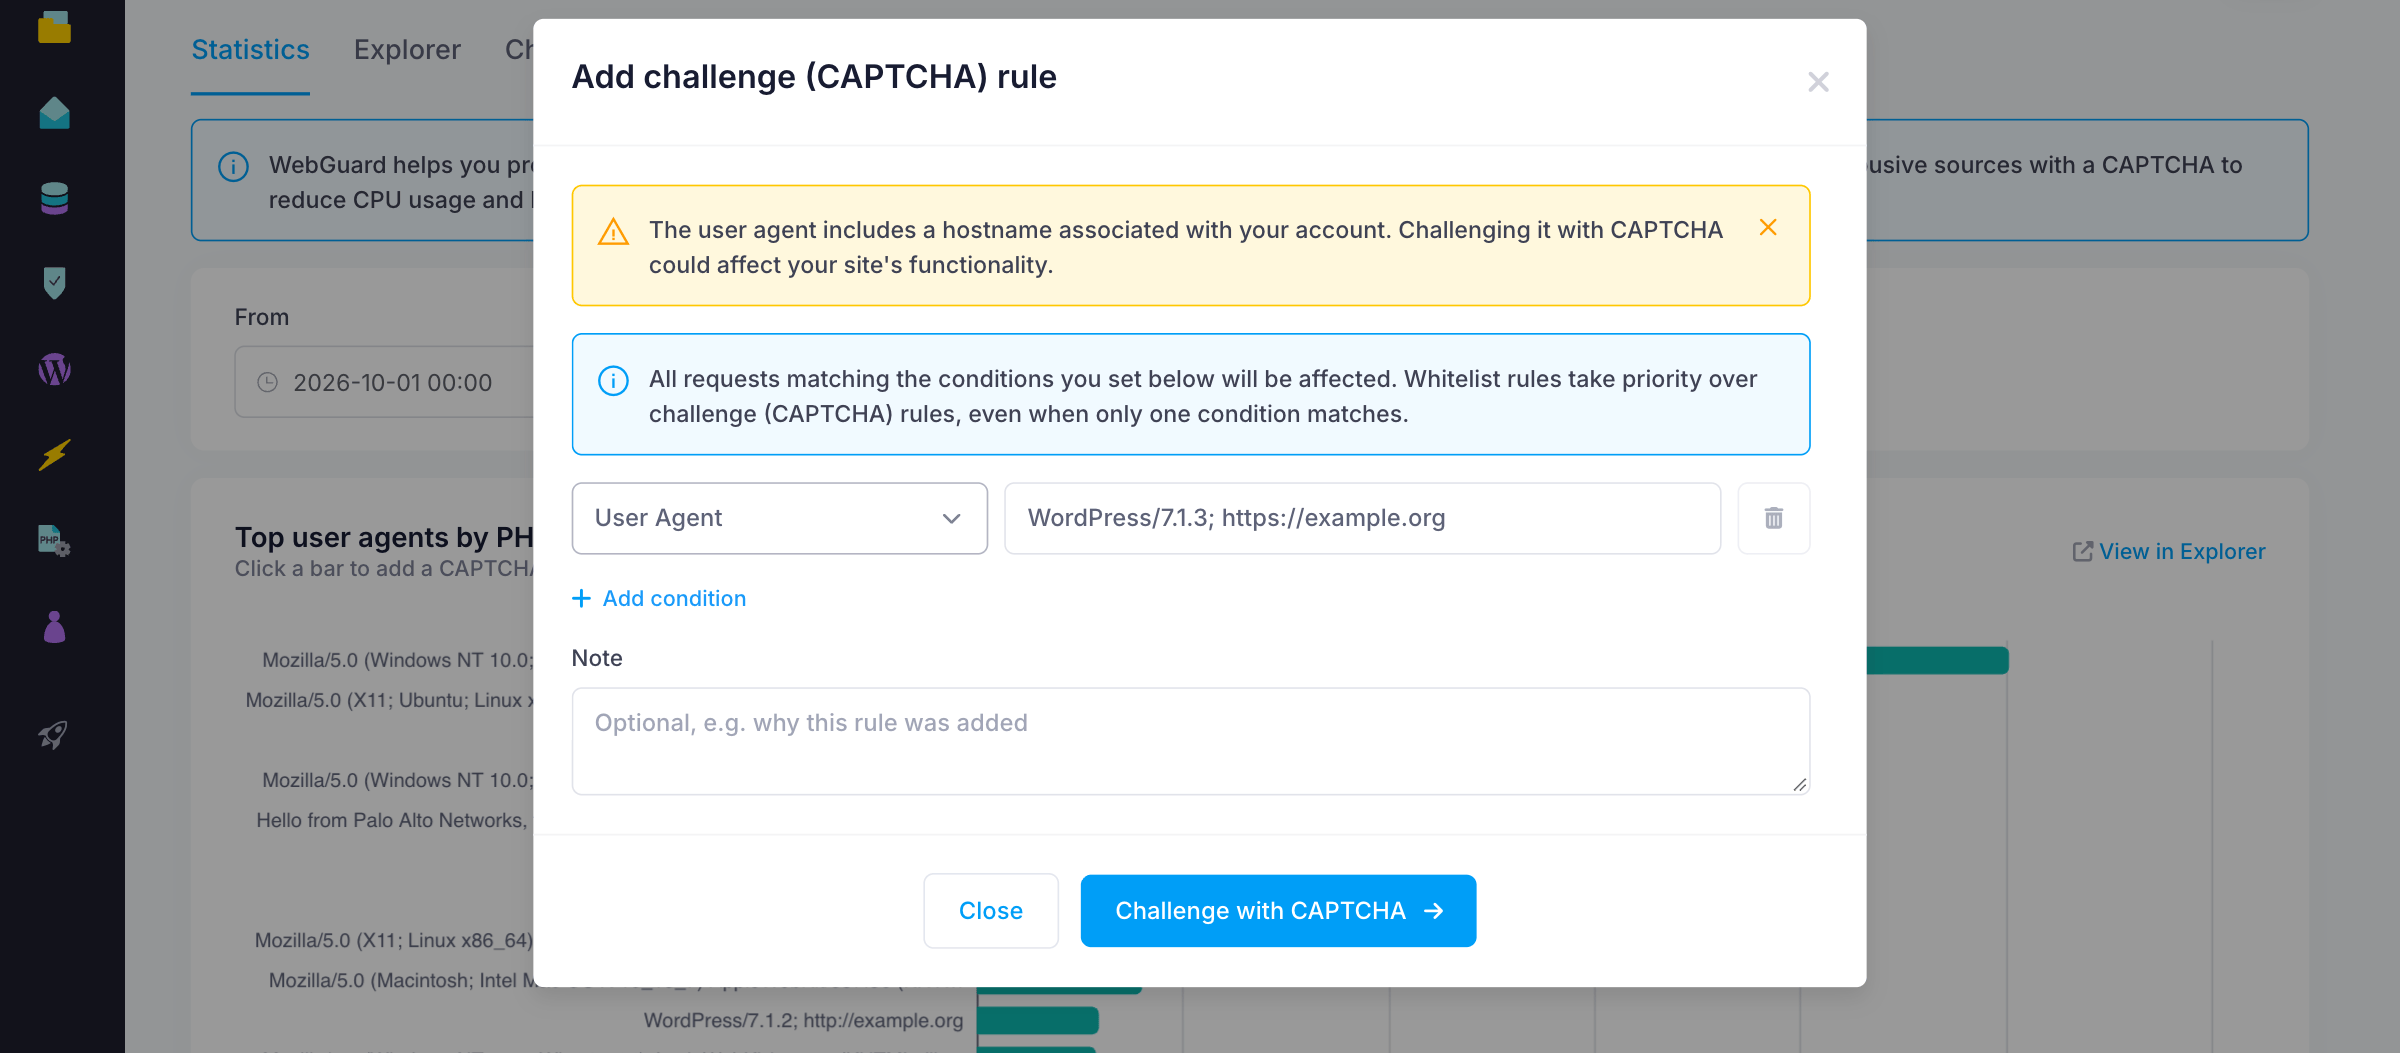
Please note that WebGuard shows a warning when the selected user agent includes a hostname associated with your account. Challenging it with CAPTCHA could affect the functionality of your website.
The section includes several charts and tables that highlight the most significant traffic sources:
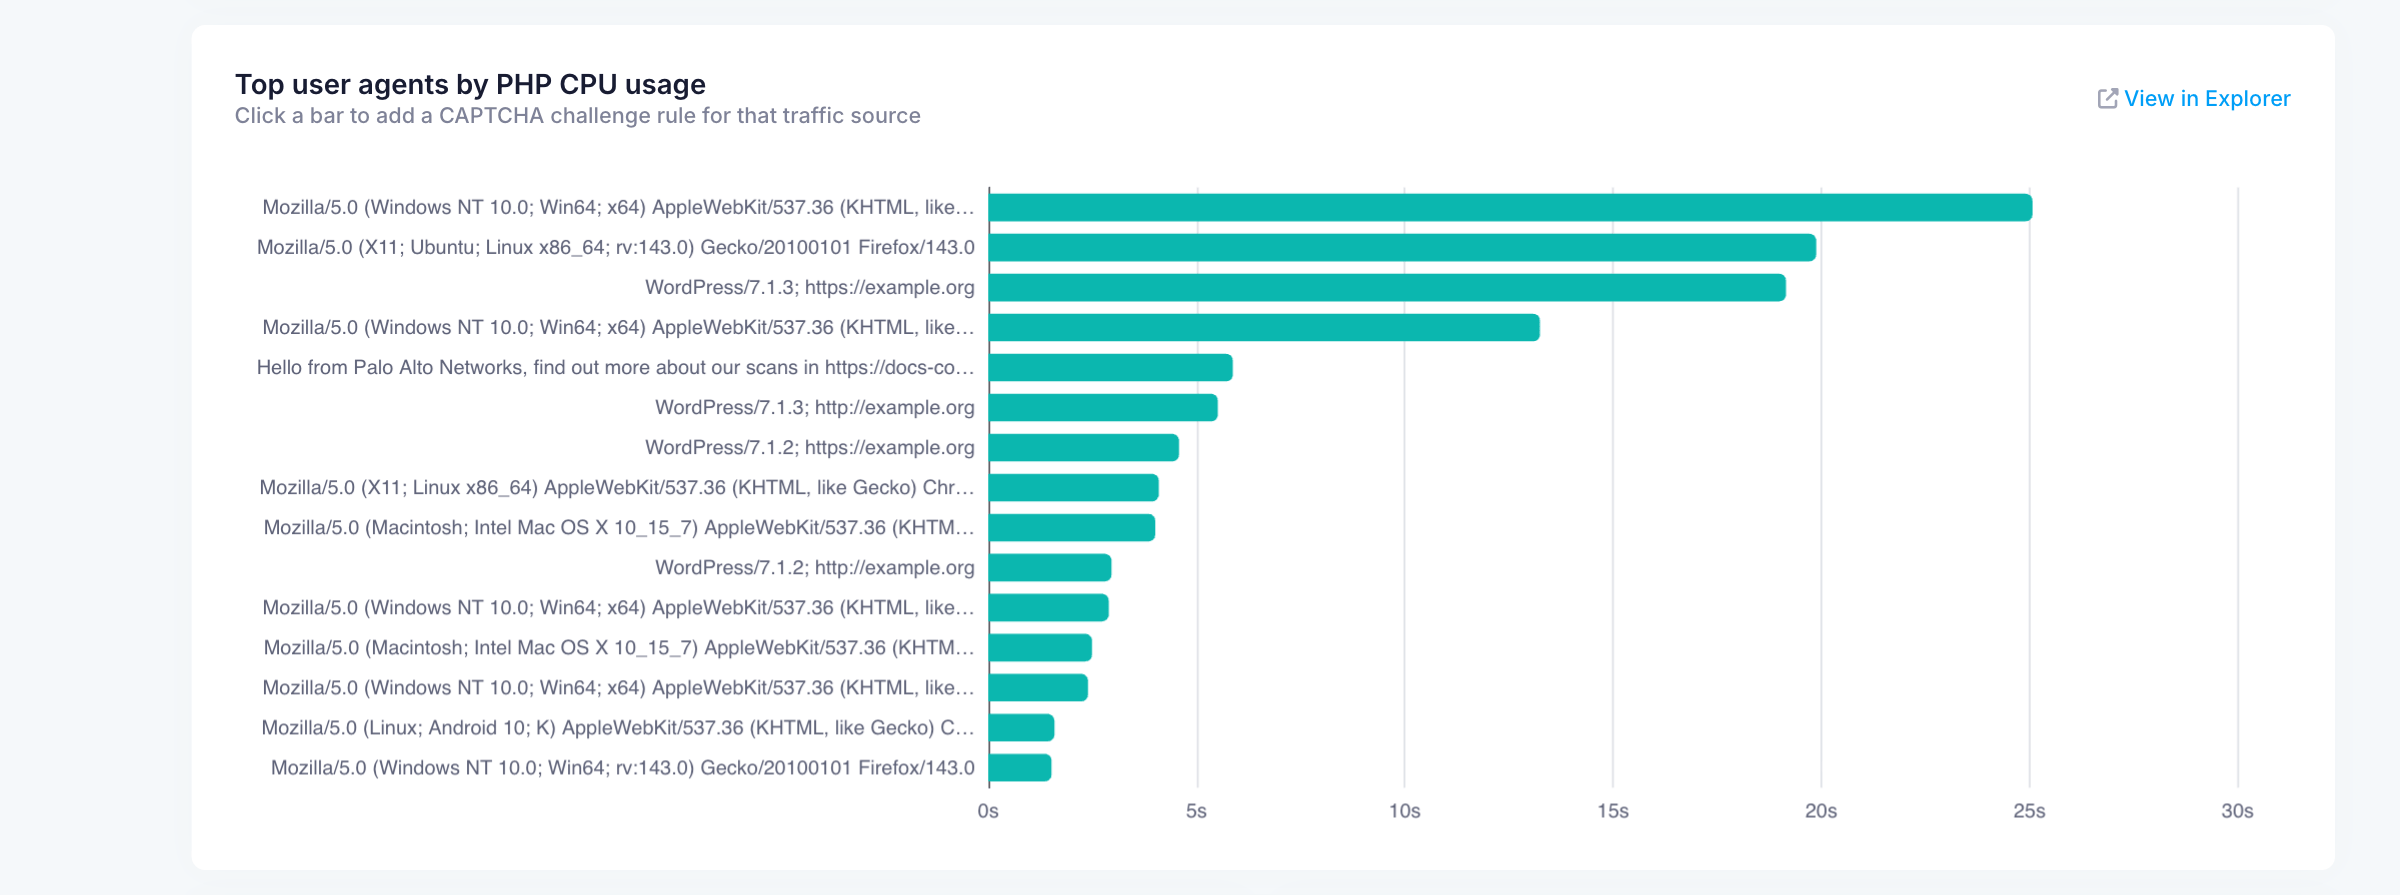
Top user agents by PHP CPU usage
A bar chart showing which user agents generate the most PHP CPU usage.
Top countries by PHP CPU usage
A bar chart showing which countries generate the most PHP CPU usage.
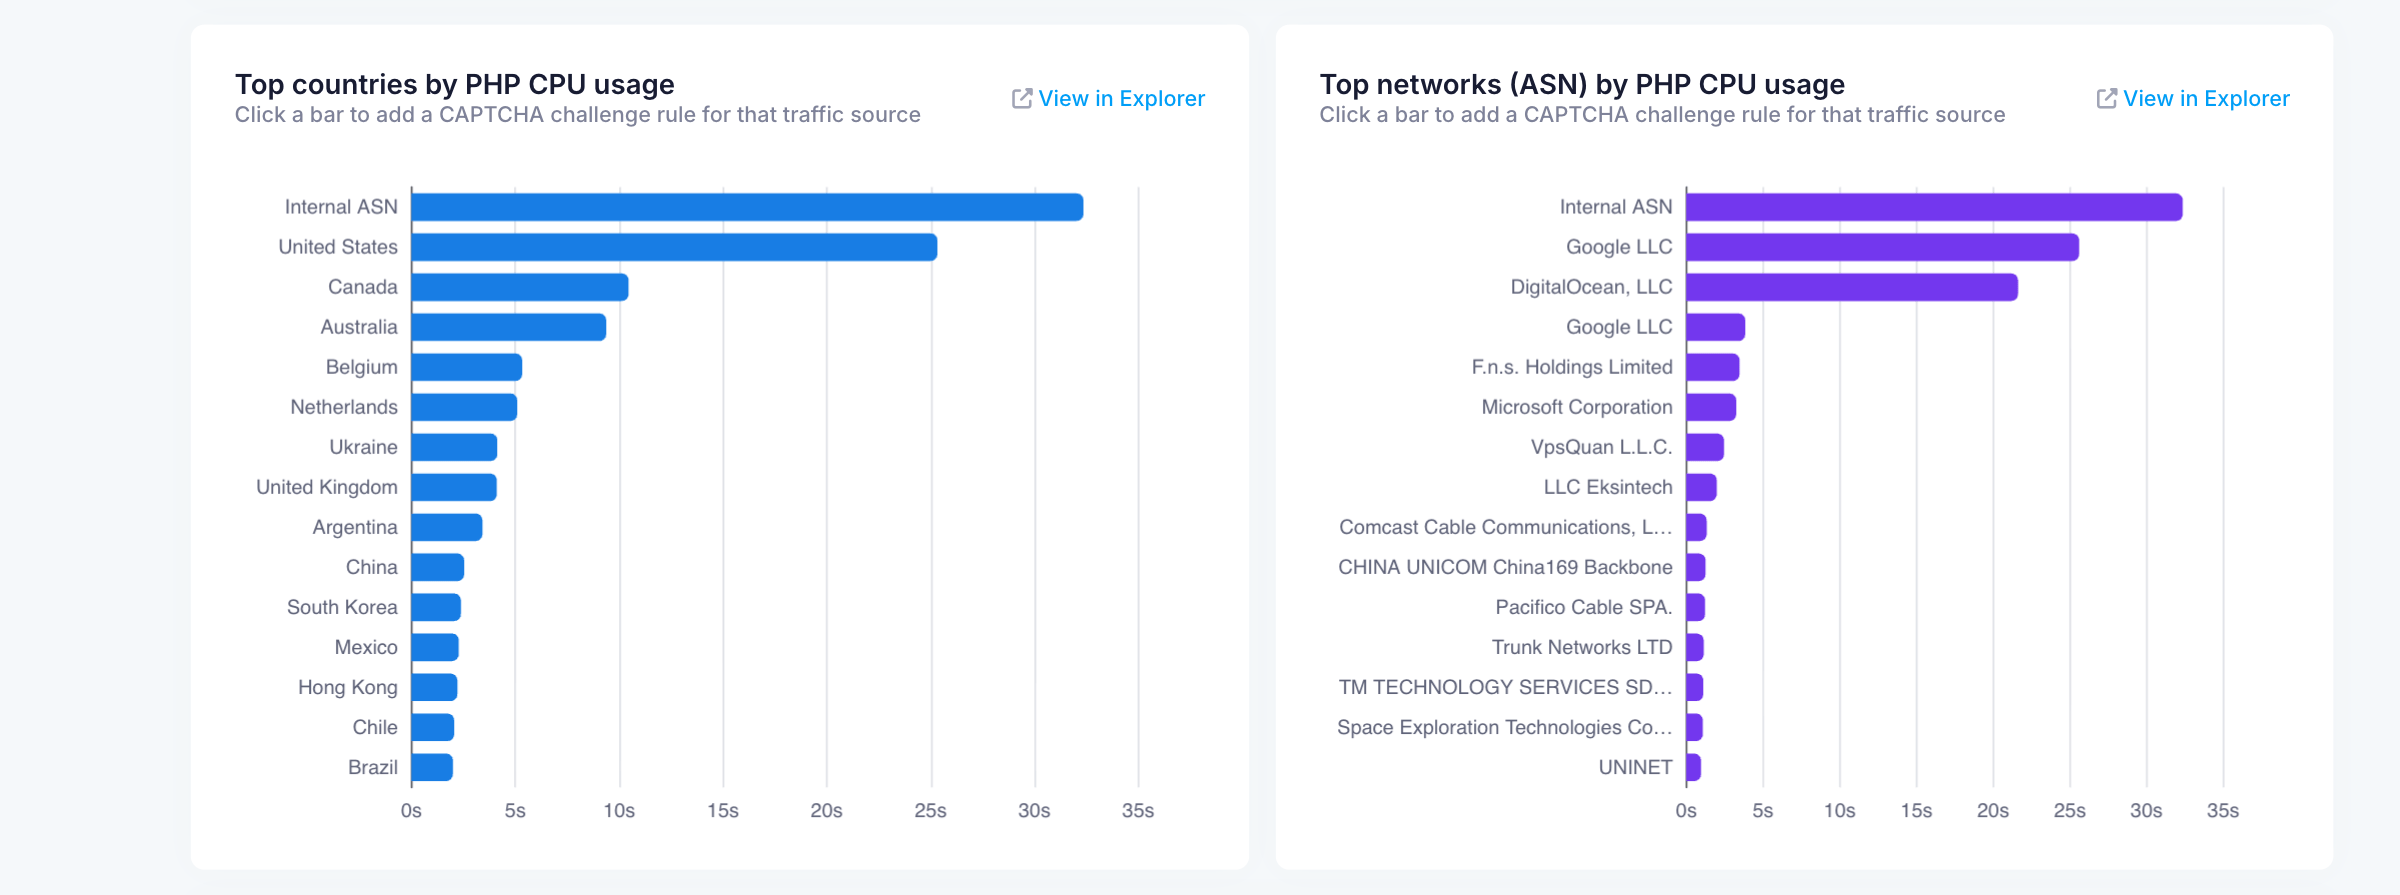
The screenshot above also shows the Top networks (ASN) chart, which is described below.
Top networks (ASN) by PHP CPU usage
ASN (Autonomous System Number) identifies the network that owns and routes an IP address.
A bar chart ranking networks by PHP CPU usage, shown on the right side of the screenshot above.
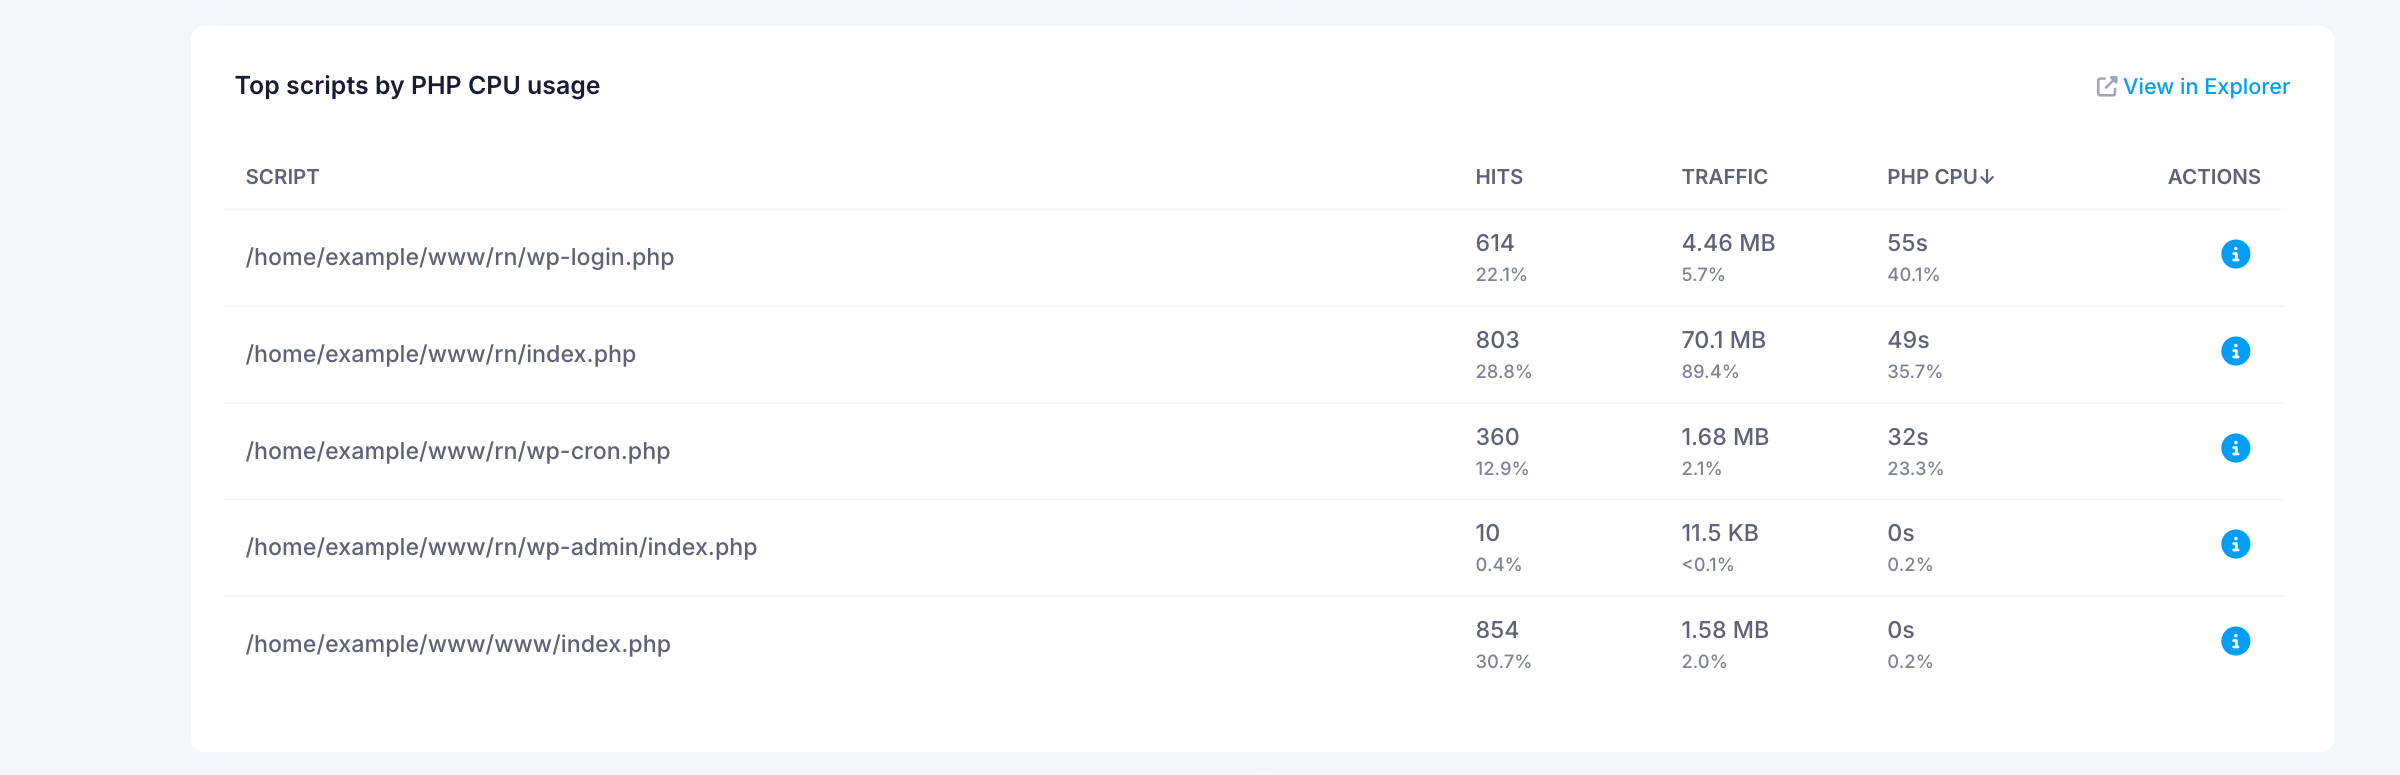
Top scripts by PHP CPU usage
A table showing which PHP scripts of your website use the most PHP CPU. For each script it shows the hits, the traffic, and the PHP CPU usage, each with its percentage of the total. The View in Explorer link opens the same data in the Explorer section.
Scripts cannot be challenged with CAPTCHA, so this table has no action buttons, only an information icon with the message "To reduce a script's CPU usage, challenge the user agent, network (ASN), or country sending the most requests to it." Challenge and whitelist rules can be created only for user agents, categories, networks (ASN), and countries.
Top combinations tables
Four tables show the top combinations of the main traffic sources: User Agent, Network (ASN), and Country.
- Top combinations by User Agent and Country
- Top combinations by User Agent and Network (ASN)
- Top combinations by User Agent, Network (ASN), and Country
- Top combinations by Network (ASN) and Country
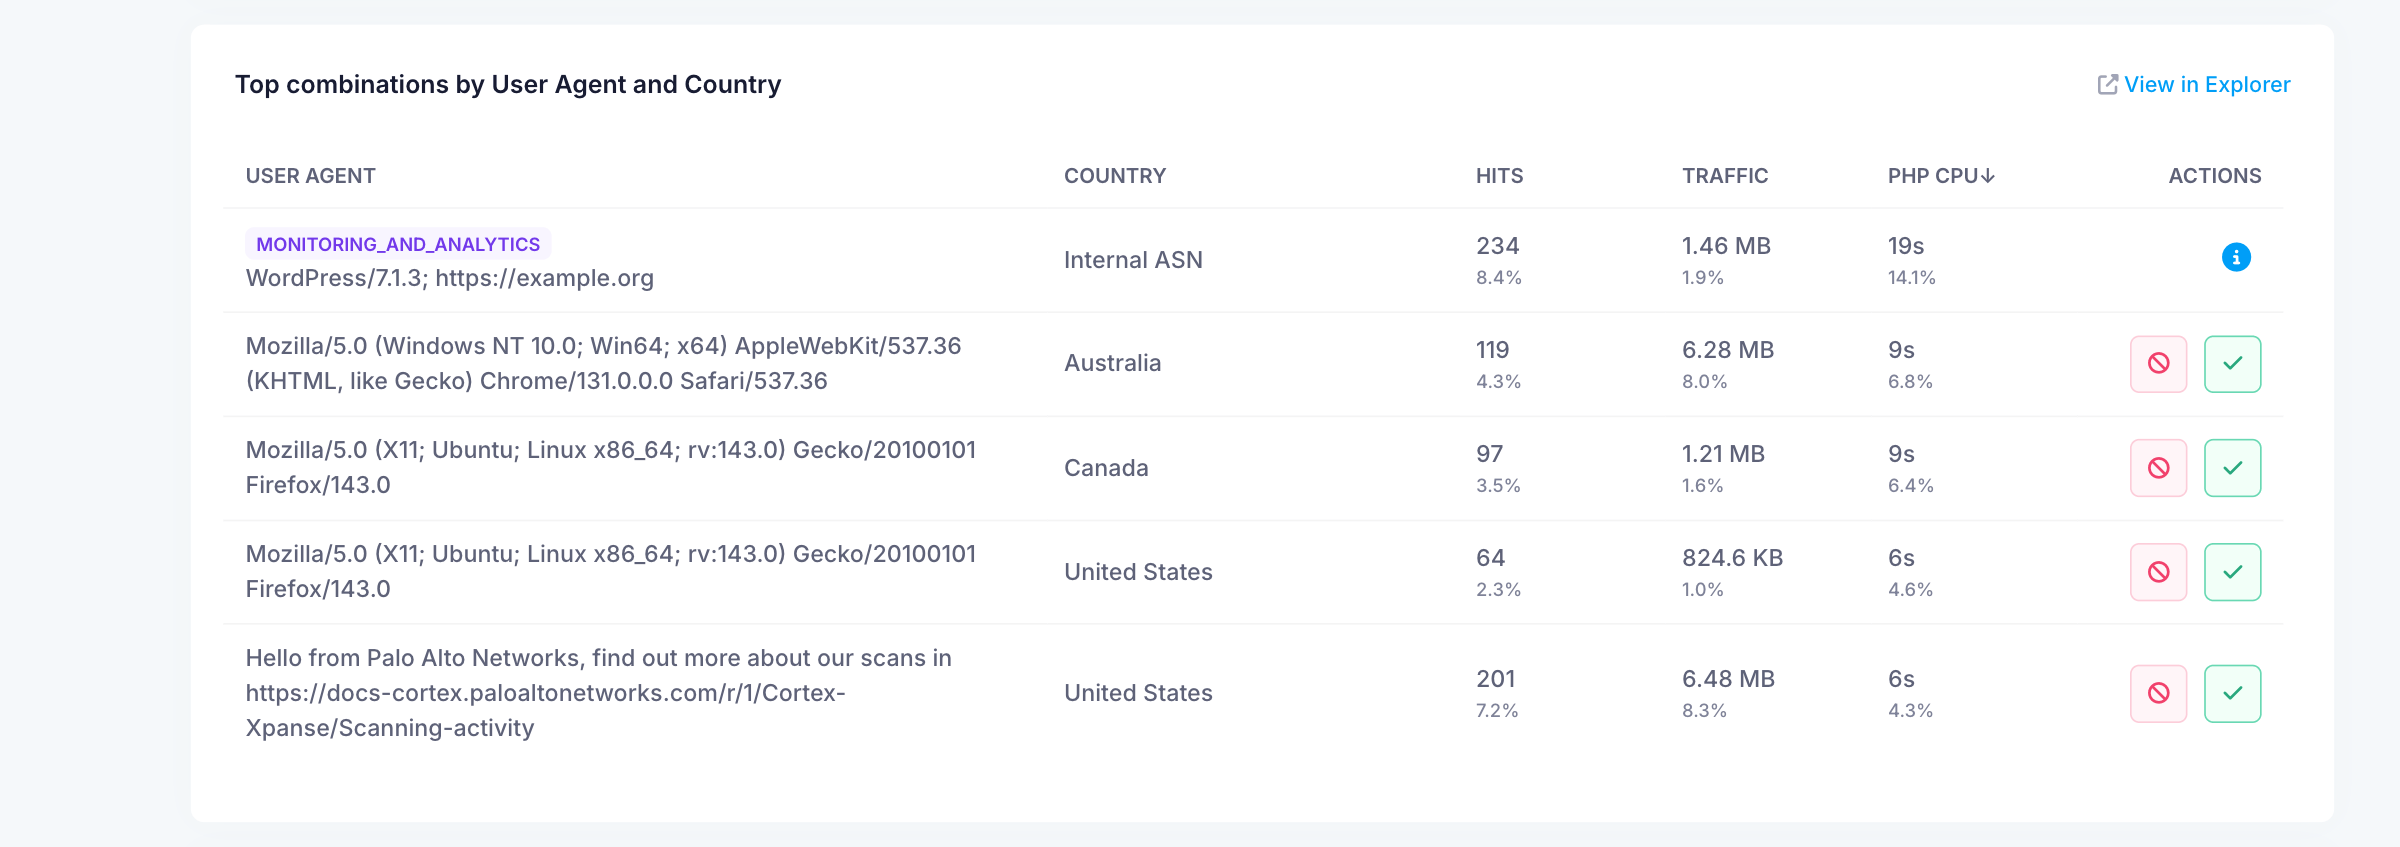
The ACTIONS column of each row has two buttons: the red button creates a challenge rule and the green button creates a whitelist rule for that specific group.
Each table includes a View in Explorer link that opens the combination in the Explorer section, where you can see all matching results for the corresponding combination. For instance, if you click View in Explorer in the "Top combinations by User Agent and Country" table, you will go to Explorer and see all matching results grouped by user agent and country.
Explorer
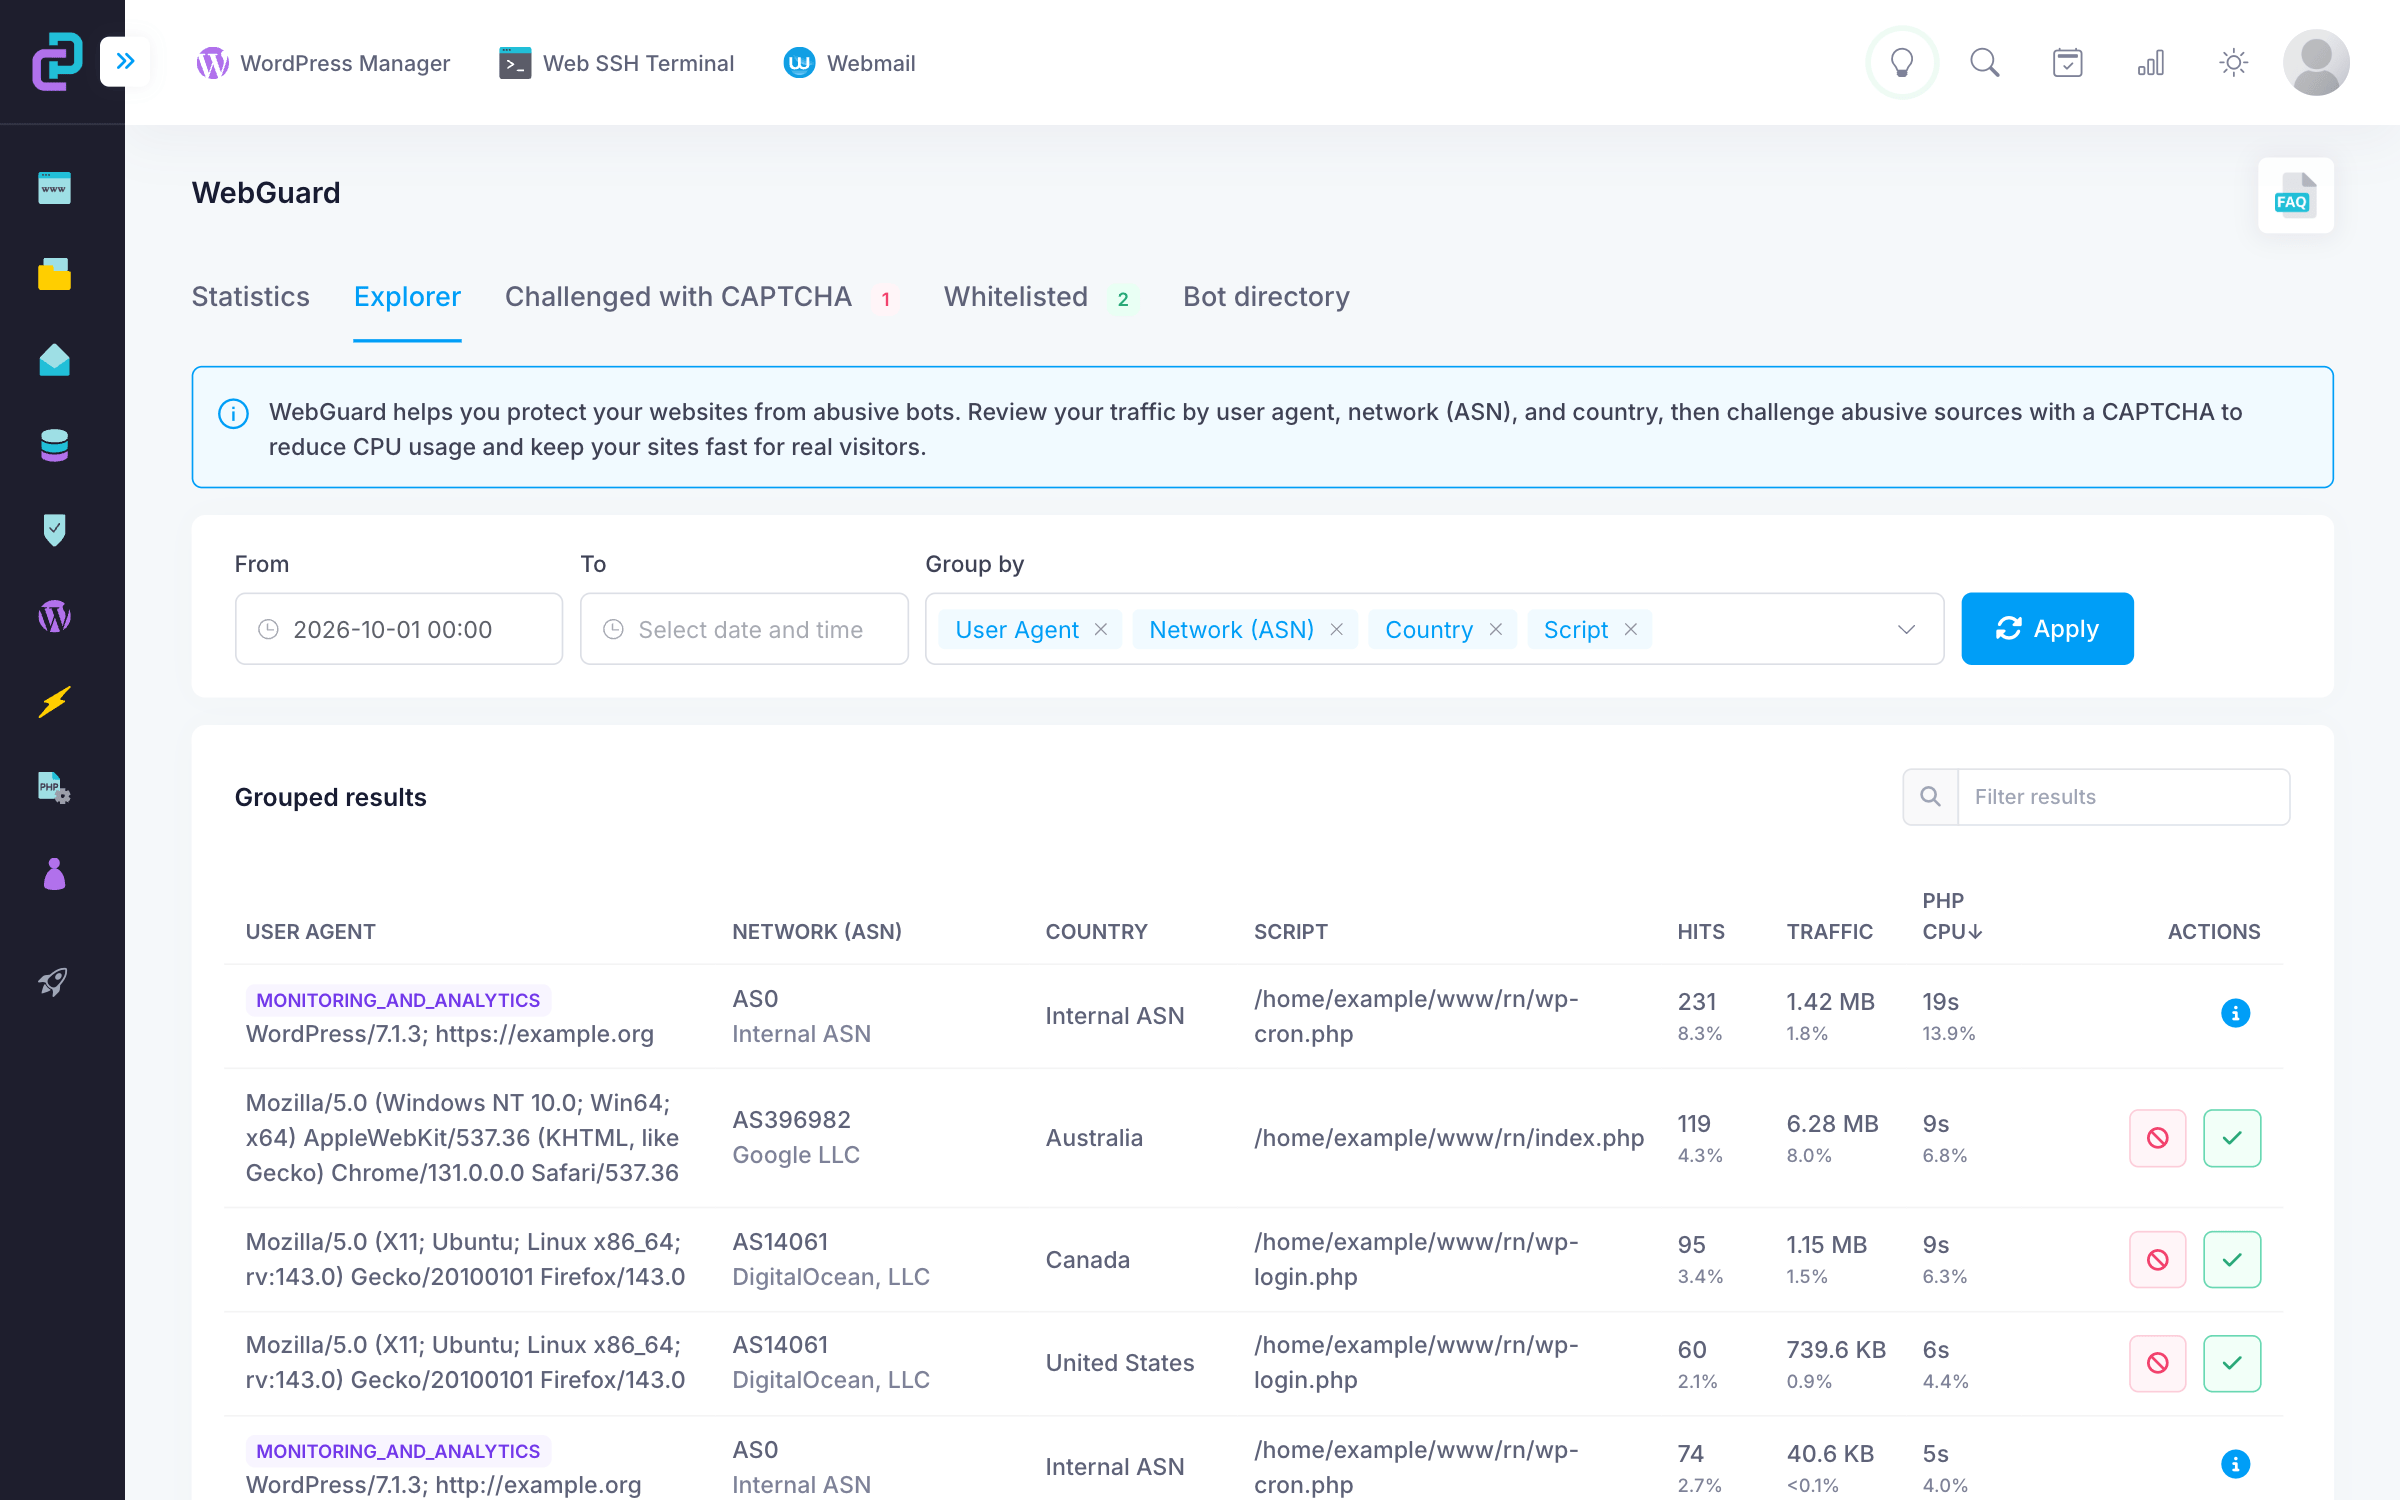
The Explorer section lets you review all traffic groups that match your selected filters and apply challenge or whitelist rules accordingly.
Filters
At the top, you can filter by date and by group:
- From and To date and time
- Group by: User Agent, Network (ASN), Country, Script
The From field works the same way as in Statistics. After selecting a period and the traffic sources to group by, please click the Apply button to update the results.
Grouped results
Each row represents a traffic group based on the selected traffic sources in the Group by field. You can narrow the list with the Filter results field. The table shows:
- User agent
- Network (ASN)
- Country
- Script
- Hits, Traffic, and PHP CPU, each with its percentage of the total
- Actions
Actions
Each row includes two buttons that let you create a challenge rule (red) or a whitelist rule (green) for that specific traffic group.
Traffic coming from our internal networks is marked as Internal ASN. No rules can be applied to this network, so these entries show an information icon instead of the two action buttons. The icon shows the message "Internal ASN cannot be challenged with CAPTCHA."
Please note that Script is only a grouping option. A rule cannot be created for a specific script, because the available rule conditions are User Agent, Category, Network (ASN), and Country.
Challenged with CAPTCHA
The Challenged with CAPTCHA section lists all challenge (CAPTCHA) rules. Traffic that matches a rule receives a CAPTCHA challenge.

The page is titled Challenge (CAPTCHA) rules. The table shows the user agent, country, network (ASN), and category of each rule, whether the rule is active, and when it was created.
Adding a rule
Click the Add rule button in the top right to open the Add challenge (CAPTCHA) rule dialog.
Please be careful when challenging broad traffic sources. A rule targeting a whole country, a large network (ASN), or a category such as ACCESSIBILITY, WEBHOOKS, SEARCH_ENGINE_CRAWLER, or MONITORING_AND_ANALYTICS can also challenge legitimate visitors, screen readers, payment or notification webhooks, search engine indexing, and internal services that share that network or category. Please review the matching traffic in Explorer before creating such a rule.
- Select a condition type: User Agent, Category, Network (ASN), or Country, and enter or select its value.
- Optionally, click Add condition (it appears after you enter a value) to add more conditions to the same rule. Use the trash icon next to a condition to remove it.
- Optionally, add a Note, for instance why the rule was added. If you add a note, the rule's row then shows an information icon with your note text, the same way as for the rules WebGuard adds automatically (see Whitelisted).
- Click Challenge with CAPTCHA.
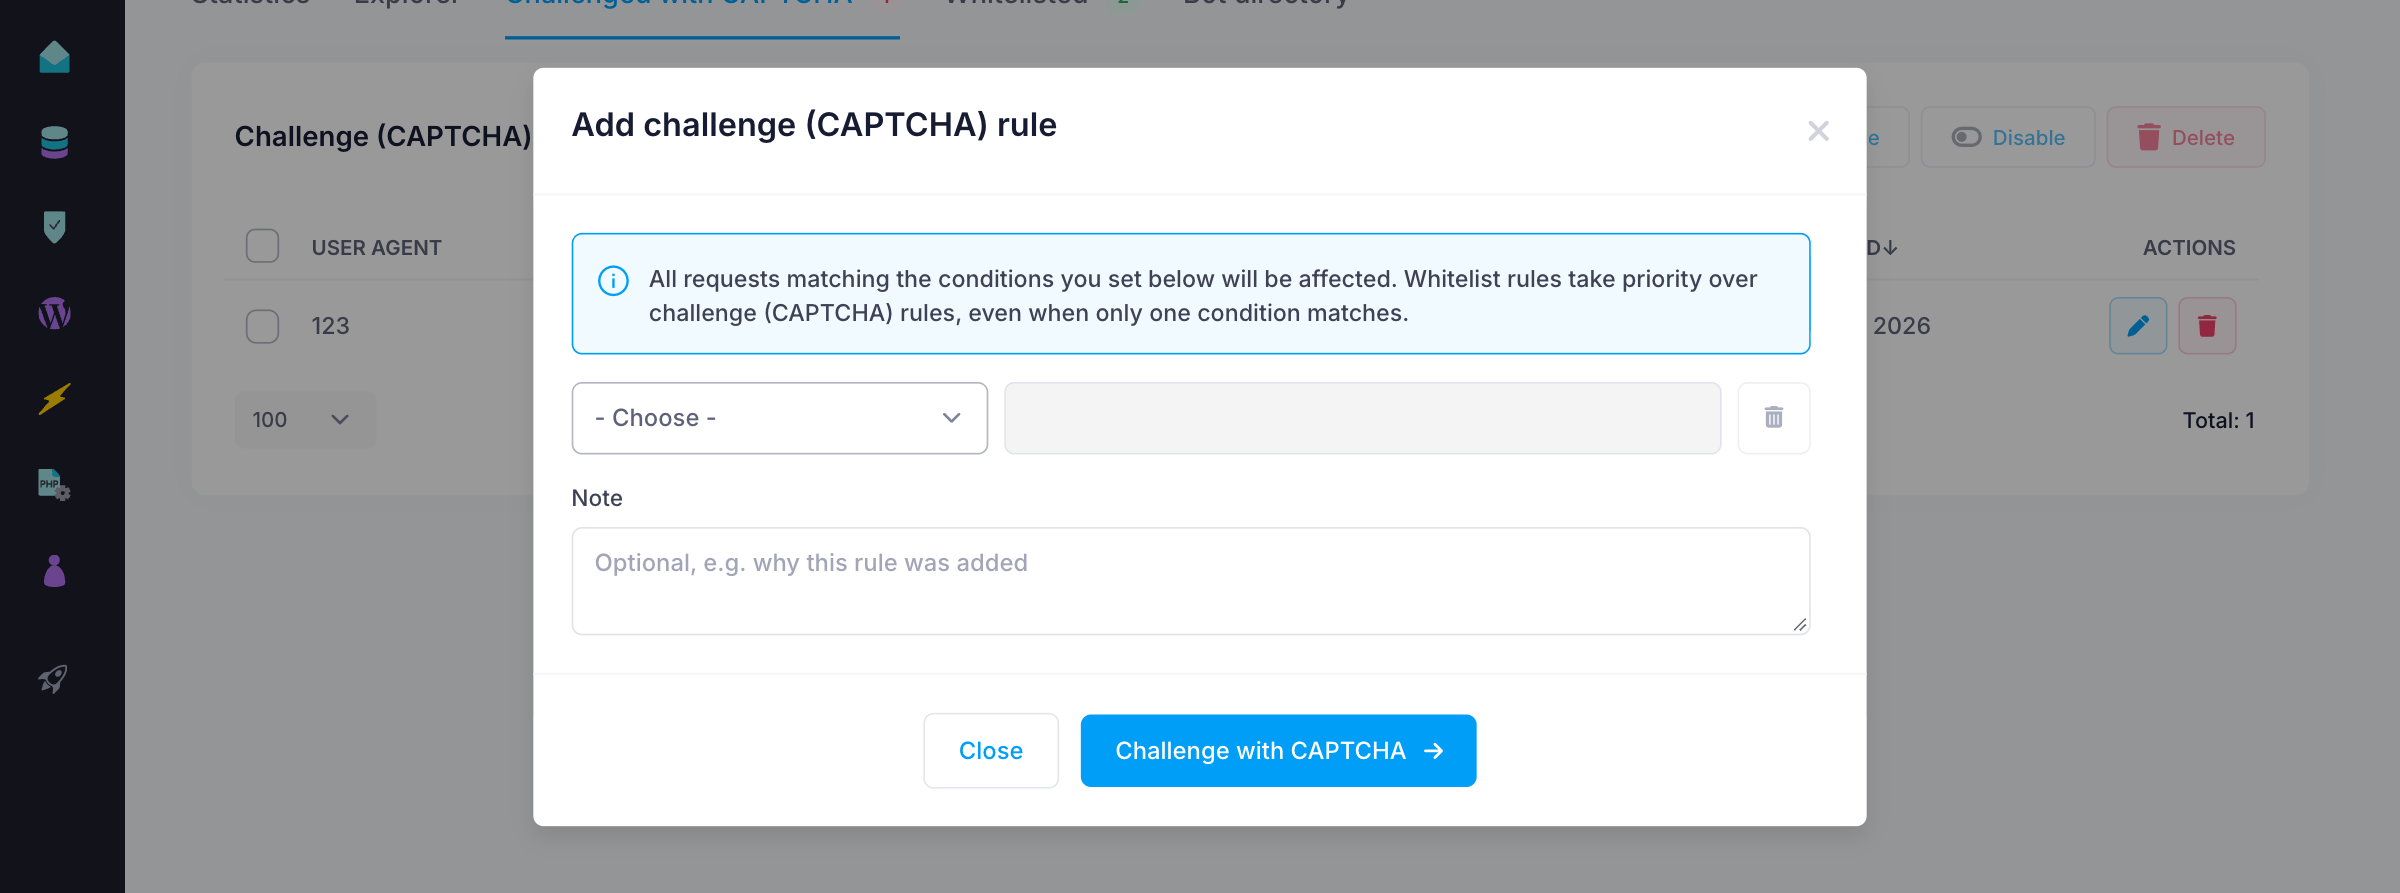
When a rule has more than one condition, a request is affected only when it matches all of them, not just one. For instance, a rule with both a User Agent and a Country condition challenges only requests that match that user agent from that country, not every request from that country. Whitelist rules take priority over challenge rules.
What visitors see
When a request matches a challenge rule, the visitor does not see your website right away. Instead, the visitor sees a page with the title "412 Request Blocked" and a CAPTCHA check (hCaptcha) with an I am human checkbox. The page shows the domain name of your website and the message "Complete the security check to access this page."
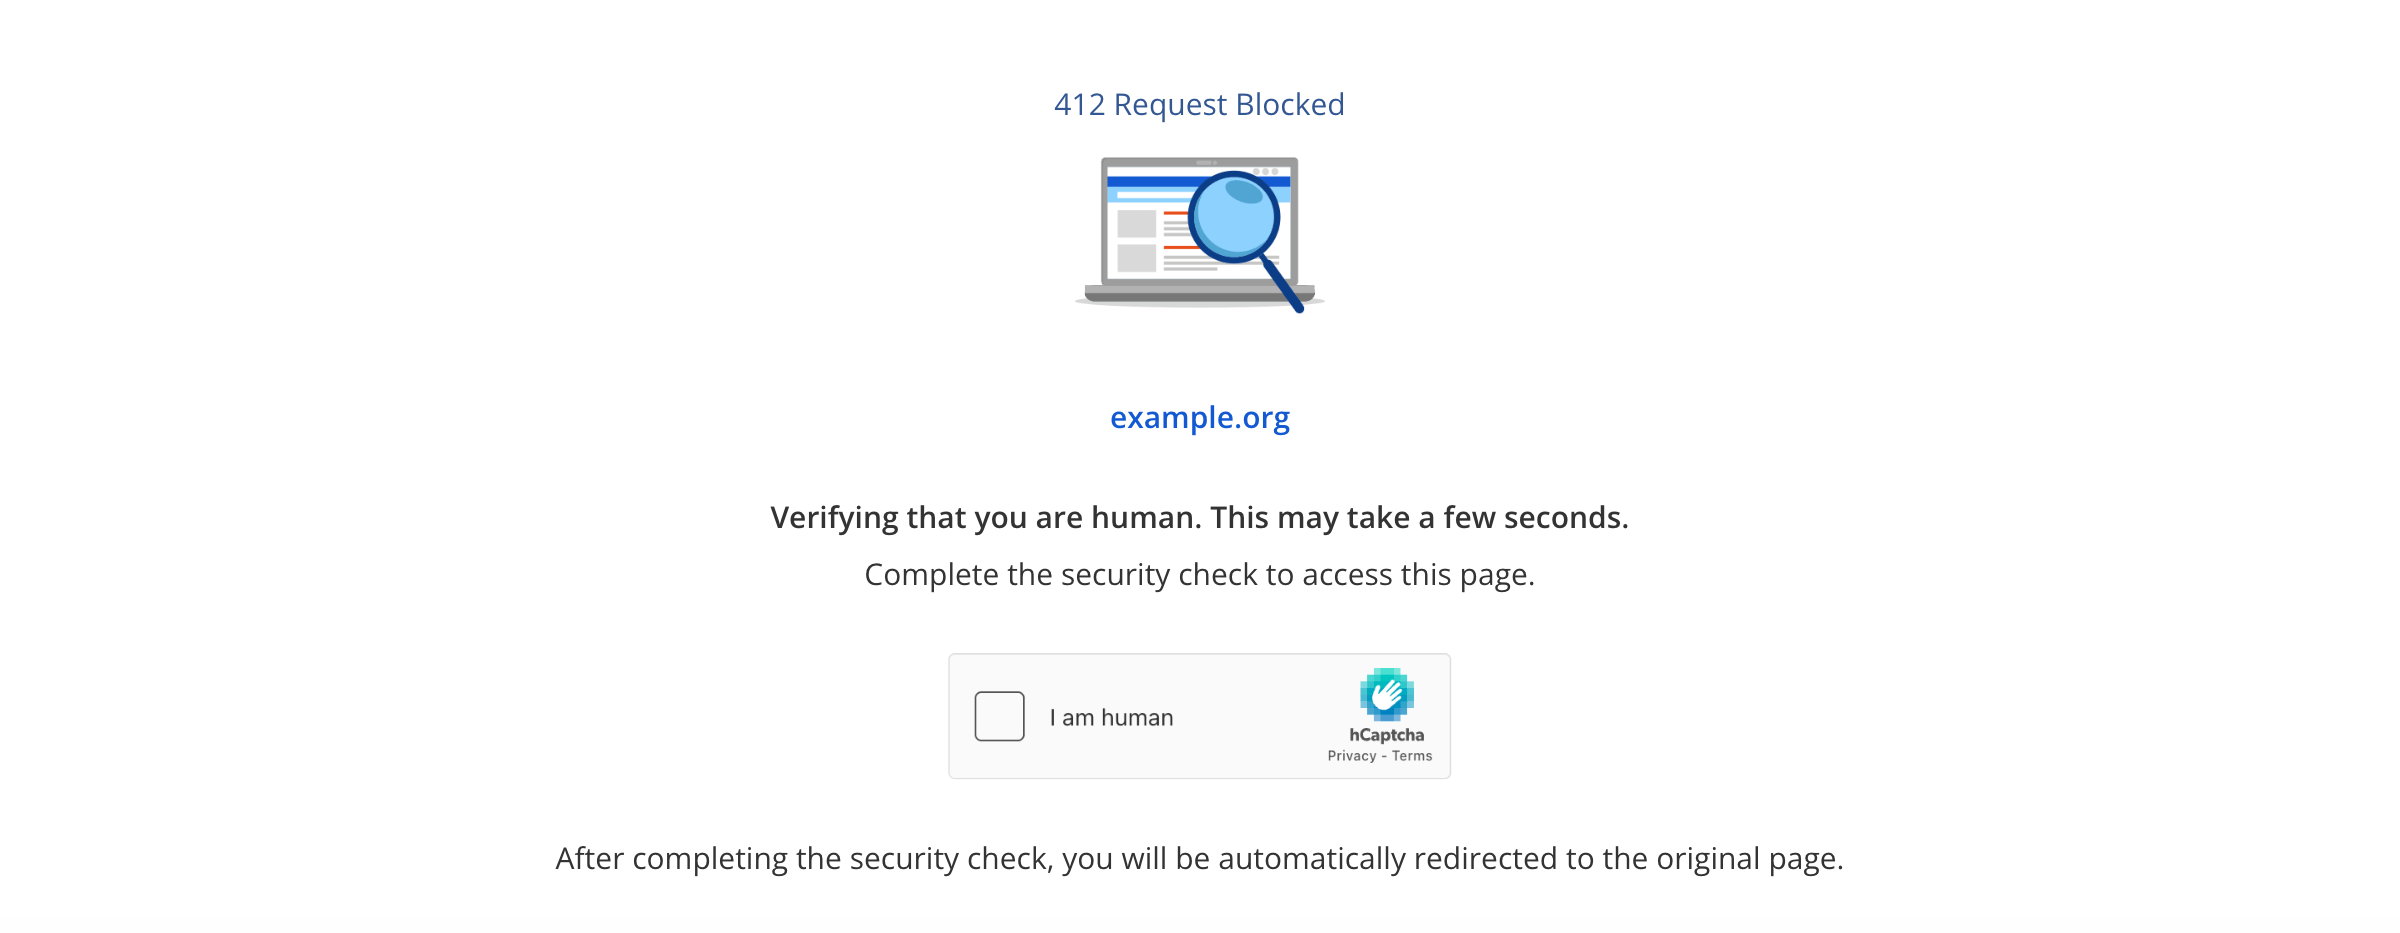
After completing the security check, the visitor is redirected automatically to the original page. Traffic that matches a whitelist rule does not see this page.
The completed check is remembered in the visitor's browser with a cookie. The cookie is valid for 28 days, counted from the moment the check was passed, and during this time the visitor is not asked to complete the check again. It works for the whole domain, including its subdomains. A visitor without the cookie, for instance in another browser, after clearing cookies, or after their device's clock passes the cookie's expiry date, sees the check again.
Managing rules
Each rule has a switch in the Active column. You can use it to disable a rule without deleting it, and to enable it again later. This is useful when you want to use the rule again in the future.
Use the checkboxes to select one or more rules, then use the buttons in the top right of the table:
- Enable and Disable turn the selected rules on or off.
- Delete removes the selected rules.
In the ACTIONS column, each rule has an edit button (pencil icon) to change the rule, and a Delete button (trash icon) to remove only that rule.
These options also apply to the rules in the Whitelisted section.
Whitelisted
The Whitelisted section is titled Whitelist rules and lists all whitelist rules. The number next to the tab name shows how many rules exist. You can add new whitelist rules using the Add rule button in the top right.
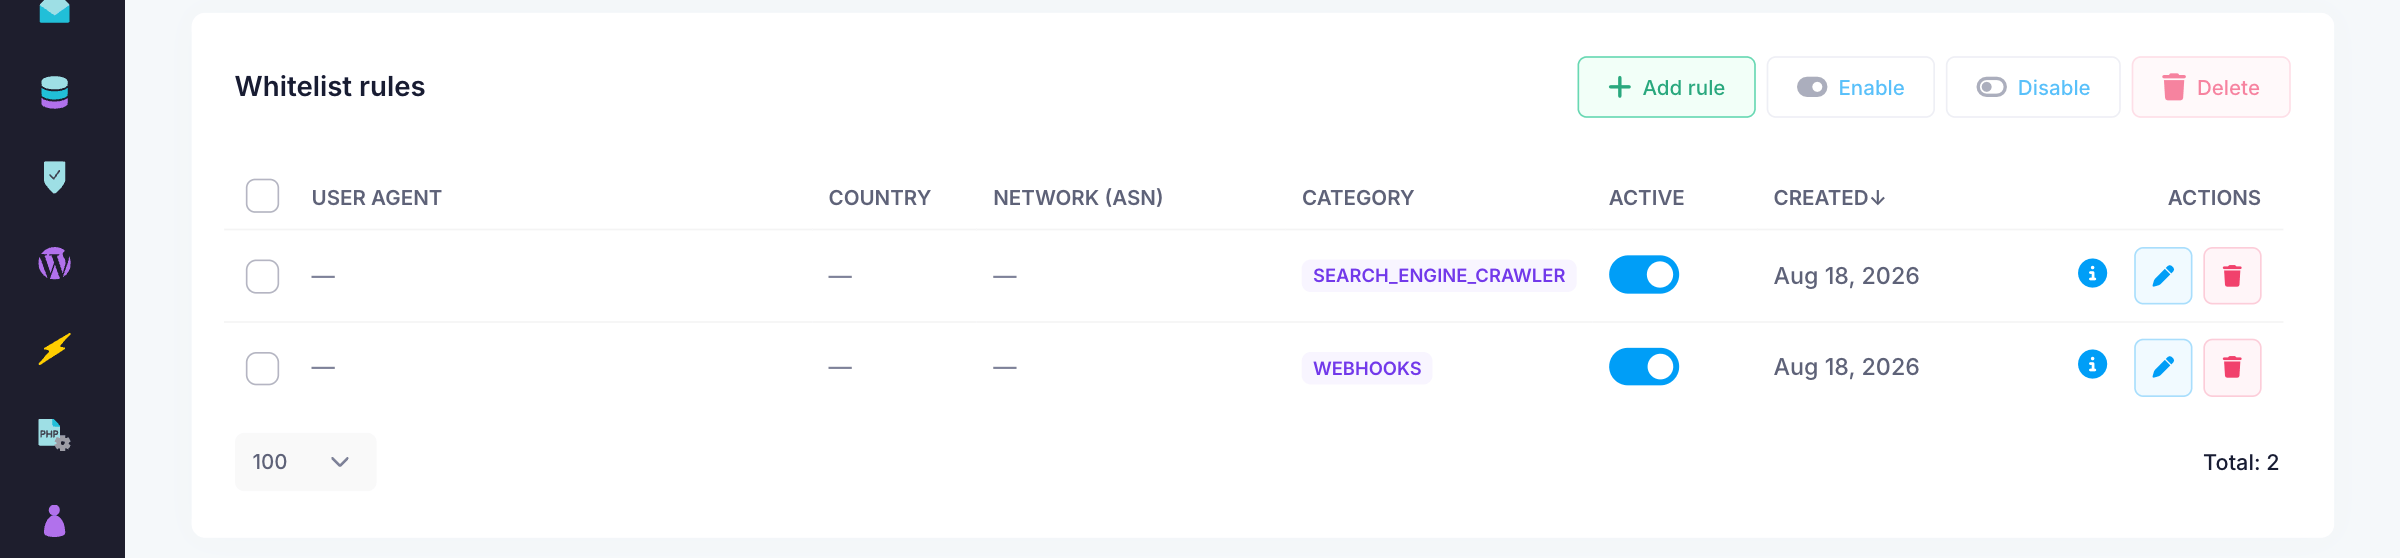
Whitelist rules are managed in the same way as challenge rules: the Active switch lets you disable a rule without deleting it, and the Enable, Disable, and Delete buttons work for the selected rules. For details, please see Managing rules.
Some whitelist rules are added automatically by WebGuard, for instance for the categories SEARCH_ENGINE_CRAWLER and WEBHOOKS. These rules have an information icon with the message "Automatically added by WebGuard to help prevent potentially legitimate traffic matching this category from being challenged." A rule you create yourself shows the same icon when it has a note, displaying your note text instead.
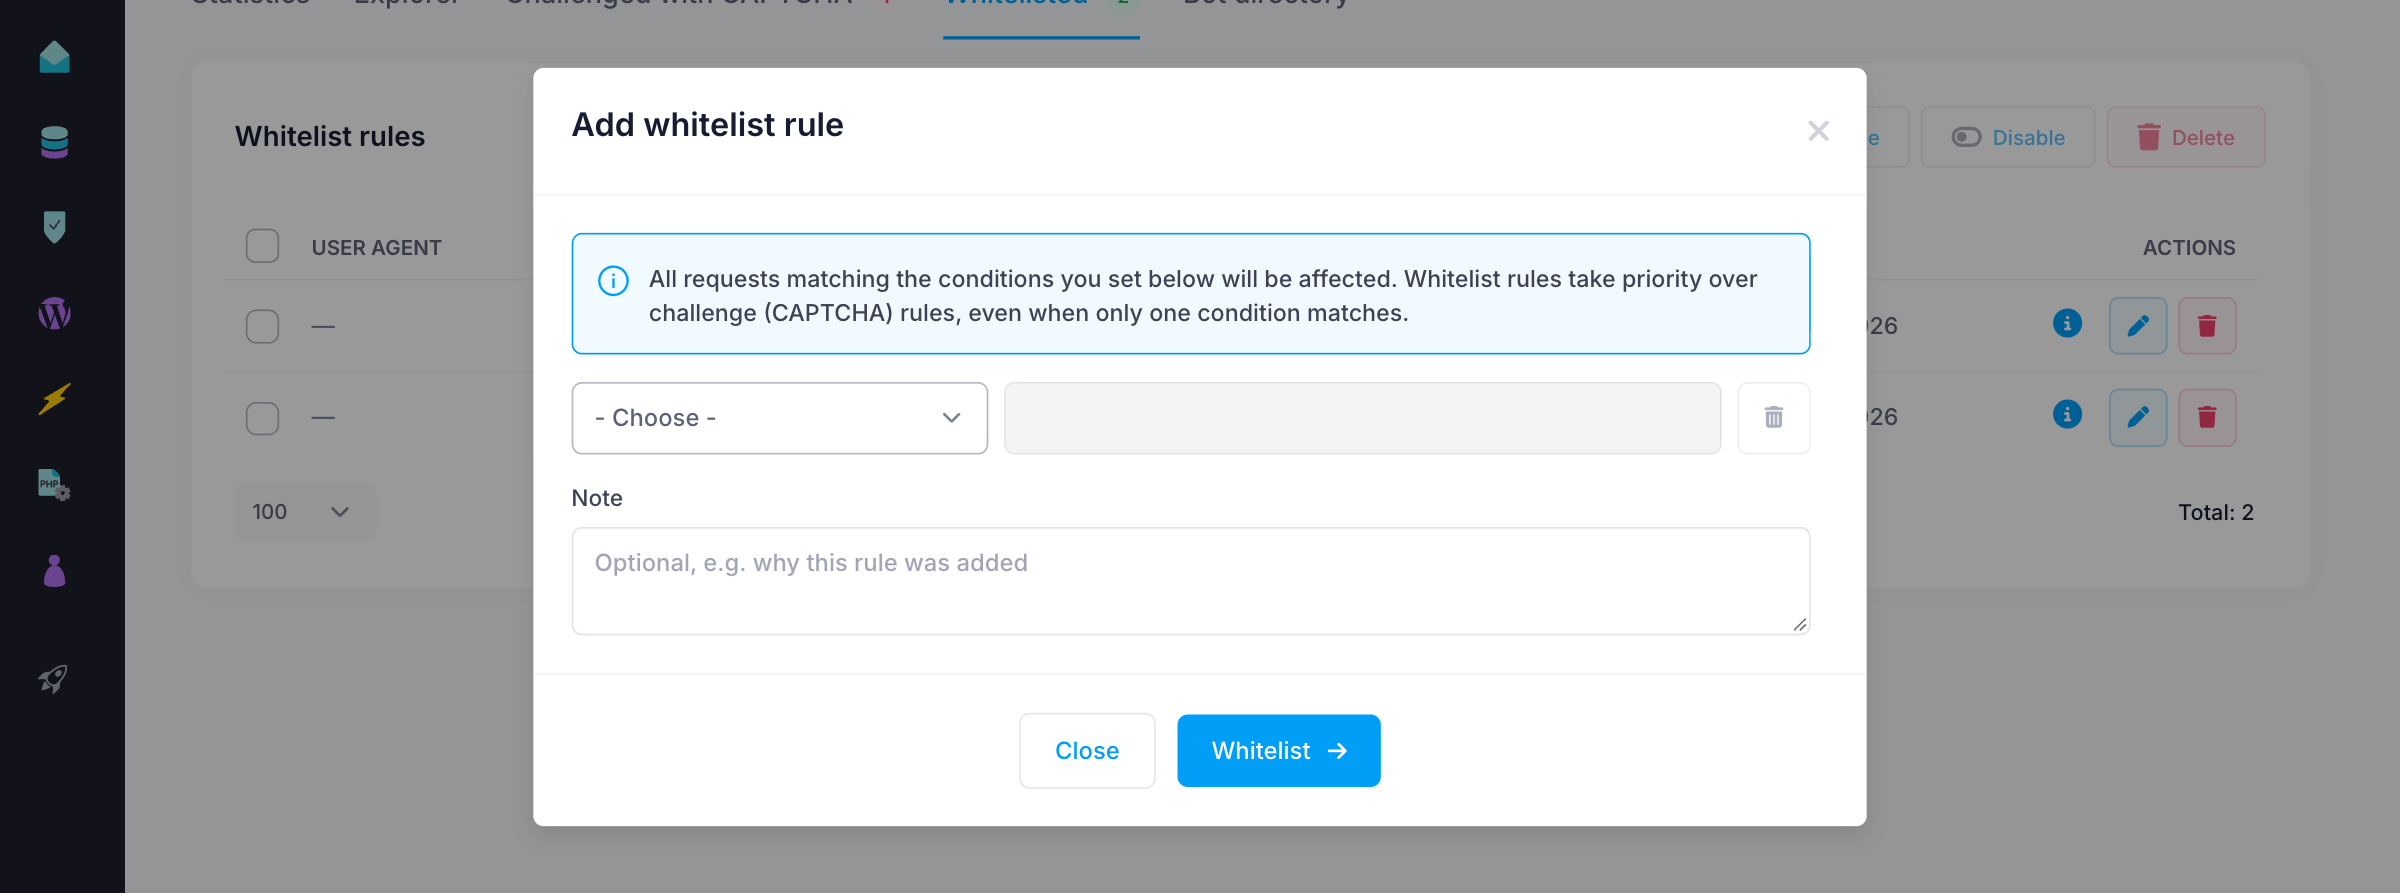
Whitelist rules always have higher priority than challenge rules. A request is allowed when it matches a whitelist rule, even if it also matches a part of a challenge rule. For instance, if a country and a network are challenged but a specific user agent is whitelisted, a request from that user agent from that same country and network will still be allowed.
Bot directory
The Bot directory section lists the known bots that WebGuard can recognize, together with the category of each bot. A request is assigned to a category when its user agent contains the text shown in the User agent contains column. The check is case-insensitive. The list is based on the Cloudflare directory of verified bots and is updated weekly.
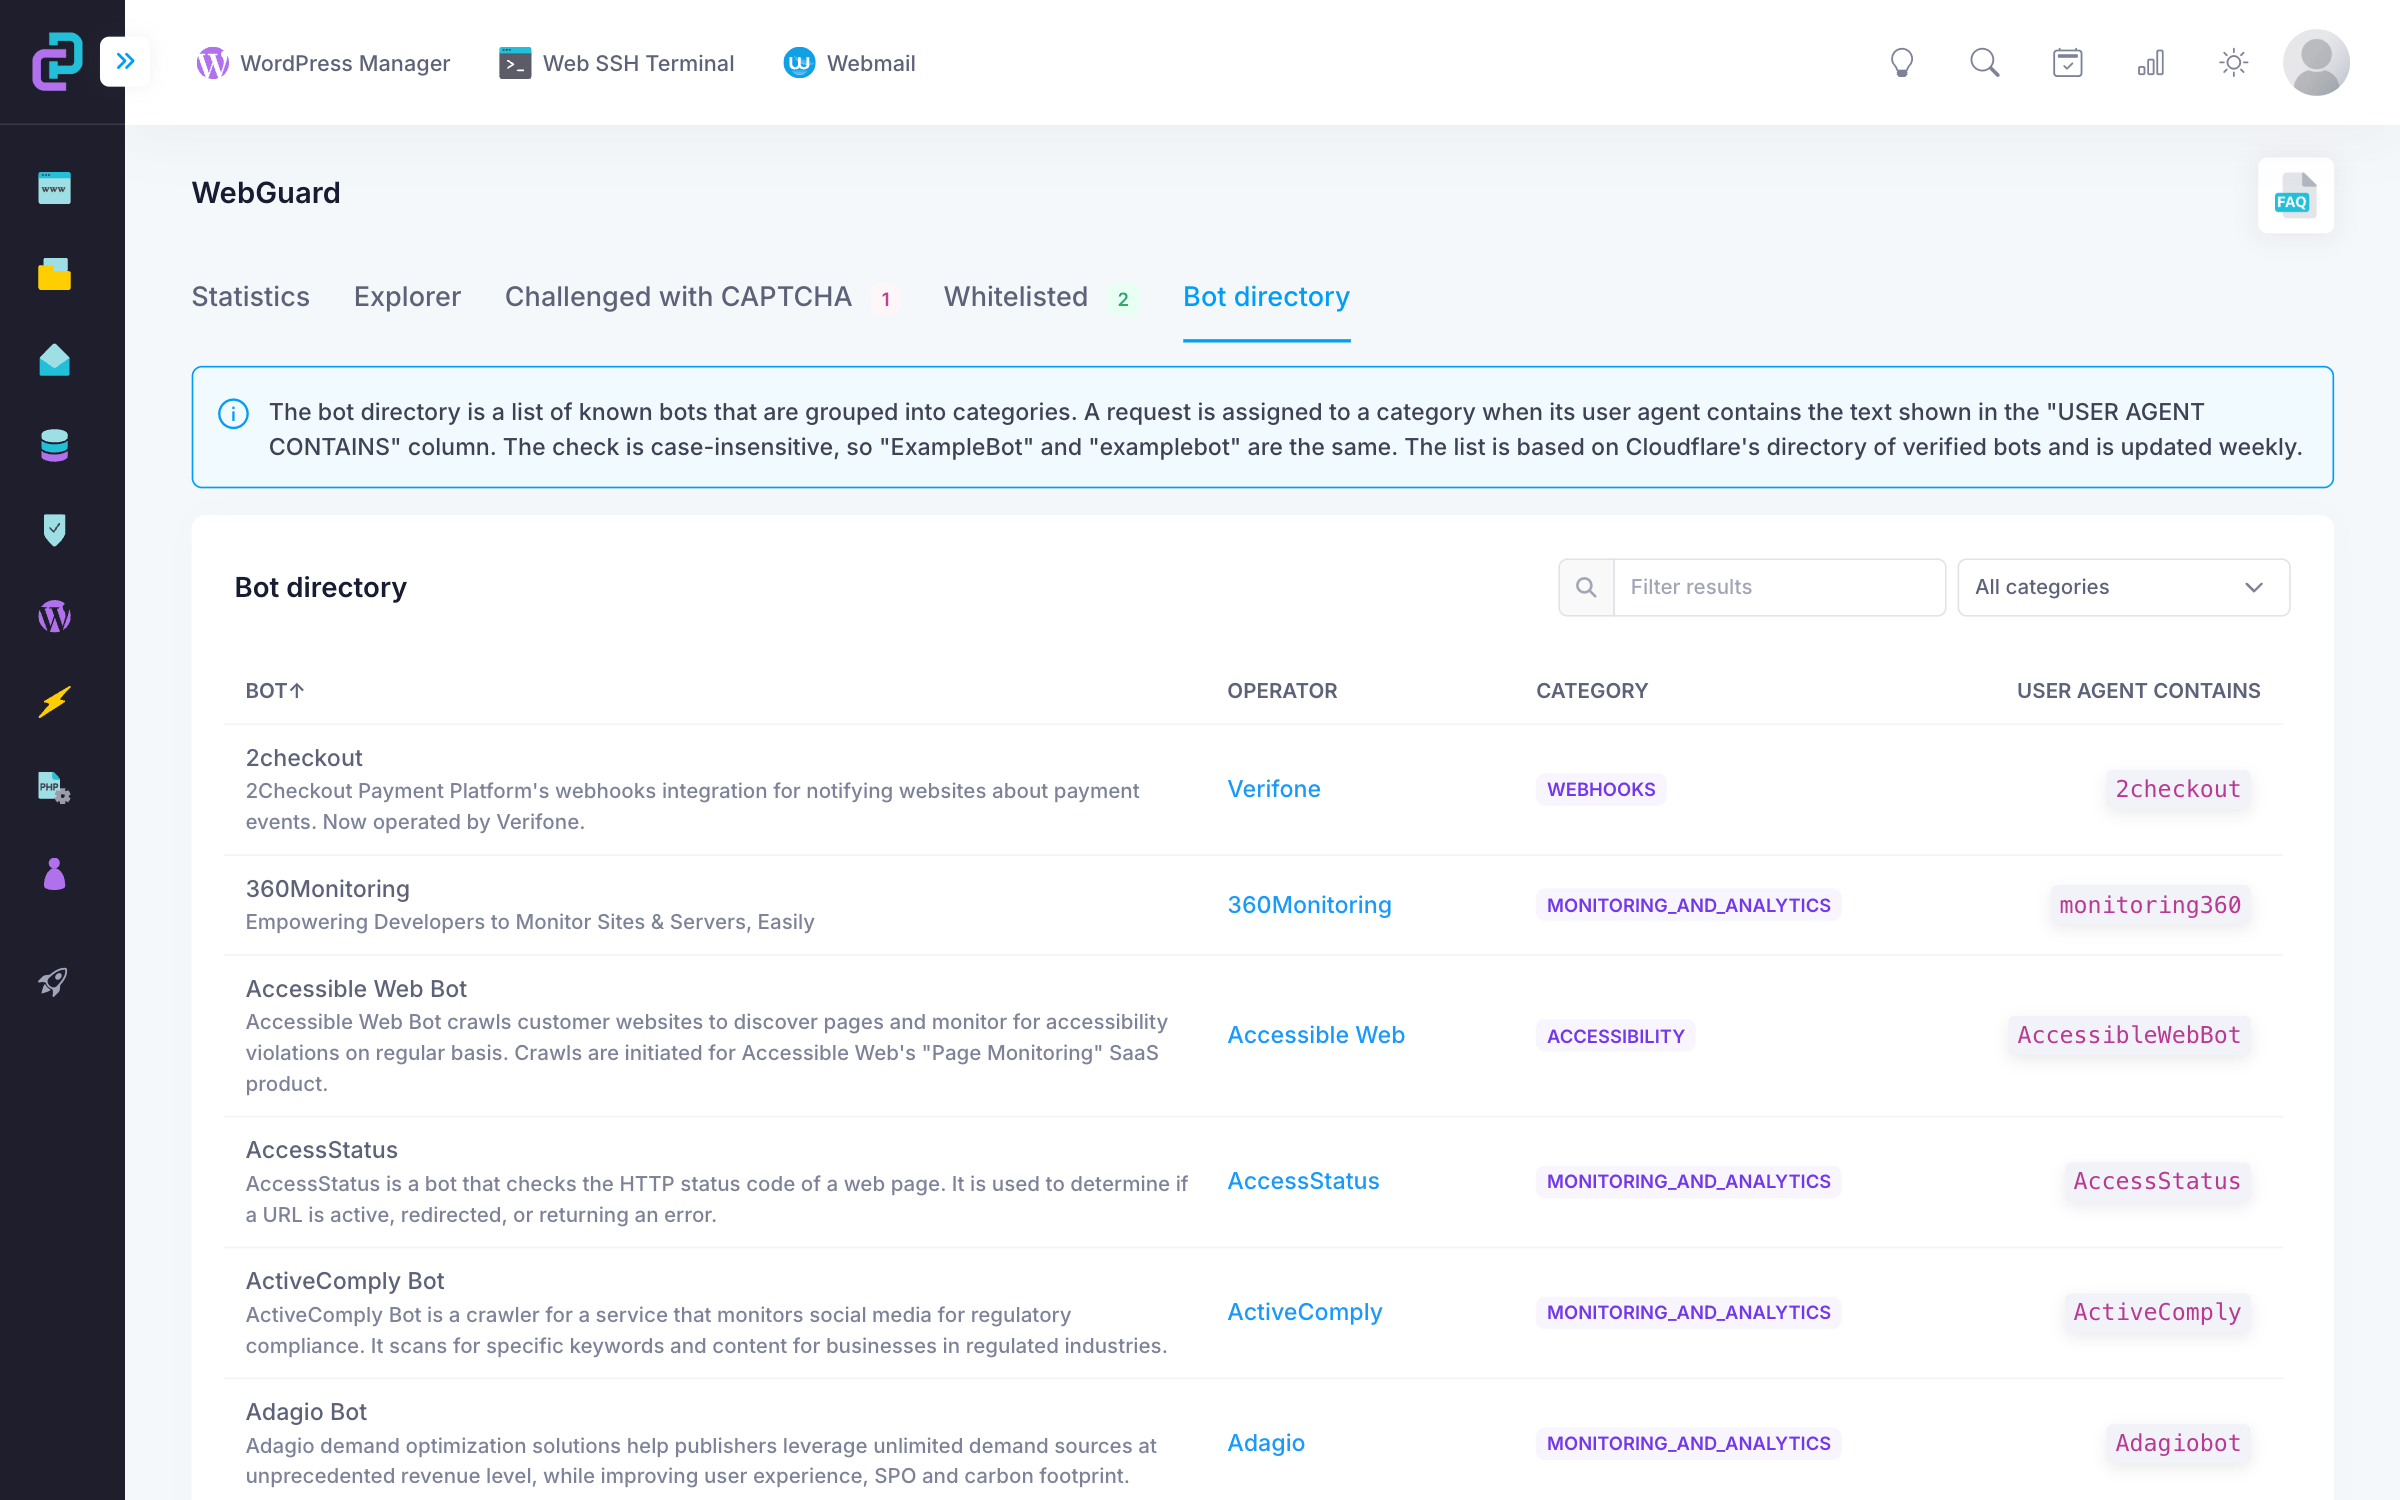
The table shows:
- Bot: the name and a short description of the bot
- Operator: the company that runs the bot, with a link to its website
- Category: the traffic category of the bot
- User agent contains: the text pattern that WebGuard looks for in the user agent
Use the Filter results field to search the list, or the All categories menu to show only one category. The menu shows the number of bots in each category.
Categorization of requests
A request belongs to a category when its user agent contains one of the patterns of that category (the check is case-insensitive). Requests that cannot be identified are left uncategorized. You can use a category as a condition in a challenge or whitelist rule.
Traffic categories
- ACADEMIC_RESEARCH: university, research, and academic crawlers
- ACCESSIBILITY: screen readers and assistive browsing tools
- ADVERTISING_AND_MARKETING: advertising, tracking, and marketing automation bots
- AGGREGATOR: content, product, or data aggregation services
- AI_ASSISTANT: AI assistants fetching page previews or contextual data
- AI_CRAWLER: crawlers used for AI model training
- AI_SEARCH: AI-powered search engines and indexing tools
- ARCHIVER: archiving services such as snapshot or preservation tools
- FEED_FETCHER: RSS and Atom feed fetchers
- MONITORING_AND_ANALYTICS: uptime monitors, performance scanners, and analytics bots
- OTHER: identified traffic that does not match any other category
- PAGE_PREVIEW: link preview bots from messaging or social platforms
- SEARCH_ENGINE_CRAWLER: search engine crawlers
- SEARCH_ENGINE_OPTIMIZATION: SEO audit tools and optimization crawlers
- SECURITY: vulnerability scanners and security assessment tools
- SOCIAL_MEDIA_MARKETING: social media scheduling, analytics, and marketing bots
- WEBHOOKS: webhook delivery and callback services
Categorization is based on the available user agent information in each request. Some traffic sources may be categorized incorrectly or may not be categorized at all.