

So you want to improve the Google ranking of your WordPress website, and that makes a lot of sense because Google traffic is incredibly well qualified. There are millions of people out there searching for the exact things that you offer, and if you can tap into that, the chances of making sales, generate leads or simply increase your page views are tremendous. After all, this is organic traffic that's 100% targeted because these would not be just random visitors to your site. These would be visitors that are actually after the services or information that you provide. That's because they have found your website after making a search for a specific term that you've worked quite hard to rank for.
- What is SEO And Why SEO is important?
- 1. Check the Visibility Setting of Your WordPress
- 2. Set the WordPress Site Title & Tagline
- 3. Use An SSL Certificate
- 4. Choose Your Preferred Domain
- 5. Password-Protect Staging/Dev Instances
- 6. Test Your Website For SEO Issues With Google's Web Dev Tool
- 7. Install An SEO Plugin
- 8. Generate A Sitemap For Your WordPress Website
- 9. Make Your URLs SEO Friendly
- 10. Add Your Site To The Google Search Console & Submit Your Sitemap
- 11. Optimize Your Content
- Use Categories and Tags
- Add Internal Links
- Sanitize Your WordPress Comments
- Images and SEO
- Add Meta Description to your Posts and Pages
- 12. Speed Up Your WordPress Website
- 13. Keep Your WordPress Safe From Harm
- It's Your Turn Now
What is SEO And Why SEO is important?
Search Engine Optimization (SEO) is the process of improving the quality and quantity of traffic to a website. SEO targets unpaid traffic (known as "natural" or "organic" results) rather than direct traffic or paid traffic. Unpaid traffic may originate from different kinds of searches, including image search, video search, academic search,[2] news search, and industry-specific vertical search engines.
Wikipedia.org
In other words, SEO is a strategy used by webmasters to get more traffic by ranking higher in search results for specific terms. Search engines are usually the biggest source of high quality traffic for most websites, and that's why it's super important to tailor the content of your site in way that it's easier for search engine algorithms to categorize it and understand what it is about.
Good news is that WordPress is pretty well optimized in terms of SEO right out of the box, but there are still some improvements that can be made to help you rank higher and perform better on search results.
1. Check the Visibility Setting of Your WordPress

WordPress has a built-in option to hide your website from search engines, so the first thing you want to do is make sure it's not active. To do that, go to your WordPress dashboard.
There, look under the Settings menu > Reading > and make sure that the option "Discourage search engines from indexing this site" is not checked.
2. Set the WordPress Site Title & Tagline
Search Engines use your Site Title and Tagline when displaying your website in their search results, so it's really important to configure them and not leave the default "This is just another WordPress website".
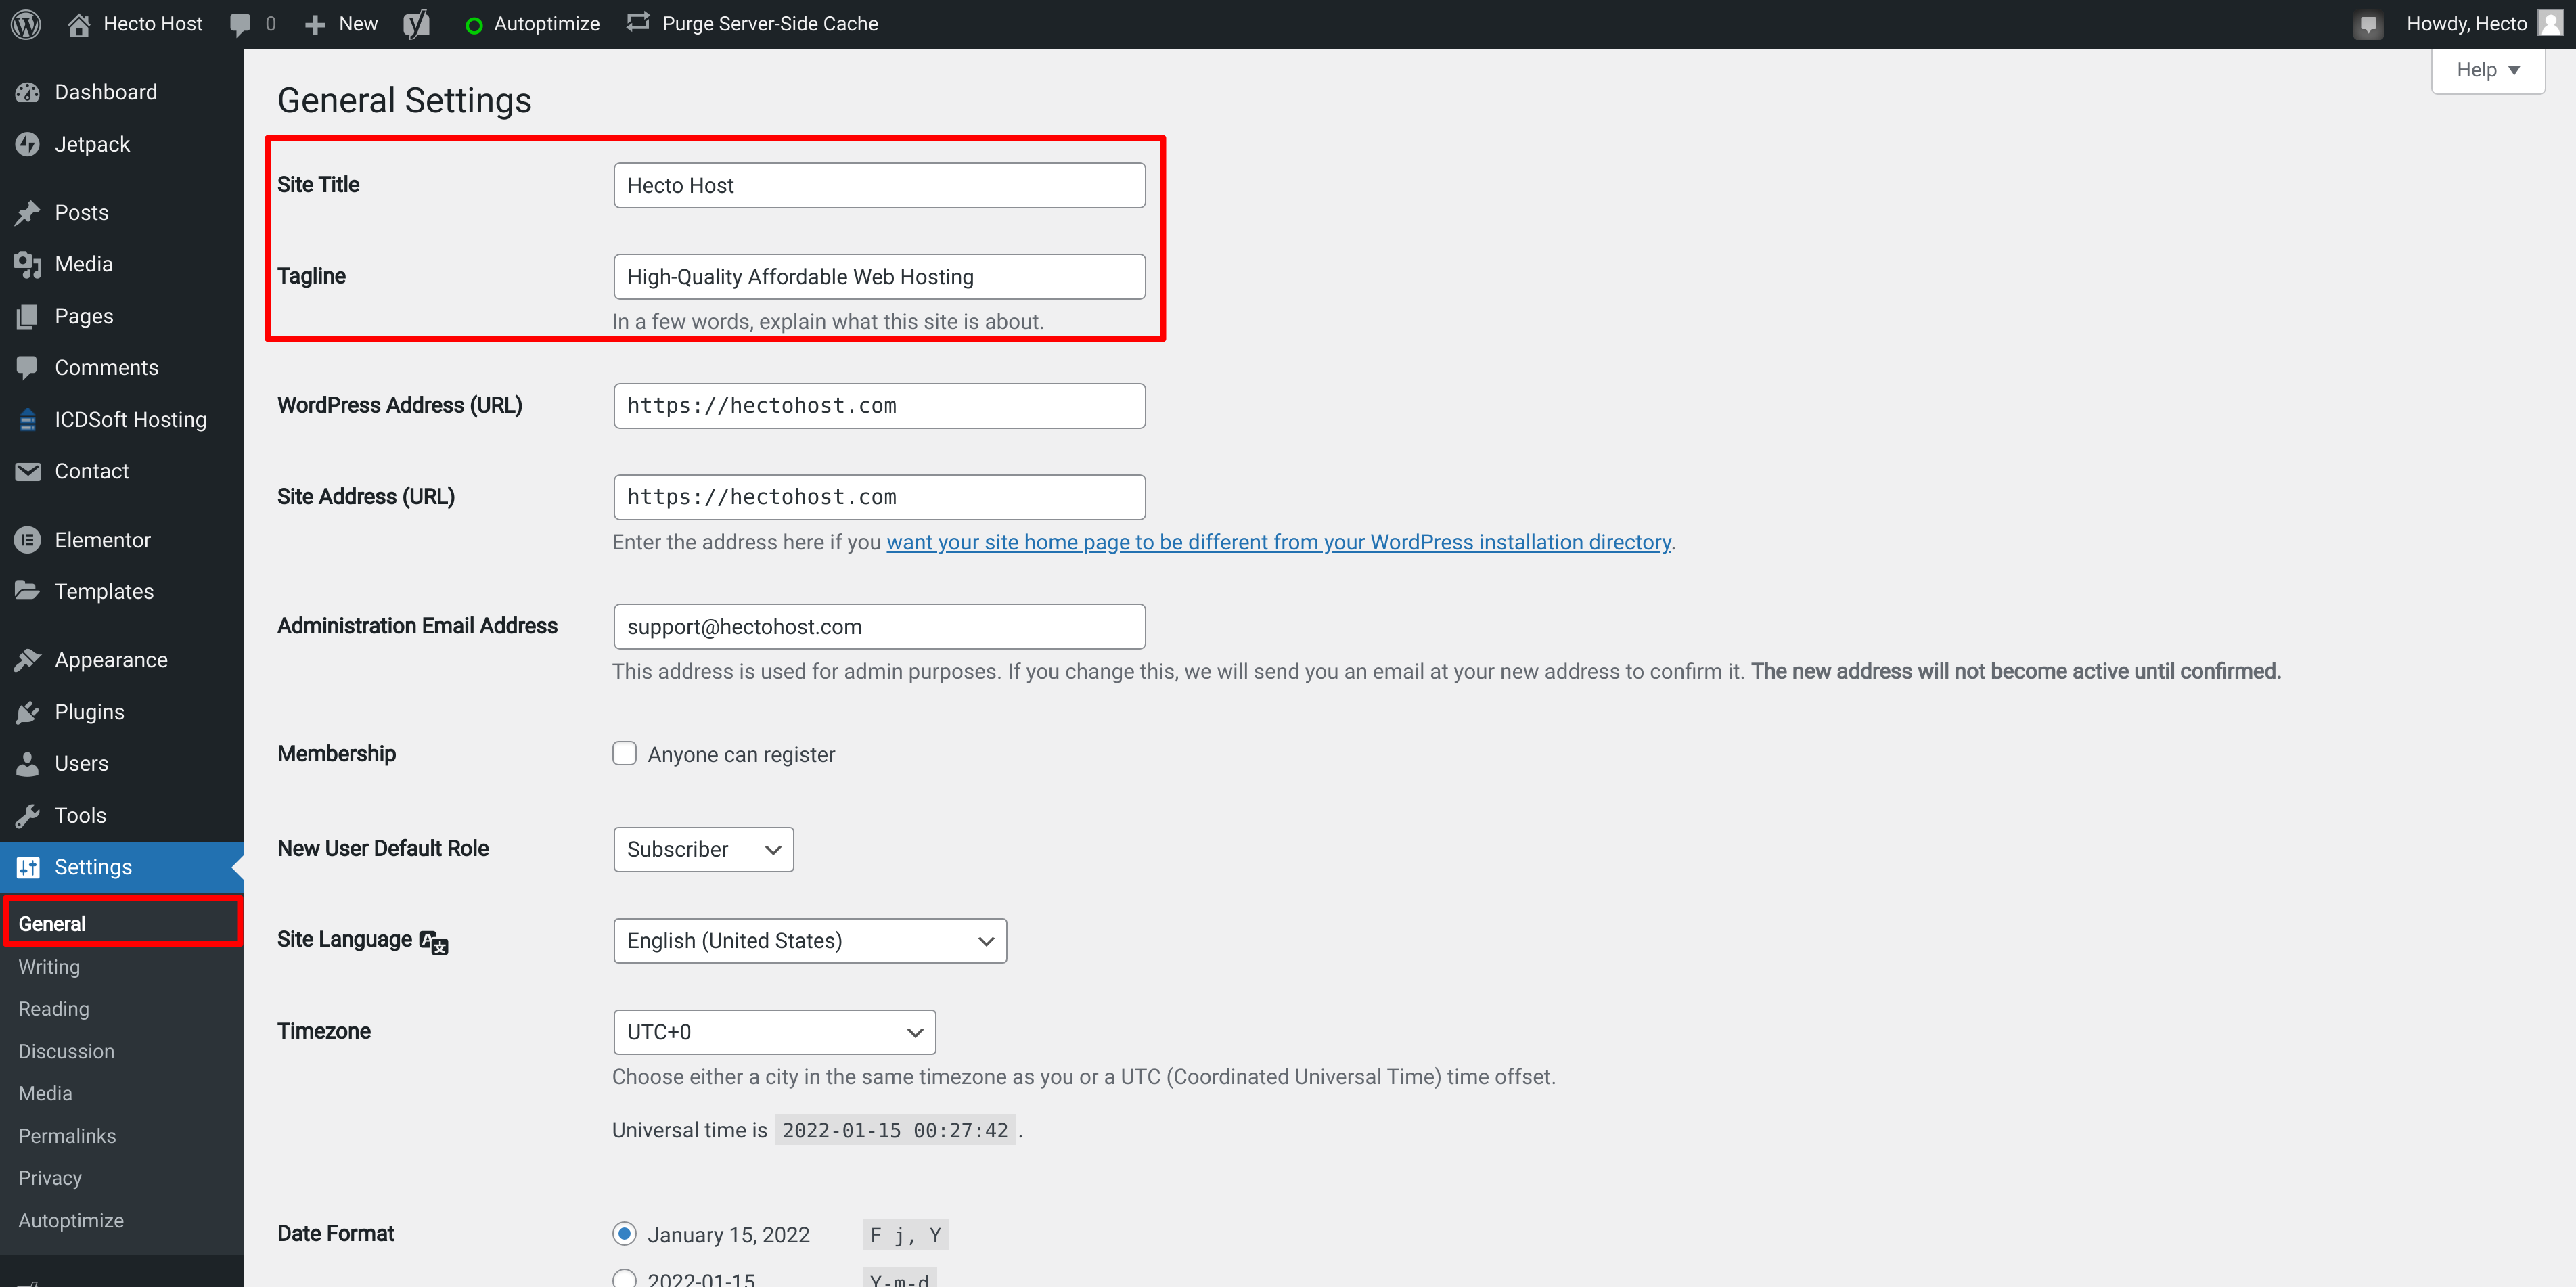
So go to Settings > General and update your Site Title and Tagline.
3. Use An SSL Certificate
In the past, having an SSL certificate on your website was considered a must-have mainly for online stores and ecommerce. Nowadays, it's turning into an absolute requirement for all websites, and there are a number of good reasons for that. The first and most obvious benefit is the improved security as connecting over SSL means that all data transmitted between your visitors and the hosting server would be encrypted.
But the use of an SSL brings another important advantage. Back in 2014, Google confirmed that HTTPS is used as a ranking signal, so having an SSL certificate for your website not only improves security, but brings an added SEO bonus.
All ICDSoft Hosting Plans Come With Free SSL Certificates
So having an SSL certificate is great, but how do you get one? The most obvious choice here is to buy a certificate from an SSL vendor, and there are a number of popular providers out here. However, if you are hosted with ICDSoft, you don't have to spend any extra money on that. All ICDsoft hosting plans come with free SSL certificates from Let's Encrypt.
These certificates are issued and activated with a single click in the Control Panel of your account. Let’s Encrypt’s free SSL certificates use the same encryption methods and strength as commercial certificates. Perhaps their only downside is that their validity period is just three months, but we've solved that problem with a fully automated renewal system, so once you activate a certificate, your website will stay secured for good. The certificate will be automatically renewed when needed.
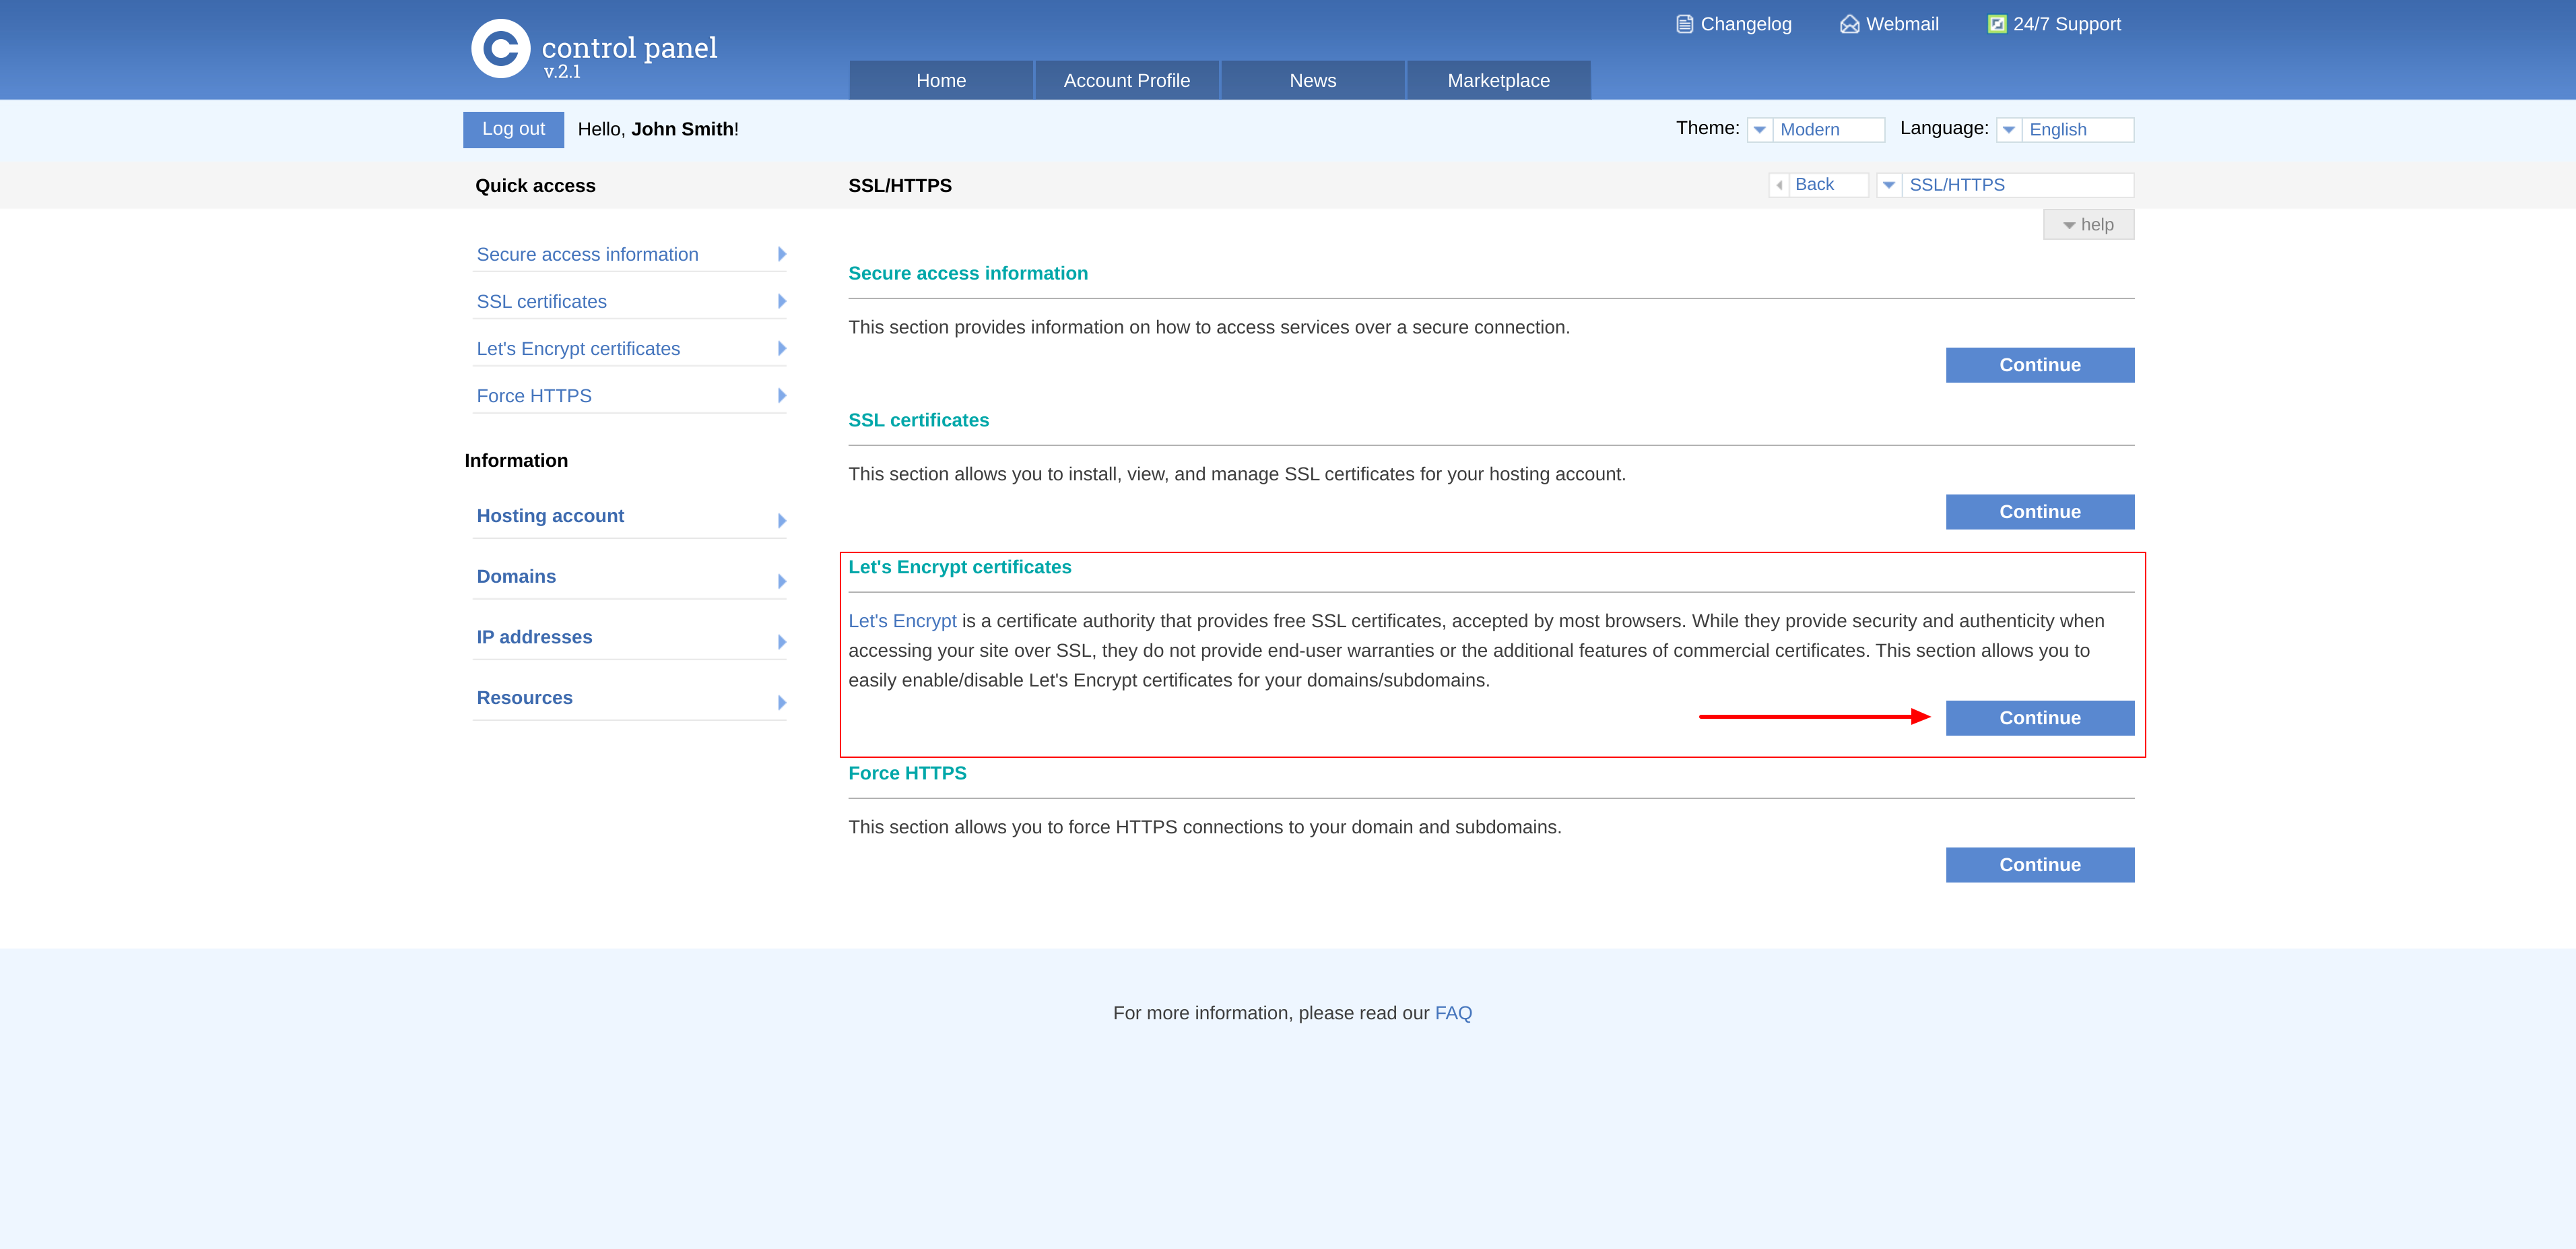
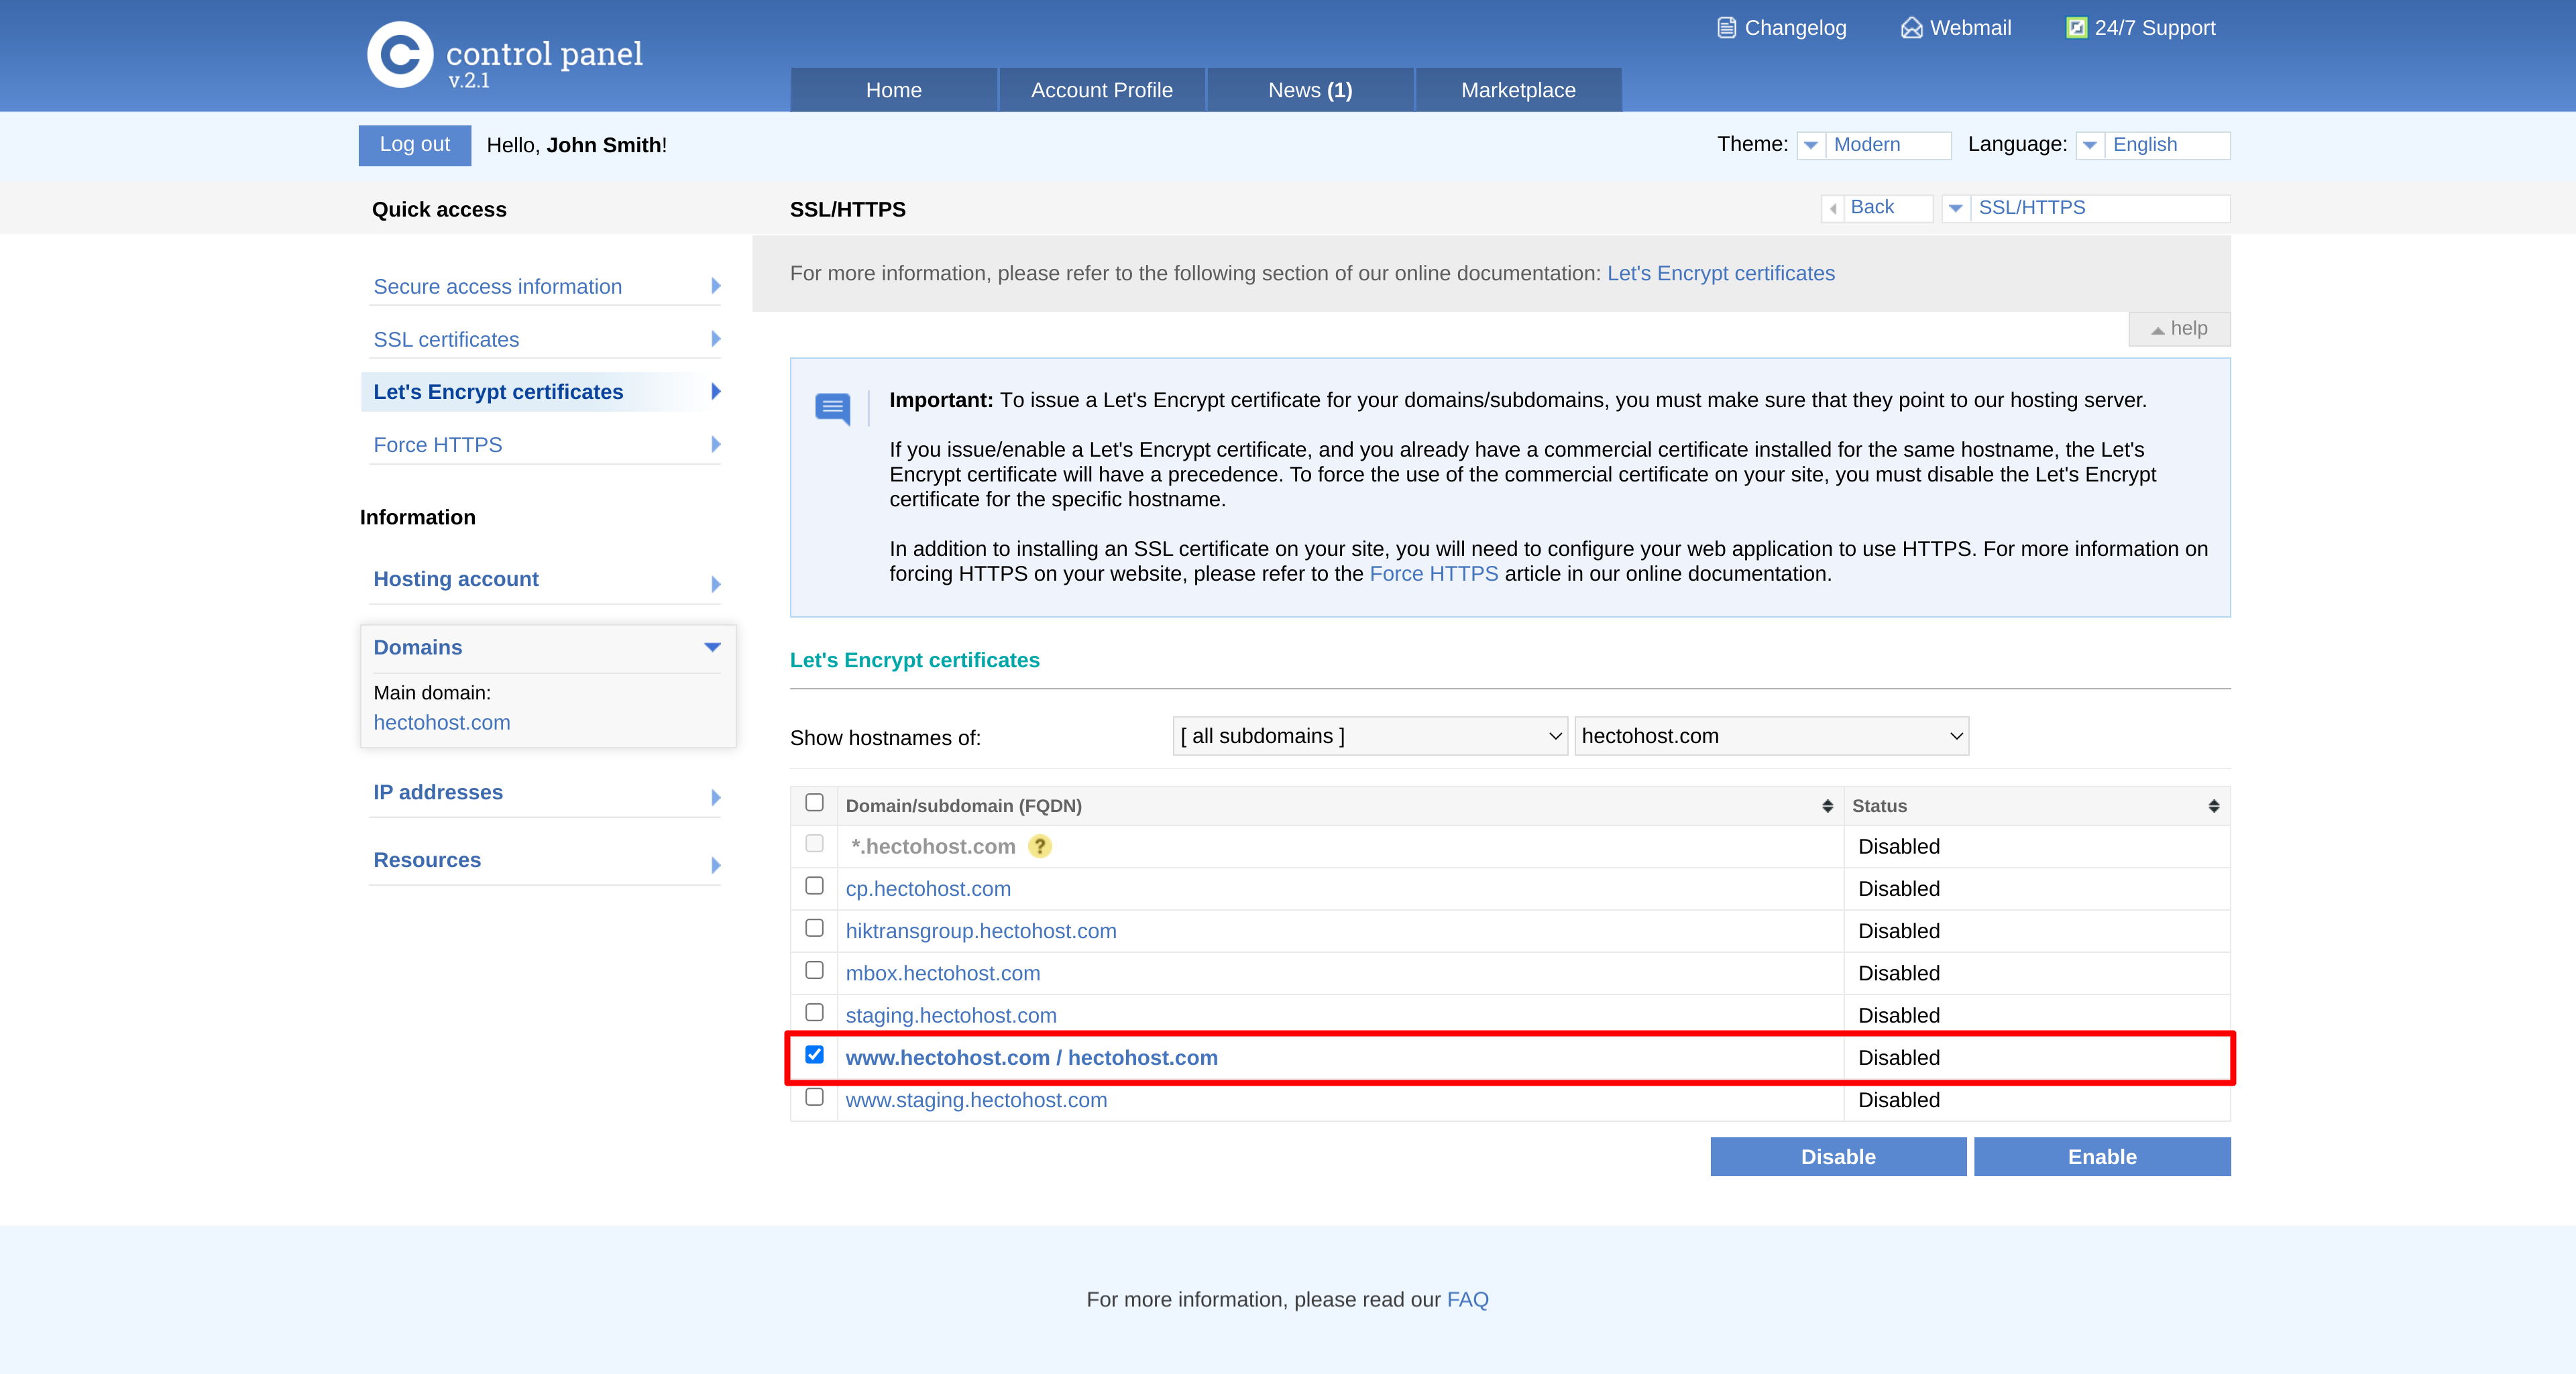
So the first step in configuring your WordPress website to work over HTTPS is to get an SSL certificate covering the address of your WordPress website - in our example case right here, that's hectohost.com.
Let's go ahead and install one. Go to the Control Panel > SSL/HTTPS > Let's Encrypt certificates > and enable a Let's encrypt certificate for your domain. And just like that, we now have a working SSL certificate installed on the server for our website.
The next step is to configure your WordPress website to work over HTTPS (SSL), and we have detailed tutorial on that as well as a YouTube video:
4. Choose Your Preferred Domain
While this step might not directly improve the Google ranking of your WordPress website, it will definitely ensure that your search listing won't be wrongfully penalized or removed.
If you have a single page that's accessible by multiple URLs, Google may identify that as duplicate content and that's a red flag. Therefore, you have to decide whether your website would be accessible with our without the "WWW" subdomain in the URL.
If you have a single page that's accessible by multiple URLs, or different pages with similar content (for example, a page with both a mobile and a desktop version), Google sees these as duplicate versions of the same page. Google will choose one URL as the canonical version and crawl that, and all other URLs will be considered duplicate URLs and crawled less often.
Consolidate duplicate URLsOur ICDSoft website is accessible with and without the "www" subdomain, and also with or without an SSL connection. However, you would notice that all these requests redirect to one single URL - https://www.icdsoft.com/. The same thing is valid for our use case website here - hectohost.com, but we've set the canonical or preferred URL for it to https://hectohost.com. So you should decide whether you'd like to keep the "www" part in your preferred URL, but you should definitely use HTTPS, as Google is known to view it as a ranking signal.
With the release of Chrome version 69, Google decided to strip the "www" and "m" subdomains from the URL displayed in Chrome's address bar. This decision by Google has caused a huge backlash as most users have expressed serious concerns against it. It does make sense to a certain degree, and you can definitely say that stripping the "www" subdomain makes the URL shorter, and therefore easier to remember, type in and also pronounce/articulate.
Whether you decide to keep that part or not, this will not affect your rankings in any way. The important part is to choose one and stick with it. This is also known as the canonical or preferred URL for your website.
So to configure it with WordPress, go to the Settings menu again > General. There, enter your preferred (canonical) address for both the WordPress Address (URL) and Site Address (URL) fields. In our case, that's https://hectohost.com.

Apply the HTTPS prefix in your WordPress Address and Site Address fields
It's also important to apply the HTTPS prefix there, as that will force the SSL connections to your website. Otherwise, your WordPress website would be accessible via both plain HTTP and HTTPS and that could be viewed as Google as yet another duplicate version of your site.
5. Password-Protect Staging/Dev Instances
Speaking of duplicate content and the negative impact it could have on your SEO, here is another tip on how to improve the Google ranking of your WordPress website. When it comes to WordPress, a lot of webmasters opt to test updates (of the core version, plugins, themes) and theme customizations in a separate installation, called staging. That's actually the correct way of doing it as the live website remains unaffected should something go wrong. However, this could open the door for potential issues with duplicate content. Moreover, such staging instances are left active for a long period of time, and they might even get completely abandoned leading to a serious security risk as such installations fall behind in terms of updates.
The best way to avoid such duplicate content and security risks if you've set up a staging instance of your website, is to password-protect that installation, so that you'd be absolutely certain that Google and the bad guys would not be able to access it at all. If you need to provide access to someone else, you can just set up login credentials for them.
You can easily do that with the ICDSoft hosting service via the Control Panel > Protection > Web access protection. There, browse to the location where the staging installation is running, and password-protect the entire folder.
6. Test Your Website For SEO Issues With Google's Web Dev Tool

Google's web.dev tool gives insights on potential performance and SEO issues, so it's really important that you give it a go. We will run the audit with our site hectohost.com.
Make sure to enter your canonical URL as any additional redirections will negatively impact the performance results. Let's examine our SEO results:

You can see that our "Document does not have a meta description", so let's see how we can resolve that.
7. Install An SEO Plugin
Despite how great WordPress is in terms of SEO right out of the box, you can still expand on its core features by adding an SEO plugin, and the two most popular free options are Yoast, RankMath and the All in One SEO Pack. In this tutorial, we will go with Yoast, but feel free to explore All in One as well as any other plugin that may come your way.

Keep in mind that simply installing an SEO plugin does not optimize the website for you. It just makes it easier for you to do it and to adhere to the best practices.
So let's go ahead and install Yoast. You know the drill, go to your WordPress dashboard > Plugins > Add New, search and install Yoast. Activate it.

Now, to add the Meta description that was reported as missing by Google's web.dev tool, we will just have to Edit our Home page > scroll down to the "Google preview" section, and let's enter something in the Meta description field, let's say "Fast And Reliable Web Hosting With Outstanding Customer Support".
8. Generate A Sitemap For Your WordPress Website
An XML sitemap file lists all the URLs for a website along with additional information about each URL - when it was last updated, how often it usually changes, and how important it is, relative to other URLs in the site. It allows search engines to crawl your site more effectively.
In WordPress 5.5, a new feature was introduced that adds basic, extensible XML sitemaps functionality into WordPress core.

In other words, as of version 5.5 every WordPress website would get a default sitemap file. Its name is wp-sitemap.xml. So if we go to our website URL / wp-sitemap.xml, we will see its contents - https://hectohost.com/wp-sitemap.xml.
You can see that it references two additional sitemaps, let's go to that first one - https://hectohost.com/wp-sitemap-posts-page-1.xml, and it contains the URLs to all of our website pages, so this will help search engines locate them more easily. However, you can see that this sitemap is quite basic and doesn't contain any additional information, such as the date when a given page was last modified or the images that exist on a page. That's important, and that's why it's best to use a dedicated sitemap plugin to generate a good sitemap file for your website.

Both the Yoast and All in One SEO plugins do a good job of generating proper XML sitemaps. In our case, since we are using Yoast, we will go to SEO menu > General > Features. There, make sure that you have the "XML sitemaps" option enabled.

Now, you should have a cool sitemap file that should be available at your domain.com/sitemap.xml. Let's check it out:

And you can see that we have the "last modified" date, all of our pages and their URLs, as well as the number of images on each page. These details are not available with the default sitemap file that comes with WordPress.
Also, your robots.txt file should point to the location of your sitemap - not the default one by WordPress, but the cool one generated by either Yoast or All in One SEO. In the case of WordPress, the robots.txt file is generated on the fly, so you wouldn't normally find it under your web root folder where WordPress is installed. In other words, you'd have to modify it through a special plugin.
So if you are using Yoast, go to the Tools menu > File Editor. In our case, it says "You don't have a robots.txt file, create one here". So let's go ahead and create it. And now you can see, we can edit the contents of our robots.txt file.

Let's add this one line that would direct search engine bots to our sitemap file:
Sitemap: https://hectohost.com/sitemap.xml
Press the Save Changes to robots.txt button.
9. Make Your URLs SEO Friendly
This is a very powerful step in improving the Google ranking of your WordPress website, and it's about making all the URLs on your website SEO friendly. Your URLs should contain words that clearly explain what the given page is all about, so they are easier to read and understand by both humans and search engines. This will greatly improve your chances of ranking higher in search results, and it will also increase your click-through rate (CTR).
To do that, go to your WordPress dashboard > Settings > Permalinks, and you can see there are a number of different options available, and some of them don't really contain any useful information, such as the first option called "Plain" where the URL would be something similar to this one (https://hectohost.com/?p=123) or the "Numeric". Notice that these URLs use numbers unrelated to the content, and a user can't guess what they will find on the page by looking at the URL. We recommend that you definitely avoid those two. The best option in terms of SEO is to use the "Post name", and if you are running a news website, you could also use the "Day and name" setting as it will also show the actual date.

However, if you have an established website that has been running for more than 6 months, simply changing your Permalink settings could result in 404 errors (for your old URLs) and you could even lose your SEO rank. In such cases, you need to hire a professional who will set up redirects from the old URLs to the new ones to ensure a smooth transition.
10. Add Your Site To The Google Search Console & Submit Your Sitemap

The Google Search Console, formerly known as Webmaster Tools, is a set of tools offered by Google to help site owners administer the way their website appears in their search results.
If we take a quick glance at the about page, we will see some of the important features that the search console provides:
- "Optimise your content with Search Analytics. See which queries bring users to your site. Analyse your site's impressions, clicks and position on Google Search."
- "Get your content on Google. Submit sitemaps and individual URLs for crawling."
- "Get alerts on issues and fix your site. Receive email alerts when Google identifies issues on your site."
- "Understand how Google Search sees your pages."
So it provides a lot of useful information, and it's definitely a must-have if you are looking to optimize the SEO of your WordPress website.
We have a video on our YouTube channel, which provides step-by-step instructions on how to add your site to the Google Search Console. Go ahead and watch that video if you haven't verified your domain. It will only take you a couple of minutes.
Once you've done that, a good next step is to add your sitemap there, which basically submits your sitemap to Google. Head to the Sitemaps menu, and enter the location of your sitemap.xml file. In our case, the URL is https://hectohost.com/sitemap.xml.


If you are looking to remove a sitemap, for example if it was generated with a plugin that you no longer want to use, here is how you can do it - click on the actual sitemap, and then click on the three vertical dots in the upper right corner and select "remove sitemap".
The URL Inspection tool is quite useful as it allows you to check whether a given page on your website has been indexed by Google. You just need to enter its URL there, and you will see if it has been indexed or not. You will also see some important details like when it was crawled and whether the page is mobile friendly.
11. Optimize Your Content
When it comes to improving the Google ranking of your website, content the single most important factor of them all. Racking up high quality content on your site that's relevant to the keywords you want to rank for, will in time, boost other search ranking factors, such as your domain authority, credibility and popularity.
Your website needs fresh and unique content that's based on certain keywords that best describe your services or topics of interest. When it comes to WordPress SEO, there are certain tricks you can use to optimize your content, and we will cover them here.
Use Categories and Tags
Firstly, WordPress allows you to set categories and different tags for your posts and pages, and you should definitely do that in order to help search engines understand your website structure and content. Categories allow you to group certain posts or pages. For example, if you are running a personal blog, you can have categories such as lifestyle, travel, images, food, etc.
Tags can be viewed as specific keywords that describe what a given post or page is about. Some themes will also display the tags of your different posts on the home page of your website and that would be really helpful for your search engine rankings.
Add Internal Links
This tip is super effective, but often overlooked. Adding links to different pages on your own website helps you increase page views and keeps visitors at your site for a longer period of time. Ultimately, internal linking improves the SEO score of your pages, so it's really important to use them whenever possible. Obviously, you don't want to over-do it. The placement of internal links should be seamless for visitors and these links have to be in line with the actual content.
Sanitize Your WordPress Comments
Having a lot of comments is a good indicator that a website is popular and does well. Allowing comments on your site keeps your visitors engaged. Visitors might even start entire threads by themselves, then add backlinks to your site, and ultimately improve the SEO of your WordPress website and help you rank higher. However, these comments have to be real, related to the actual content, and not spam.
The easiest way to automatically filter out spam is to use a plugin, such as Akismet, which comes bundled with WordPress by default. If Akismet is unable to combat this annoying issue, you could consider some extra tips and tools, which we've covered in one our previous videos linked here and also at our blog post on What is Captcha and How To Add One on Your Site?
Images and SEO
Nowadays, it's super important to provide rich content that contains not just text but also images, videos and even social media resources. When it comes to images, simply adding a picture to your post is not enough. It's really important to give it a meaningful name that's centred towards your keywords, and you should also make sure to add the Alternative Text. The Alt Text helps visually impaired users with screen readers, and it also provides a description of the image for search engines. Quite often, people perform searches solely for images and these Alt Texts will help your images get listed in the search results.
Add Meta Description to your Posts and Pages
The meta description is the little blurb that appears underneath your website on the search engine results. By default, WordPress does not allow you to set it explicitly for your pages, and it will just take a part of the first sentence. As a result, your meta description can look totally off point and incomplete. This could push potential visitors away, and that's why it's quite useful to set it explicitly.

The free version of the Yoast plugin allows you to easily do that, and it shows you a preview of how your post would appear on search engine results.

12. Speed Up Your WordPress Website
The average load time of your WordPress website is yet another Google ranking factor, so you have to make sure that your site is as fast as possible. We have a detailed tutorial on How To Speed Up WordPress and Get Top Results at Speed Tests, and you can also watch the full video from our YouTube channel:
13. Keep Your WordPress Safe From Harm
Even though this particular step is not directly related to improving the Google ranking of your WordPress website, failing to cover it could hurt your position in the search results in a major way.
If your website gets compromised by hackers, there is a huge chance that Google would notice it and slap a "deceptive site ahead" message. Once your website has been flagged as hacked, you will suffer a serious drop in traffic (around 45% according to Wordfence), but even worse - it's highly like that you would endure long term penalties to your Google ranking. To make the entire matter even more complex, WordPress is a huge target for hackers, simply because how popular it is. According to Sucuri, WordPress accounts for nearly 90% of all hacked CMS websites.
Long story short, you don't want to have your WordPress website hacked. We have put together a detailed blog post on How To Improve Security of Your WordPress website, so we strongly recommend that you go through it.
We also have a video on protecting your WordPress from hackers, and you can watch it here:
The ICDSoft Advanced Security Service To The Rescue
If that sounds like too much work for you, and you want to make sure that your WordPress is safe from hackers, sign up for our Advanced Security service! With the purchase of this service, a security expert from our company will dedicate 1 hour for a full site security audit, presented in a complete final report.
We will perform daily malware checks on all files of your account. We use commercial and internally built malware definitions, tuned to the web hosting environment. Every file change on your account is monitored and inspected in real-time for malware.
It's Your Turn Now
There is no doubt that WordPress provides a solid SEO foundation and puts you in a great position to outrank the competition. Still, taking the steps described in this tutorial will help you build up on that foundation and increase your SEO score to further improve the Google ranking of your WordPress website. It's on you now to implement these tips and enjoy an influx of visitors and sales thanks to your higher positioning on search results.


")
