

One of the most common tasks that WordPress users face at some point is having to set up a WordPress staging site or simply copy/move WordPress. The terms are different, but the underlying principle is the same, so we will show how the process works, and you would be able to do it yourself or at least get a better understanding of what's going on if you decide to use a third-party service or tool for this job.
- What is WordPress Staging, and Why Is It Good for You?
- Move vs Copy vs Clone vs Stage vs Migrate WordPress - the differences explained
- Copying WordPress Manually
- Create a New Subdomain and Install an SSL for It
- Copy the WordPress Files & Folders
- Export The WordPress Database
- Creating a Separate MySQL Database & User (for the Staging Instance)
- Copying The WordPress Database (From Live To Staging)
- Updating the WordPress Configuration File of the Staging Instance
- Update the URL of the WordPress Staging Instance
- Copying WordPress with a Plugin
- Staging WordPress with a Hosting Tool - Single-Click WordPress Staging at ICDSoft
- Copying WordPress with a Hosting Tool - Single-Click WordPress Copying at ICDSoft
- Preventing Search Engines from Indexing the Staging Site
- Troubleshooting Common Issues when Staging WordPress
- Clear the Cache of your Browser
- Clear the Server-side Cache
- Clear the Cache of your WordPress Caching Plugin
- Clear The WordPress Object Cache
- Reset the WordPress Permalinks
- Clear the Cache of your Theme
- Clear the Cache at Cloudflare
- Check Files for Hard-coded Instances of the Live URL
- Run Mass Search-And-Replace Query on your Staging Database
- Regenerate CSS & Data for Elementor Users
- Clear the Static CSS Files for Divi Users
- Conclusion
What is WordPress Staging, and Why Is It Good for You?
If you have an important website or at least a fairly popular one, you definitely want to avoid unnecessary technical issues for your visitors. Everyone wants a smooth experience whenever they go browsing for information online. No one wants to stumble upon strange error messages or weird looking design elements on a website.
Unfortunately, however, that's very common whenever you go about updating one of your many WordPress plugins, or when you just want to make a slight tweak to the looks of your site. Just a single innocent push of a button at the WordPress dashboard could unleash a mountain of PHP fatal errors and warnings on your website that only the gods at Github or Stack Overflow care to discuss.
Making changes to a live website is pretty much living on the edge, and if you like to play it safe, then you definitely need a WordPress staging site. A WordPress staging website is an exact copy of your existing (live) website at another location on your server. The two installations are fully independent, with their own separate files and databases. This allows you to test various changes at the staged/cloned website without affecting the live/production site. In that way, you can tinker with the design of your site and your actual website visitors will not even notice. Once you are satisfied with your changes, we will also show you how you can deploy them to the live website.
Move vs Copy vs Clone vs Stage vs Migrate WordPress - the differences explained
A lot of people get confused by all these terms. Is cloning WordPress the same as staging? Well, if we (and we will) get to the bottom of it, you will see that these are pretty much just different words for the same thing.
When you copy WordPress, you get the exact same WordPress website at another location with its own (copied) files and database. Cloning WordPress is just a synonym of copying.
Obviously, moving or migrating WordPress means to move all the files and the actual database to another location (could be another server as well), usually without leaving anything behind.
And staging WordPress is pretty much the same as copying especially if you do it manually or with a plugin. That's because you get an exact, independent replica of your existing site at another location. Once you've done all your changes, and you want to push them over to the live site, you have two options - you either have to manually replicate these changes all over again at the live site or copy over the staging website to the live URL. The second option would in turn overwrite all changes made to the live website in the meantime. For example, if you've added new posts, pages or products, they would be gone.
Single-Click WordPress Staging at ICDSoft With a "Set as live" Option
If you stage your website with the ICDSoft WordPress tool (not manually), you can set the staging site as live with a single push of a button. You won't have to bother yourself with replicating all the changes or manually copying the staging site in place of the live one. In addition, our staging tool gives you the option to "Preserve the content" of your production website. But in the context of our terms comparisons right here, that's where staging WordPress is different from copying - you have the option to easily push your changes to the live website.
So, without further ado, let's get to work and see all the different ways we can copy, stage, or clone a WordPress website. Of course, there are different ways to accomplish this task, but they could be narrowed down to the following three methods - manual, using a plugin, or through a hosting tool. Once we cover those, we will also take time to reveal some of the road blocks you can stumble upon along the way. There are certain issues that could arise while attempting to copy or stage WordPress, and we will show you how you can resolve them.
Copying WordPress Manually
Let's start with the manual method. It's free, and it's sort of universal as you should be able to do it regardless of where your WordPress website is hosted. We can break it down to three simple steps:
- First, you need to copy all of your WordPress files to the new location where your staging instance would reside.
- The second step is to export your WordPress database and import the resulting SQL (dump) file into a newly-created database.
- The third step is to configure the staging instance to work with the new database at the new URL.
It might sound like too much work, but it's actually not that hard. When it comes to copying the files, all web hosts provide some type of file manager that you could use for this job. At ICDSoft, we have a File Manager at our hosting Control Panel that allows you to easily do it. But first, let's create a new subdomain where our staging installation would reside.
Create a New Subdomain and Install an SSL for It
Go to the Subdomains section of your Control Panel, and create a new one called "staging".
The next step is to have an SSL certificate installed for the newly-created subdomain. We have previously covered the importance of having SSL certificate. If you have a wildcard certificate issued for your domain, you can skip this step. If not, go to the SSL/HTTPS section of the Control Panel > Let's Encrypt certificates, select the newly-created staging subdomain, and press the Enable button. This will issue and install an SSL certificate for that subdomain.
All ICDSoft Hosting Plans Come with SSL Included
We offer free SSL certificates provided by Let’s Encrypt with all our hosting plans. These certificates are issued and activated with a single click in the Control Panel of your account. Let’s Encrypt’s free SSL certificates use the same encryption methods as commercial certificates.
Copy the WordPress Files & Folders
Now, go to the File Manager and navigate to the location where your live WordPress website is installed. At some hosts that would be the public_html directory, with us that's the /www/www folder. Go there, use the "Select all" checkbox to select all files and folders, and then press the "Copy selected" button to copy them over to the newly-created subdomain. Let's go one level up, and we will see the different subdomains under the account; click "staging", and then Select.
Export The WordPress Database
The next step is to export your WordPress database. First, you should find its name, and that information is in the WordPress configuration file - wp-config.php. Open that file for editing using the File Manager of your web host, and look for the following line:
define( 'DB_NAME', 'WordPress-Database-Name' );
That's the actual database name. Now, we need to export it. Typically, all web hosts provide phpMyAdmin, and it's a tool that allows you to export/import databases and do all kinds of MySQL operations. So you can go to the phpMyAdmin tool of your web host. We've used a MySQL 8 database, but the same instructions apply even if you use MySQL 5.
Once you are in the phpMyAdmin interface, select your database, click on the "Export" tab, and press the Go button. This should automatically start a download of your database export file (also known as a MySQL dump file) in your browser. Once you have that file, you can use phpMyAdmin to import it into a newly-created database that would be used by the staging instance.
With our hosting, it's much easier to export a database. Go to the MySQL Databases section, press the Export button next to the source database, and this will "start exporting the database into a dump file in your private directory". Once that file has been generated, you can use the Import button to import that file into a new database that would be dedicated to the staging installation.

Creating a Separate MySQL Database & User (for the Staging Instance)
So our next task is to create a new database. In that way, the staging installation would be fully independent from our production site. Go to the MySQL Databases section in the Control Panel. Change the version to MySQL 8, enter a name for it (we will call it wpstaging), and press the Create button.
Now we need to create a separate MySQL user that would be associated with the staging database, so go the MySQL Users tab, enter a username (wpstaginguser), generate a strong password, but make sure to copy it to your clipboard, and use the drop-down menu to associate the user with our newly-created database for the staging installation, so we would select the one with the underscore wpstaging.
Copying The WordPress Database (From Live To Staging)
Now we have to import all data from the source database into a new one, and that's done by importing the MySQL dump file we generated in the previous step. Again, every host has phpMyAdmin, so I will show you how to do it with it. Open phpMyAdmin, select the database that would be used by the staging instance, go to the Import tab, and use the "Choose file" button to select the dump file from your own computer.
If you are an ICDSoft web hosting customer, there is a much easier way to do it. Go to our Control Panel > MySQL Databases section. You can use the Import button next to your staging database to upload and import the MySQL dump file generated via phpMyAdmin, or to directly import the dump generated via the Export button of the MySQL Databases section in the Control Panel. In case of the latter, the resulting file should be available under the MySQL_Dumps directory under your /private folder.
Updating the WordPress Configuration File of the Staging Instance
So far we've copied over the database and the files, and the last step is to update the WordPress configuration file. Again, you can use whatever File Manager comes with your web host. Navigate to the location where you copied the files of the staging installation. Here it's the www/staging folder. Open the wp-config.php file, and now we need to update the database settings. First, you need to update the name of the database that's next to the DB_NAME variable. Then you should update the MySQL username that's next to the DB_USER variable, and the actual password for that user, which is next to the DB_PASSWORD variable.

Update the URL of the WordPress Staging Instance
If you test your staging website now, your browser will probably redirect you back to the live website. That's because this address has been defined as the Site URL of our WordPress installation in the database we copied over. The very last step is to update that URL. Again, there are a number of ways to do that.
Obviously, due to the redirect, you can't access the dashboard at the staging instance in order to do it via the Settings menu there. The first workaround is to do it via the phpMyAdmin, where you need to open the "wp_options" table and update the siteurl and home fields with the actual address of the staging instance. In this case, we will enter https://staging.hectohost.com for both values. Note that according to the official WordPress documentation, you should have the http or https prefix and you should not have a slash “/” at the end.

The other option is to update the URLs in the WordPress configuration file as those settings overwrite what's stored in the database. Basically, you need to open your wp-config.php file for editing, and enter the following two lines there:
define( 'WP_HOME', 'http://example.com' );
define( 'WP_SITEURL', 'http://example.com' );
Make sure to replace 'http://example.com' with the URL of your staging instance.
Clear the Cache of Your Browser Before Testing
Before you test your website again, note that you will probably have to clear the cache of your web browser as browsers are usually really quick to cache those settings.
So we managed to set up a WordPress staging installation manually without using paid plugins or any other automated tools. It's not hard to do it, but it does involve a number of different steps that you would have to go through.
Copying WordPress with a Plugin
If you want to make things a bit easier on yourself, you could set up a WordPress staging instance with a plugin. Perhaps the most popular plugin for this task is Duplicator.
"With over 30 million downloads Duplicator successfully gives WordPress users the ability to migrate, copy, move or clone a site from one location to another and also serves as a simple backup utility."
https://wordpress.org/plugins/duplicator
Note that we are not affiliated with this plugin in any way, and we are just showing it to you so that you can see all the different ways of copying a WordPress website. In that way, you would be able to decide for yourself which method would be most suitable for your specific needs.
With all that in mind, let's install Duplicator. Go to your WordPress dashboard > Plugins > Add New. There, make a search for "duplicator" > Install > Activate.
Now, a Duplicator menu should appear on the left side of your dashboard, expand it and select Settings. If you are hosted with ICDSoft, you should go to the Packages tab, and change the SQL mode to PHP Code.
We need to create a new package, which is actually an archive of our WordPress installation that includes the files and database. Go to the Duplicator > Packages menu, press the Create new button, click Next. You can safely disregard the notice concerning the size checks, so put a check on Yes and Build. Once the Package build has completed, you need to download the actual package files which consists of an installer.php script and an archive that contains our WordPress files and database.
After you download these files to your computer, you need to upload them to your server where the staging installation would reside. Run the installer script and it will ask you for your database settings. So you still need to create your new MySQL database and user, and enter them. It's important to note that you should use this string with the MySQL 8 socket in order to connect to the MySQL 8 server:
localhost:/tmp/mysql8.sock
Validate, accept the terms, hit next. Once the process completes, at the end, you will see this important notice:
"Login into the WordPress Admin to remove all installation files and finalise the install process. This install is NOT complete until all installer files have been completely removed. Leaving installer files on this server can lead to security issues."
Click on the Admin login which is just a link to the url of your dashboard page. Note that whenever you clone, stage or copy a WordPress installation, regardless of how you call it, the login credentials for all existing users remain the same. Log in with your existing credentials, and you should see this notice:
"This site has been successfully migrated! Installation cleanup ran!"
from the Duplicator plugin when logging in for the first time. Logging into the dashboard triggers an automatic removal of the Duplicator installer script and archive.
So, to summarize our experience with the most popular migration plugin for WordPress, and that's pretty much true for all such plugins, their use does automate a lot of steps involved in the process, but it's still not a super simple and straightforward experience by any means.
Staging WordPress with a Hosting Tool - Single-Click WordPress Staging at ICDSoft
If you are looking for a single-click way of staging a WordPress website, you should check if the company that hosts your website provides such a tool. Here at ICDSoft, we have a hosting tool that can stage a WordPress installation for you with just a single click. You won't have to bother yourself with copying the files, exporting and importing the database, and updating the WordPress configuration file. Our WordPress staging tool takes care of all that automatically for you with just a single click, and it's included with all of our hosting plans. Unlike some other hosts, we don't charge extra for providing that functionality.
All you need to do is go to the WordPress tool in your Control Panel, click Edit next to your WordPress installation, under the "Site URL" section change the Subdomain to the one that would contain your staging instance, and simply press the Create staging button. And that's how easily we just created a fully independent staging instance of our WordPress installation. You can see that it now appears under the "Staging" section, and there is also a set as live button which is another super useful tool.
Copying WordPress with a Hosting Tool - Single-Click WordPress Copying at ICDSoft
If we wanted to just create a copy of this installation, that can be done under the Site URL section.
"You can use this tool to change the Site URL of a WordPress installation, copy it, or move it to another directory. You perform all actions by selecting the desired new address and clicking on the Change button. The interface will automatically detect and perform the suitable action."
Single-Click WordPress Copying at ICDSoft
So what you need to do in order to copy or move this WordPress installation to another location on your server, is simply configure the new URL - select another subdomain, in this case we will use a different subdomain called "test". The tool detects if there is an SSL certificate installed and it will preselect the HTTPS option if that's the case. So you just need to select the subdomain and press the Change button. On the next step, you would be asked whether you want to move or copy this WordPress installation.
Preventing Search Engines from Indexing the Staging Site
Another really important tip when it comes to WordPress staging installations in general, regardless of where your site is hosted, is to prevent search engines from indexing the staging website. That's because you can get penalized for having duplicate content, or the URLs of the staging site could appear in the search results, which could confuse your visitors. Bottom line is there are different issues that could arise from having a staging site indexed, and you would not normally want that.
To avoid this issue from happening in the first place, you can use a feature that's built in WordPress. Go to the dashboard of the staging instance > Settings menu > Reading, and activate the option "Discourage search engines from indexing this site". You can see the sign below though - "It is up to search engines to honor this request."

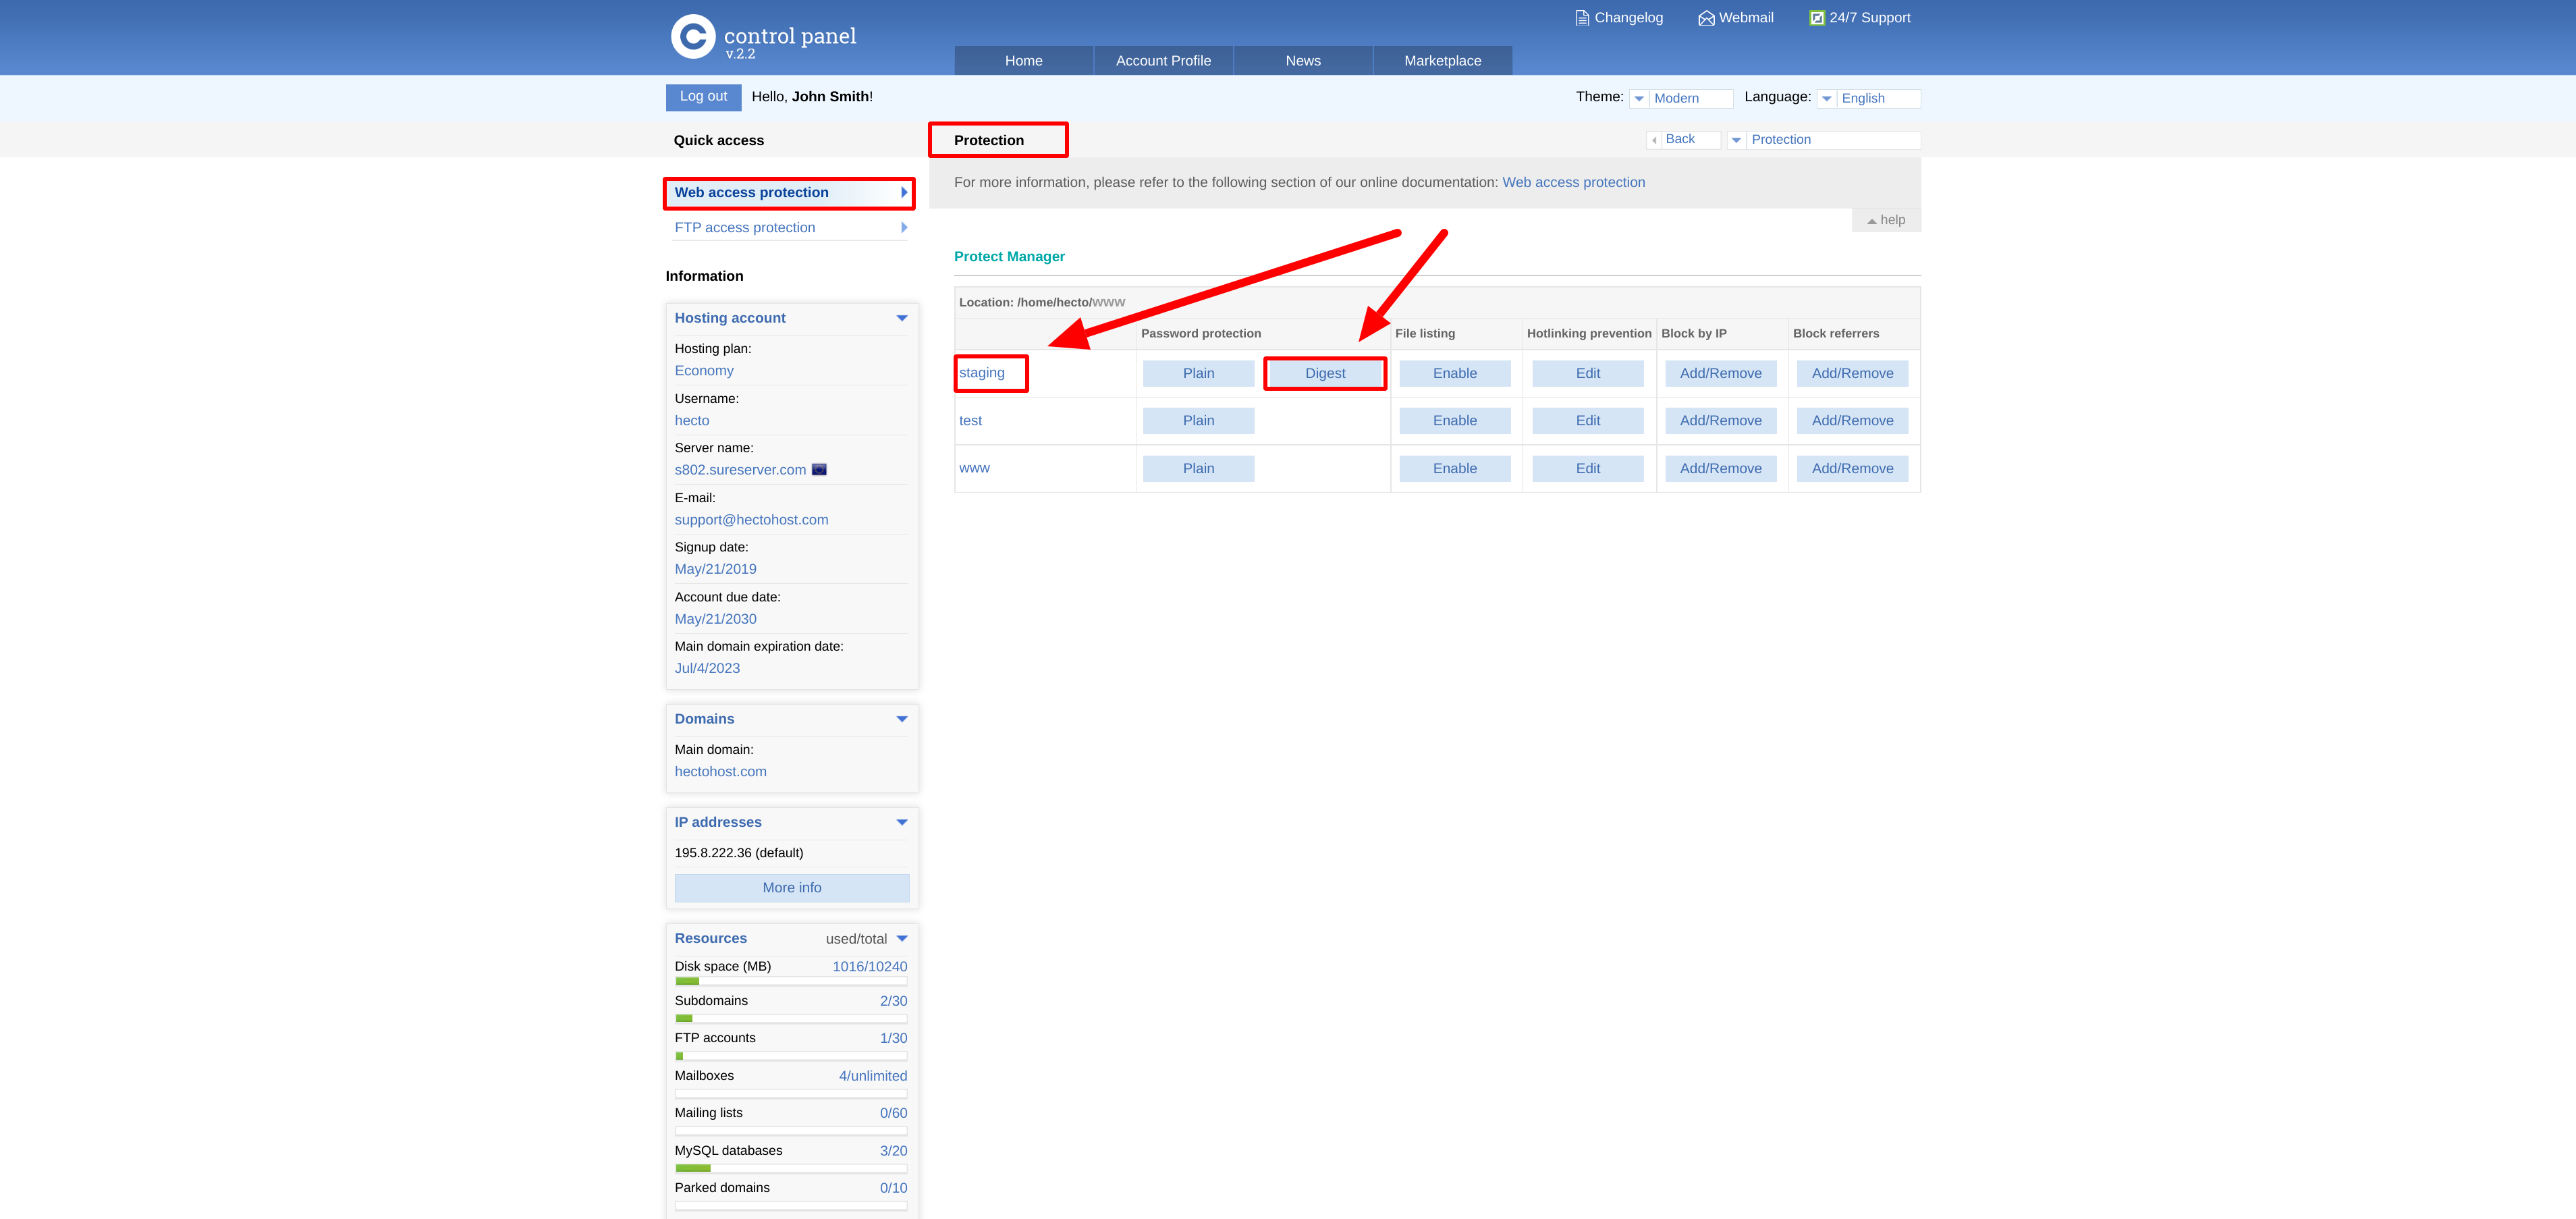
If you want to take things a step further and be absolutely certain that search engines won't even be able to access the website, you could password-protect it entirely. With ICDSoft, this can be done via the Protection tool in the Control Panel > Web access protection, where you simply need to apply a password protection on your entire subdomain. Note that once you do that, you would have to use that username and password combination in order to access the staging website. Of course, you can create multiple users, but a valid user would be required in order to access the actual site.
Troubleshooting Common Issues when Staging WordPress
All is fun when things are going right, but that's not always the case with WordPress staging. Due to the fact that WordPress installations tend to be so vastly different, and there are thousands of themes and plugins out there, it's almost impossible to guarantee that everything will work as expected even if you've followed all steps described here down to a T.
Clear the Cache of your Browser
A common problem that could arise is to have the staging website redirect to the live one. That could happen even after you've updated the Site URL and Home settings, and it's usually a sign that the caching has not been fully cleared.
As the saying goes though, before you start pointing fingers, make sure your hands are clean. So if you are getting redirected from the staging site over to the live one, the very first thing you should do is clear the cache of your web browser.
If you've cleared your browser's cache and the problem persists, then the caching could be somewhere else, so let's move on to the next common culprit.
Clear the Server-side Cache
If your host deploys any server-side caching, it's a good next step to clear it. At ICDSoft, this can be done via the Control Panel > Server-side caching > Purge:

Clear the Cache of your WordPress Caching Plugin
If you have some type of WordPress speed optimization plugin, then it most likely employs its own caching mechanism that you will have to clear in case you are running into problems at the WordPress staging instance. However, there are so many WordPress performance plugins that it would be nearly impossible for us to cover all of them, so we will just refer you to the official documentation of the most popular ones (in random order):
Clear The WordPress Object Cache
The WordPress Object Cache is used to save on trips to the database. The Object Cache stores all of the cache data to memory and makes the cache contents available by using a key, which is used to name and later retrieve the cache contents.
https://developer.wordpress.org/reference/classes/wp_object_cache
To clear the WordPress object cache, you would have to connect to your account over SSH, navigate to the location where the staging instance resides, and run the following command:
wp cache flush
Reset the WordPress Permalinks
If you are encountering broken links and 404 errors at the staging installation, you should try resetting the WordPress permalinks. If you have access to the dashboard, go to the Settings > Permalinks menu, and just press the Save Changes button at the bottom without making any actual changes. This will in turn update/reset your permalink structure.

In case you don't have access to the dashboard, you can reset the WordPress permalinks via WP-CLI. To do that, connect to your account over SSH, navigate to the location where the staging instance resides, and run the following command:
wp rewrite flushClear the Cache of your Theme
There are some themes that employ their own caching mechanisms, so you should explore that possibility as well. For example, Avada, which is a very popular multifunctional (paid) WordPress theme, has its own internal caching that has to be cleared separately. If you are using the Avada theme, you should log in to the dashboard of the WordPress staging installation and go to Avada > Options > Peformance > Reset Avada Caches.

You should check if the theme you are using utilizes some form of caching, and clear it. WordPress builders such as Elementor and Divi are quite popular nowadays, and we have covered the additional steps that are required for them below.
Clear the Cache at Cloudflare
If you are using Cloudflare as the DNS provider for your domain, you may have to clear the cache on their end. To do this, log in to your account at Cloudflare.com, select the domain in question, click the Purge Cache link in the upper right corner. This will take you to their Cache Configuration page, where you will see the option to Purge Everything.

Check Files for Hard-coded Instances of the Live URL
There are cases where the URL of the source (live) website is hard-coded in some files, such as CSS and JavaScript files part of the WordPress installation. That's a rather outdated and strongly discouraged practice, but still, such cases exist. If you are experiencing problems at your staging installation, you may want to search through the files (at the staging location) for instances of the live URL. To do that, connect to your account over SSH, navigate to the location where your staging installation resides, and run the following command:
grep -lr 'example.com' *Where you need to replace example.com with the URL of your live website. If there are files that match this search and contain such instances, you would see them listed in the output of the command. From this point on, you would have to update all instances of the old address with that of the staging installation.
Run Mass Search-And-Replace Query on your Staging Database
If you are staging WordPress manually, it's quite likely that you will have to perform this particular step. Note that the ICDSoft WordPress staging tool does this automatically for you as part of the procedure.
The best way to do it is via WP-CLI, which is the WordPress Command-line Interface. As the name implies, you would have to connect to your account over SSH in order to use it. Once you have connected, go to the location where you staging installation resides, and run the following command:
wp search-replace 'example.com' 'example-staging.com' --skip-columns=guidYou need to replace example.com with the URL of the source (live) website, and example-staging.com with the URL of your staging instance.
Regenerate CSS & Data for Elementor Users
This is actually a must for all Elementor users out there. If the website that you are staging, copying or moving, uses Elementor, then you will definitely have to do it. Basically, at the WordPress staging (or copied/moved) site, you should go to the dashboard, expand the Elementor menu, go to > Tools > General and click Regenerate CSS & Data.

Clear the Static CSS Files for Divi Users
If you are using the Divi builder, clearing its particular cache could be of great help when troubleshooting WordPress staging issues. To do that, go to the dashboard of the staging site > Divi menu > Theme Options > Builder (menu) > Advanced (tab) > press Clear next to "Static CSS File Generation".

Conclusion
So these are the different ways you can stage a WordPress installation. A process that's also known as copying or cloning WordPress. Of course, not all WordPress installations are created equal, and there could be few isolated cases where some additional changes have to be made for the staging instance to work correctly. Typically, it comes down to running a mass search-and-replace function or clearing all the different types of caching that could be in place - it could be server-side caching, theme caching, or the usual caching plugin. For those of you that are hosted with ICDSoft, you can rely on our excellent support team for help by posting a support ticket. And those of you who are not as fortunate can refer to our tips on troubleshooting WordPress staging issues or simply switch to our hosting service. We will migrate your entire WordPress website for free!


 – Improved Email Forwarding")
